Set up Salesforce
Install and set up your Salesforce integration.
Prerequisites
- Admin user login for the Salesforce Org where you're installing the package
- An Install Link provided by your Metronome representative upon your request
Package Install
- Click on the Install Link.
- Authenticate with Salesforce.
- Select Install for all Users.
- Wait for installation to finish.
Installation may complete within seconds, or the request may time out (but continue to run) and you will receive an email notifying you that the installation is complete.
- After installation, grant users access to the Metronome app by adding them to the Metronome User Permission Set.
- Log in to Salesforce and navigate through the App Launcher to the Metronome App.
Data Sync
Install and configure the Metronome Salesforce Package.
Configure
- In the Configuration Options field input your Metronome Account API Key.
For security reasons, this field never shows as populated.
- Select the desired Window Size. The current version of the package only supports Day.
- Click the Submit button.
- Refresh the browser.
Start Scheduled Job
- Once the configuration is complete, click the Start button in the Package Start section of the Metronome Configuration page.
- The Salesforce integration will begin fetching data from your Metronome account. Jobs run daily at 3 AM local time.
About Customer Custom Fields
Metronome customer custom fields only sync to Salesforce account records that have an association to a Metronome customer ID. To allow users to view this data in the Salesforce UI, add a related list to the Account Page Layout.
- Navitage to Setup > Object Manager.
- Choose Account.
- Select the Page Layouts option from the side bar.
- Click the page layout that your users use.
- Choose Related Lists.
- Find the Metronome Customer Custom Fields option and drag it where you'd like on the layout.
- Click the wrench icon to configure the list.
- We recommed choosing Name, Field Name, and Field Value (in that order).
- Click Save.
Create a customer plan with Salesforce Flow
Salesforce Flow integrates Metronome into your sales process by associating customers with a Metronome plan.
If you need help with setup or with data mapping recommendations, contact your Metronome representative.
Create a new Flow
- Navigate to Setup > Flows and click New Flow.
- Choose Record-Triggered Flow.
- Choose the object to initiate the trigger. If you want to create a customer plan when an opportunity is set to Closed Won, choose Opportunity.
- Trigger the Flow when a record is created or updated.
- Choose any conditions that are relevant to your sales process.
- This could be when the opportunity stage name changes to Closed Won.
- Optimize the Flow for Actions and Related Records.
- Check the box that says Include a Run Asynchronously path to access an external system after the original transaction for the triggering record is successfully committed
- The Metronome Apex Action runs in the background and can only run asynchronously.
If you are new to Flow Builder, see Salesforce's Build a Flow.
Add Apex Action
With the Flow template created, click the plus icon under the Run Asynchronously Flow and select Action.
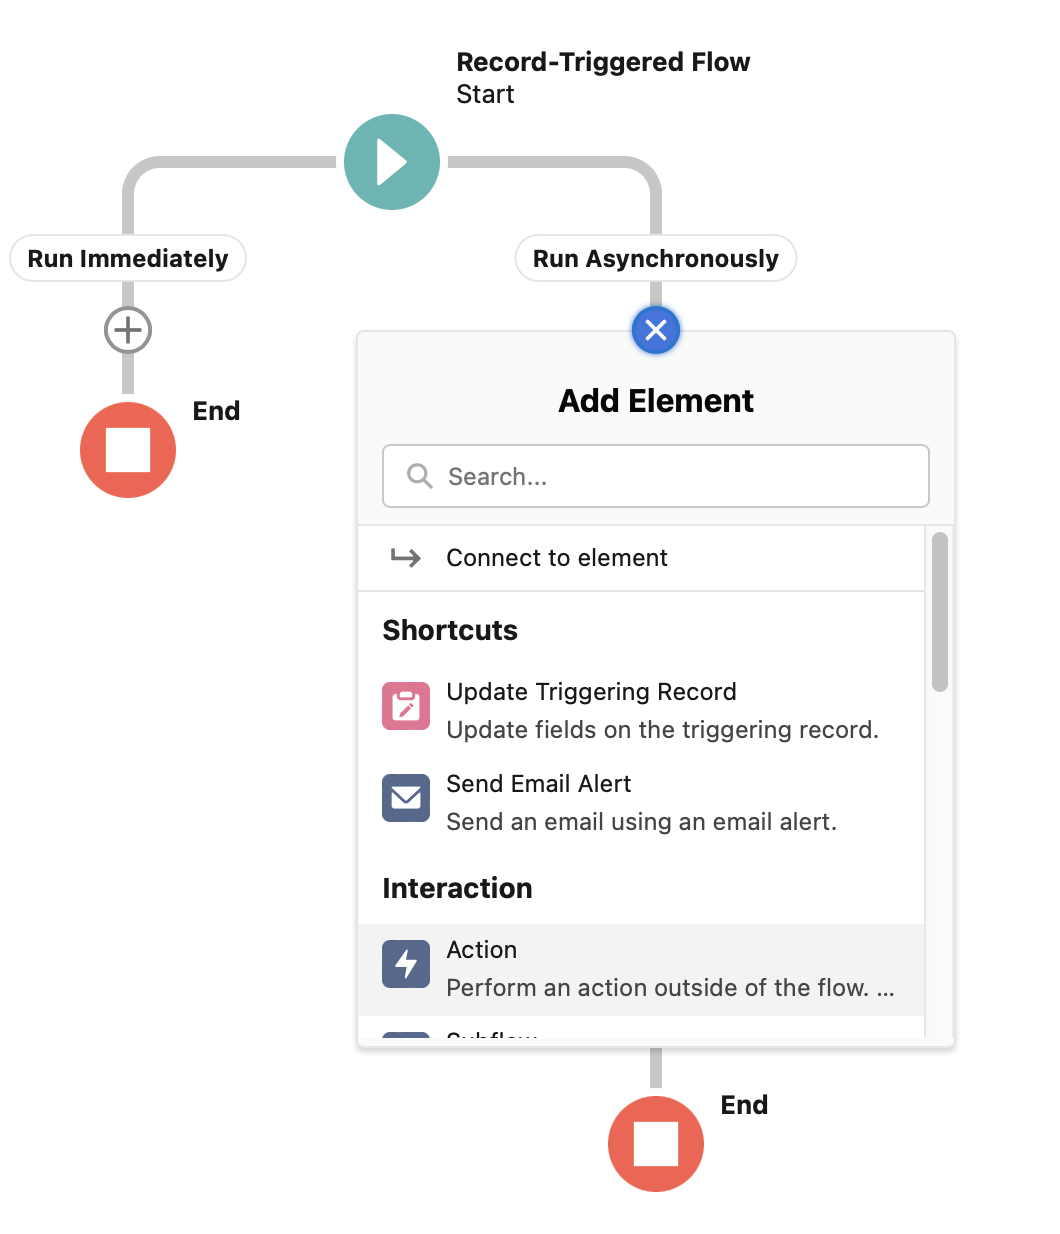
After adding the action, configure the Metronome Submit Plan action.
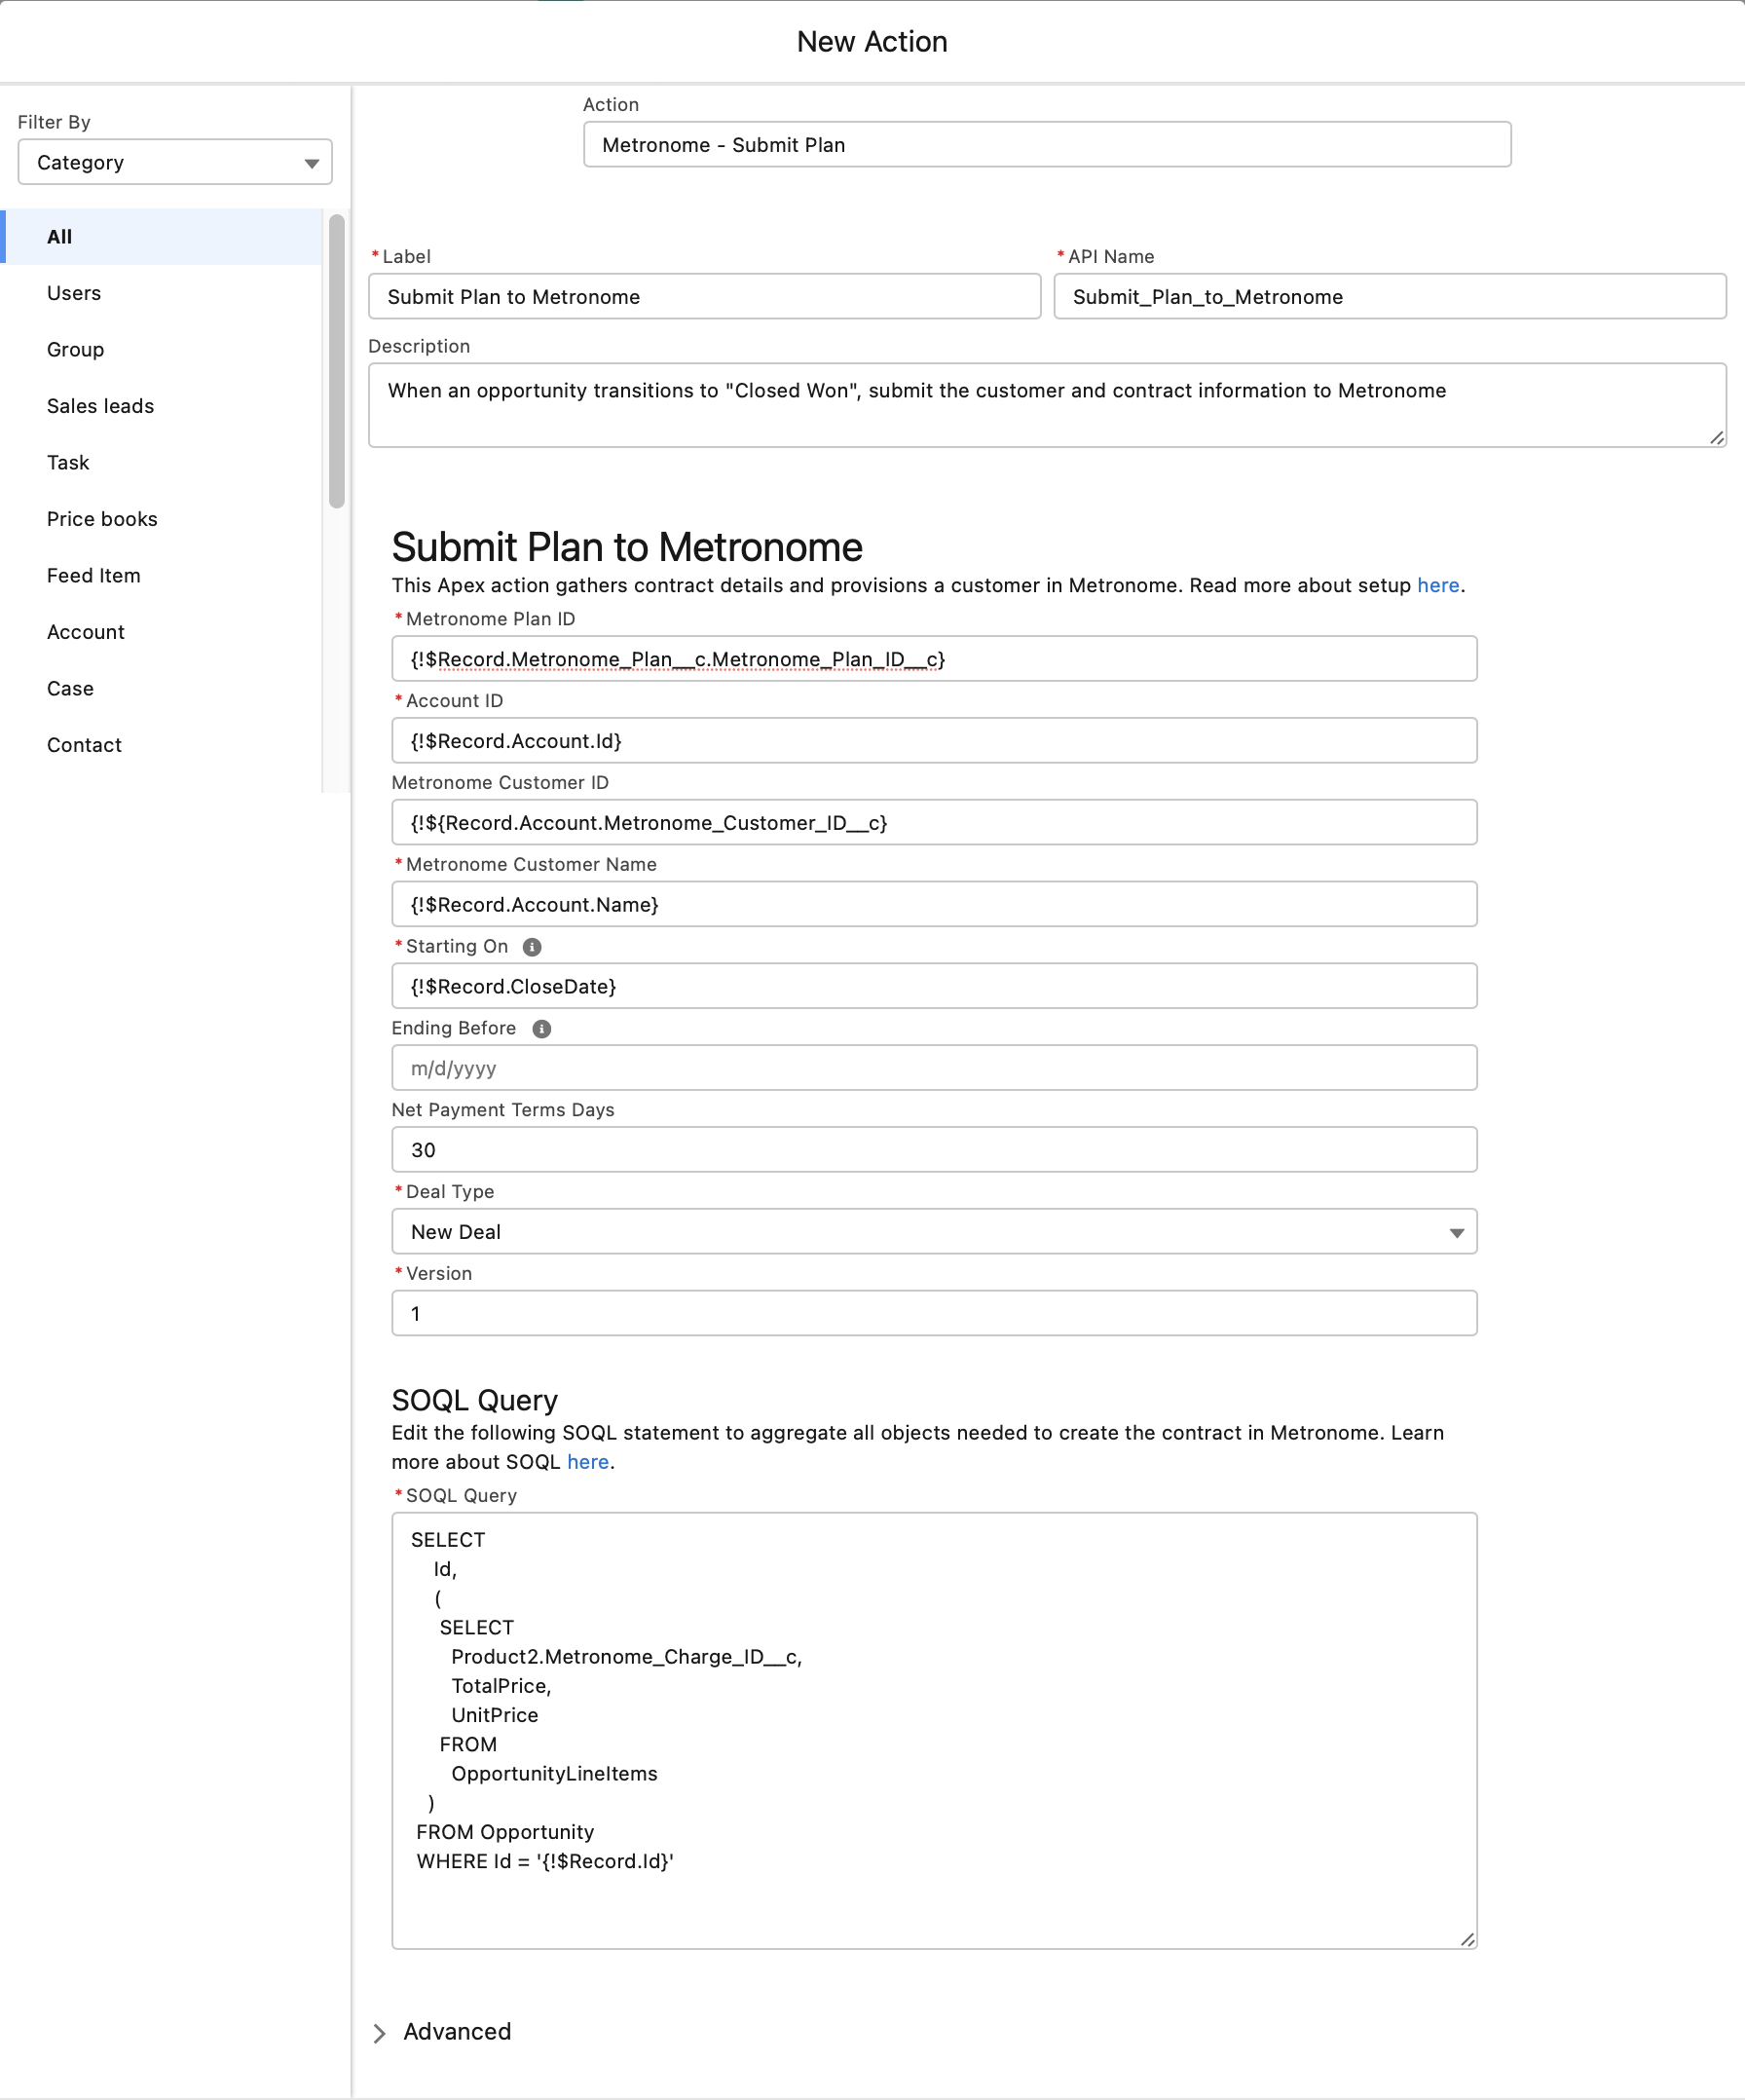
Fields can be set to a value or any variable that's available in Salesforce Flow. For more information on available variables, see Salesforce's Global Variables.
Here are some common examples of useful variables:
{!${Record.Account.Name}captures the opportunity account name{!$Record.Metronome_Plan__c.Metronome_Plan_ID__c}}captures the Metronome Plan ID if a custom lookup field was on the opportunity
Data Mapping
If your customer plans contain price adjustments or credit grants, some data mapping is required to successfully create a customer plan in Metronome.
Associate a record to a line item
The SOQL query in the Apex Action configuration is a place to capture anything custom that you may have on your contracts. In most cases, this would be opportunity product or quote lines. To associate a record to a line item in Metronome, a custom field is required to associate a Metronome charge ID:
- Metronome needs to know a way to associate a charge on a plan from a contract or quote in Salesforce. Products most closely resemble a Metronome charge. If a Product is added to each quote line, it makes sense to store this value on a Product.
- Recommended field name:
Metronome_Charge_ID__c - Charge IDs can be found in the /getPlanCharges endpoint
Handling multiple plans
If you have multiple plans in Metronome, select a plan during the sales process to associate it with a customer. A custom lookup field to NOME__Metronome_Plan__c can be added to the triggering record or any related object (for example, quotes) and then referenced in the Flow action:
- Add a Metronome plan ID.
- Add a customer name.
- Recommendation:
{!${Record.Account.Name}if using opportunity as the record
- Recommendation:
- Add an Account ID.
- Recommendation:
{!Record.AccountId}if using opportunity as the record
- Recommendation:
- Starting on: Specify the date when the contract should start
- Specify version (recommendation: 1. This will enable future functionality to have multiple processes with different data).
- Configure SOQL query:
- The query used to gather the data necessary to create the contract.
- Sample SOQL query if using opportunity and opportunity products.
- Each line item in your contract (for example, quote line items or opportunity products) needs a Metronome charge ID. This is required if you plan to have custom pricing.
- Search for the apex action named Metronome - Submit Plan.
- Add Metronome plan IDs to your CPQ Flow.
- When submitting a contract, a Metronome plan ID is required to associate a customer with a specific plan you’ve created. If you’ve already configured the data sync, Metronome Plans should already be syncing to Salesforce. You can create a custom lookup field on an opportunity or quote to indicate which plan to associate with the customer.
- Recommended field name:
Metronome_Plan__c
- Add Metronome charge ID custom field. (Only required if you have price adjustments. If you only use standard pricing on your plans, you can skip this step.)
- Metronome needs to associate a charge on a plan from a contract or quote in Salesforce. Products most closely resemble a Metronome charge. If a Product is added to each quote line, store this value on a Product.
- Recommended field name:
Metronome_Charge_ID__c - Find Charge IDs with the /planDetails/{plan_id}/charges endpoint.
Customers can only be associated with an existing plan in Metronome. Creating custom plans on a per-customer basis is currently not supported.