Set up GCP authentication for Metronome to meter on your behalf
In order to meter your listings, Metronome will require access to the procurement and metering APIs in your marketplace GCP project. Metronome will access your project via Workload Identity Federation, which allows federated access to your project by Metronome without the need to store long-lived tokens or keys. You will then associate a Google Service Account with the Workload Identity Federation pool, to which you will attach the appropriate fine-grained permissions for Metronome’s metering operations. To assist with deploying these resources, Metronome provides a set of configuration files and scripts that will walk you through deploying through either Terraform, a Bash script, or a self-guided method using thegcloud CLI utility. Those suggested configurations are available in Github.
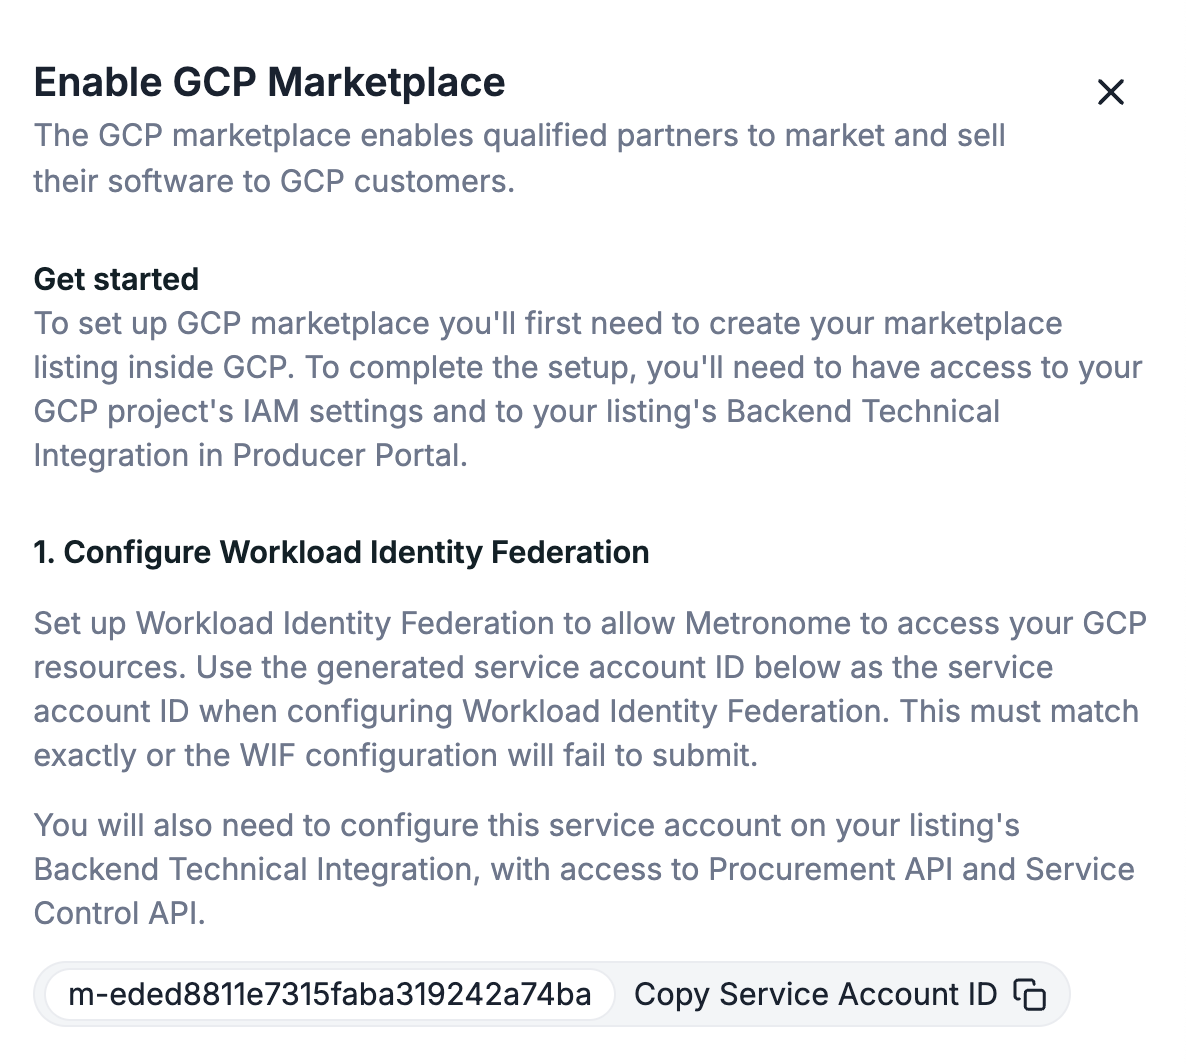
You will need some information from Metronome to fully configure this integration properly, and in return, Metronome will need some output from this process back. Here are the steps:
- In Metronome, go to Connections > Integrations > Available Integrations > GCP Marketplace > click Get started.
-
Copy Metronome’s Service Account ID, AWS Account ID, and AWS Lambda Role Name from the menu:
-
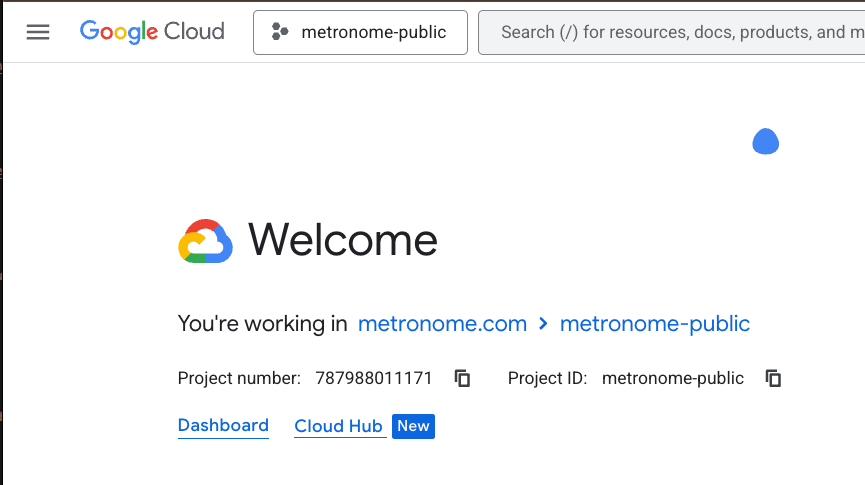
In GCP, go to the GCP Console welcome page and select your target project from the project picker in the top left. Your Project ID and Project Number will be displayed here:
-
Using any of the configuration methods provided in the Github repository, supply your metronome_service_account_id, metronome_aws_account_id, metronome_aws_lambda_role_name, project_id, and project_number as input arguments. This will deploy a Workload Identity Federation Pool, an AWS Workload Identity Federation Provider, and a Service Account to your project with the appropriate configuration.
-
For Terraform configuration, supply the required variables to the module:
-
For the Bash or self-guided
gcloudconfiguration, set the appropriate variables on your environment:
-
For Terraform configuration, supply the required variables to the module:
-
Also in GCP console, Metronome will need the appropriate GCP APIs enabled in order to authenticate to your project, discover your GCP entitlements, and report usage to GCP. See GCP’s Documentation for more information on how to enable APIs, and ensure the following APIs are enabled:
- Identity and Access Management (IAM) API
- IAM Service Account Credentials API
- Cloud Commerce Partner Procurement API
- Service Control API
- Service Management API
-
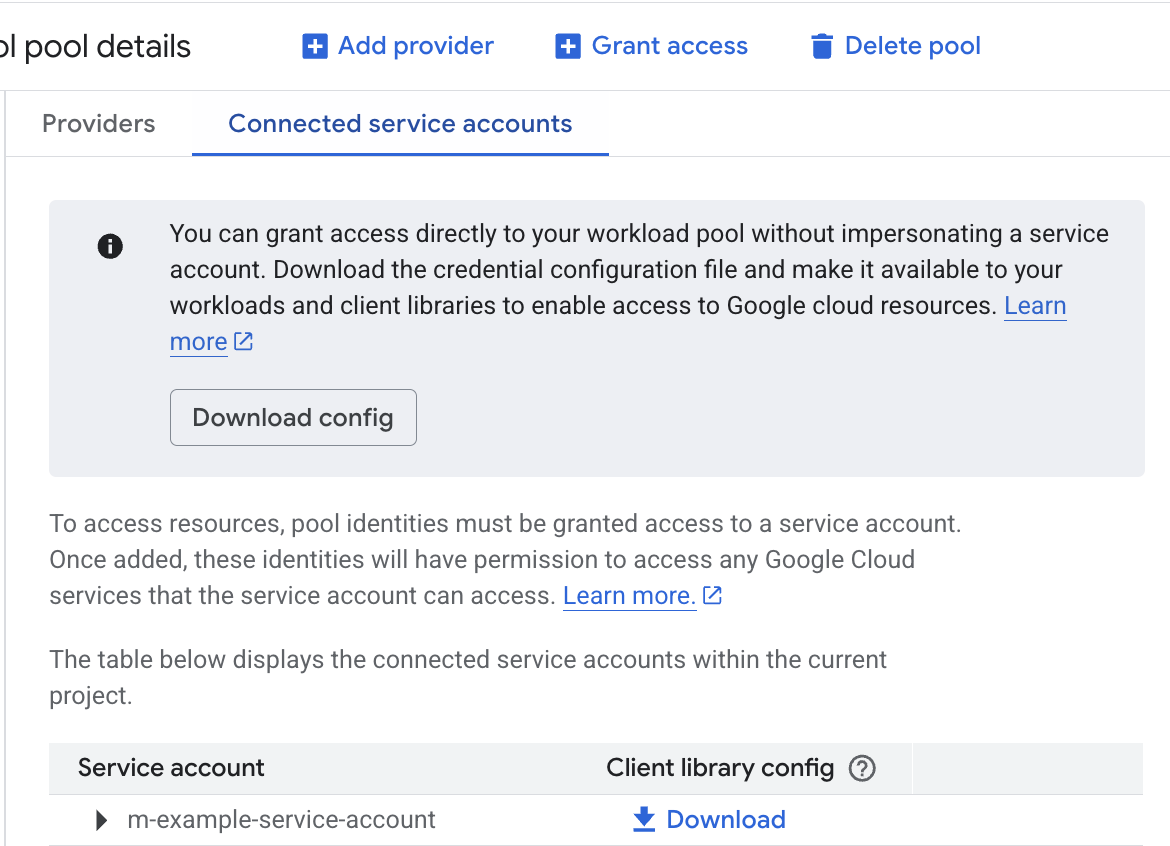
Finally, go to the Workload Identity Federation pools page in your GCP console and click on the Pool that was created in step 4. Click Connected service accounts, and then Download next to the service account we created in step 4. Save this credentials file for submission to Metronome in a later step.
Create a GCP Marketplace listing
With federated access to your project configured, we now proceed to configuring your listing for usage-based billing through Metronome:- You must have access to the GCP Producer Portal, which includes registering with Google as a vendor.
-
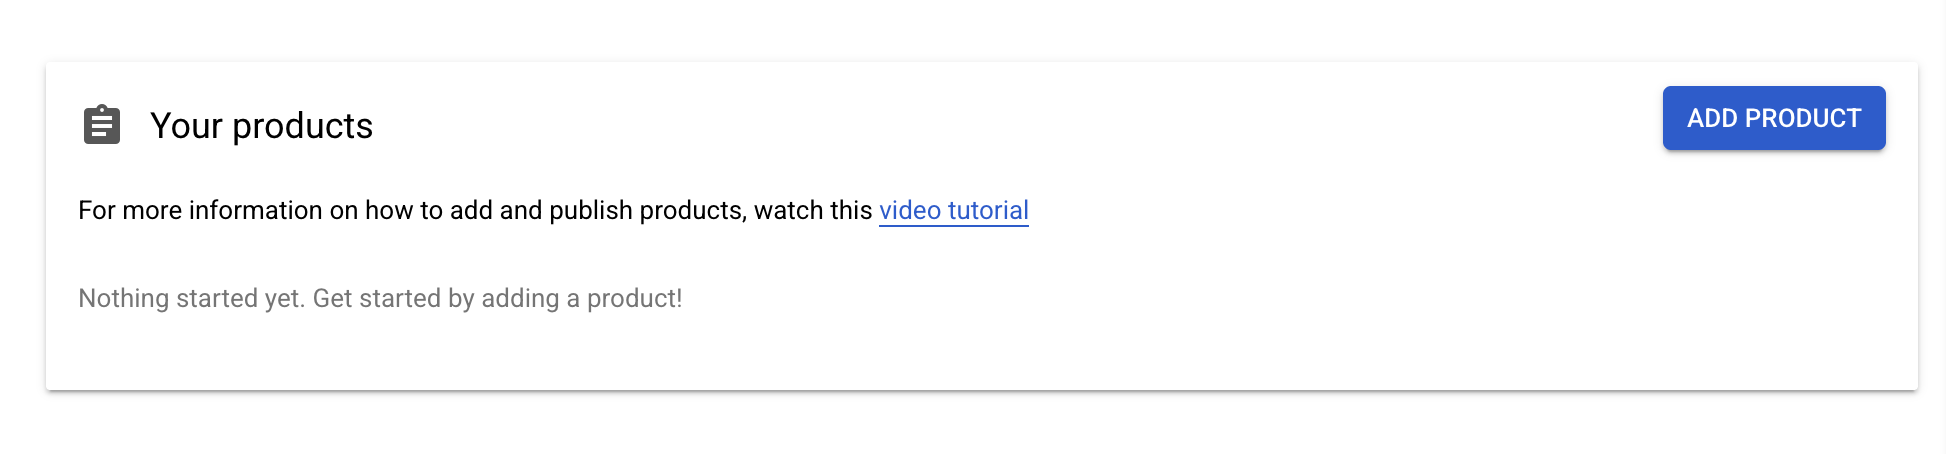
From the GCP Producer Portal home page, use Add Product to begin setting up a new listing.
-
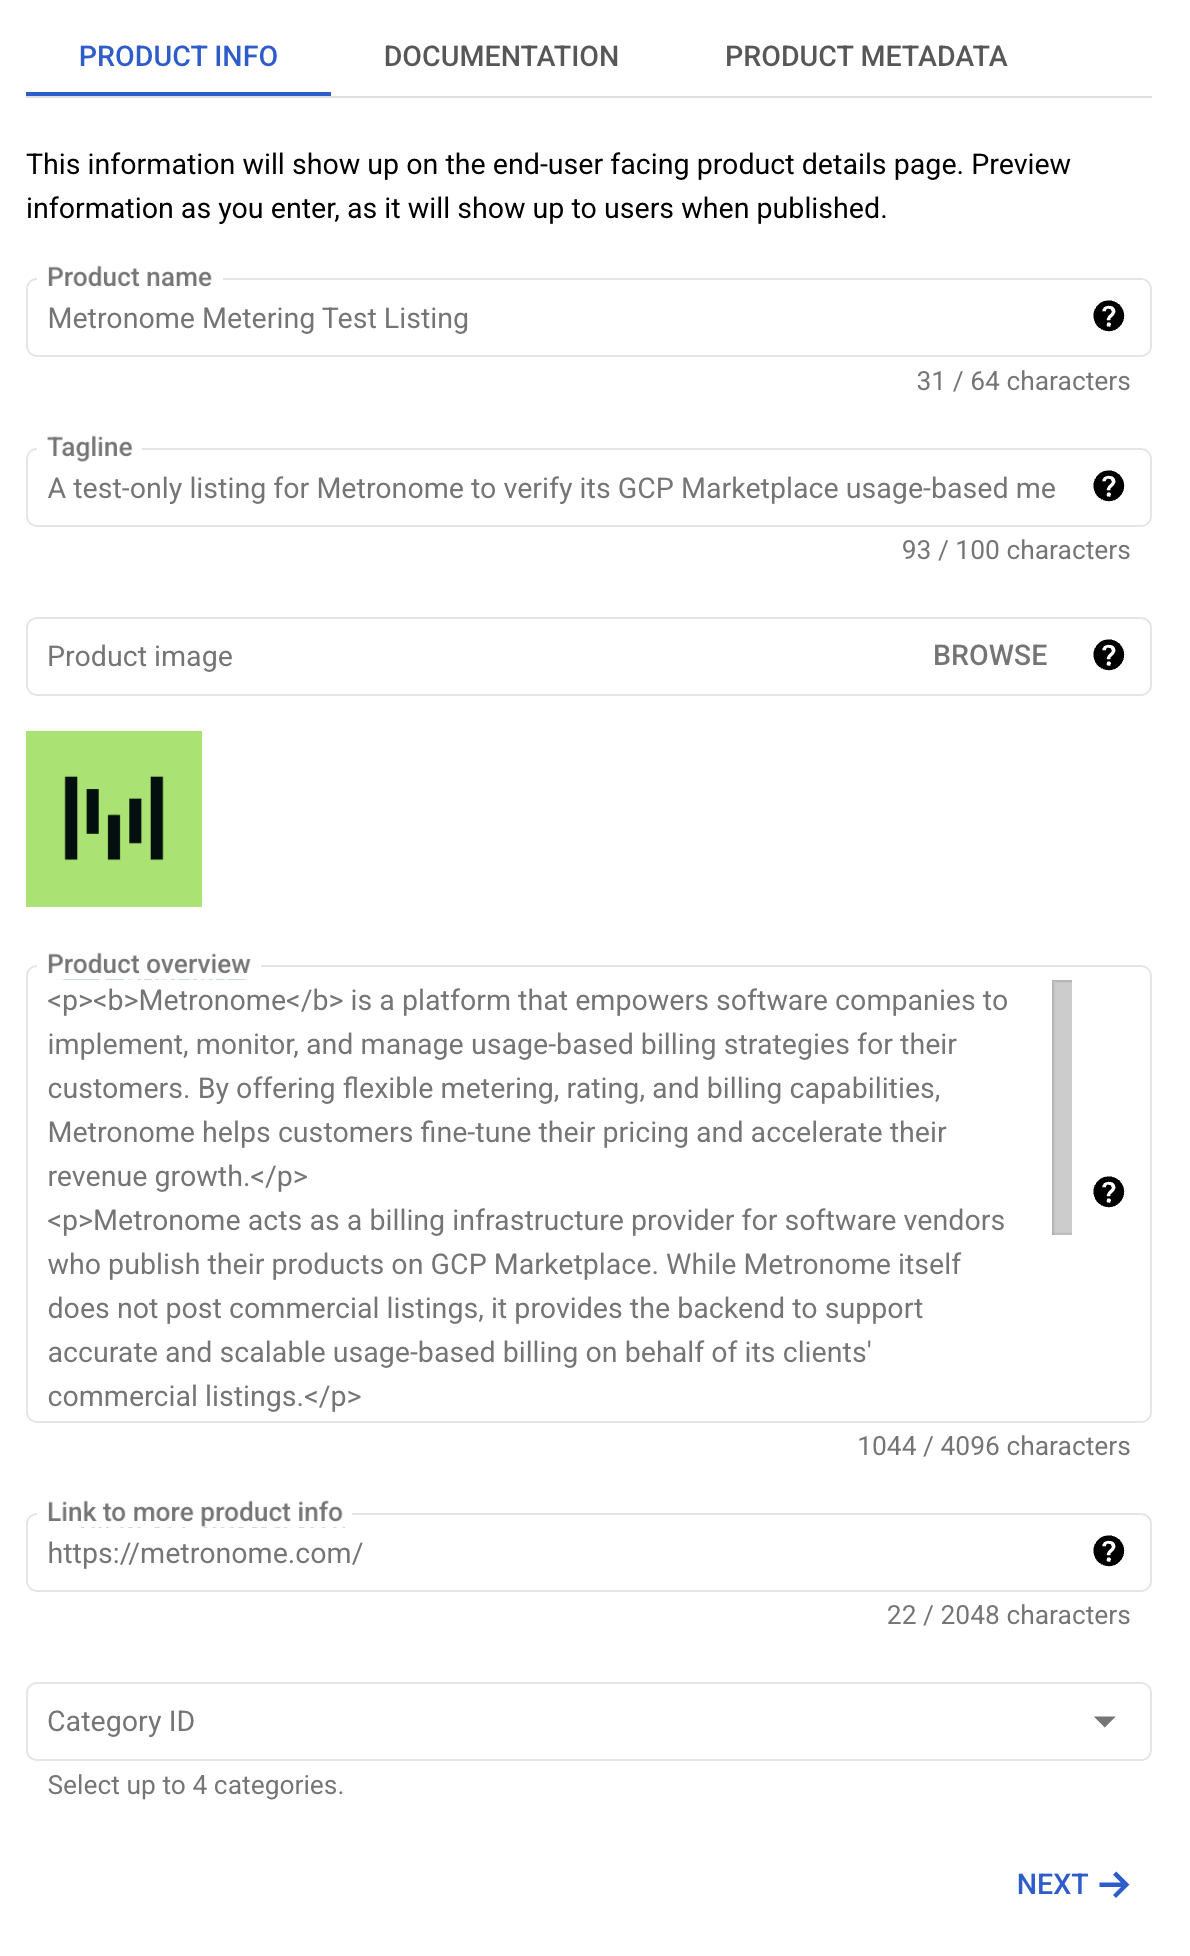
Complete the Product Details section. This is all identifying information about your listing — Metronome does not require any specific settings here.
-
Complete the Pricing section. In particular, in the Price Model tab, you will create a plan with a usage-based metric and pricing for that metric. Metronome has specific requirements for each:
-
Create a new plan and add a metric with the following settings:
- Metric ID set to
usage_fee - Reporting unit set to
count - Display unit set to
Custom - Custom unit: We recommend something generic like “Usage Fee”. Do not set the Custom unit to a value that implies an actual currency, e.g. “USD”.
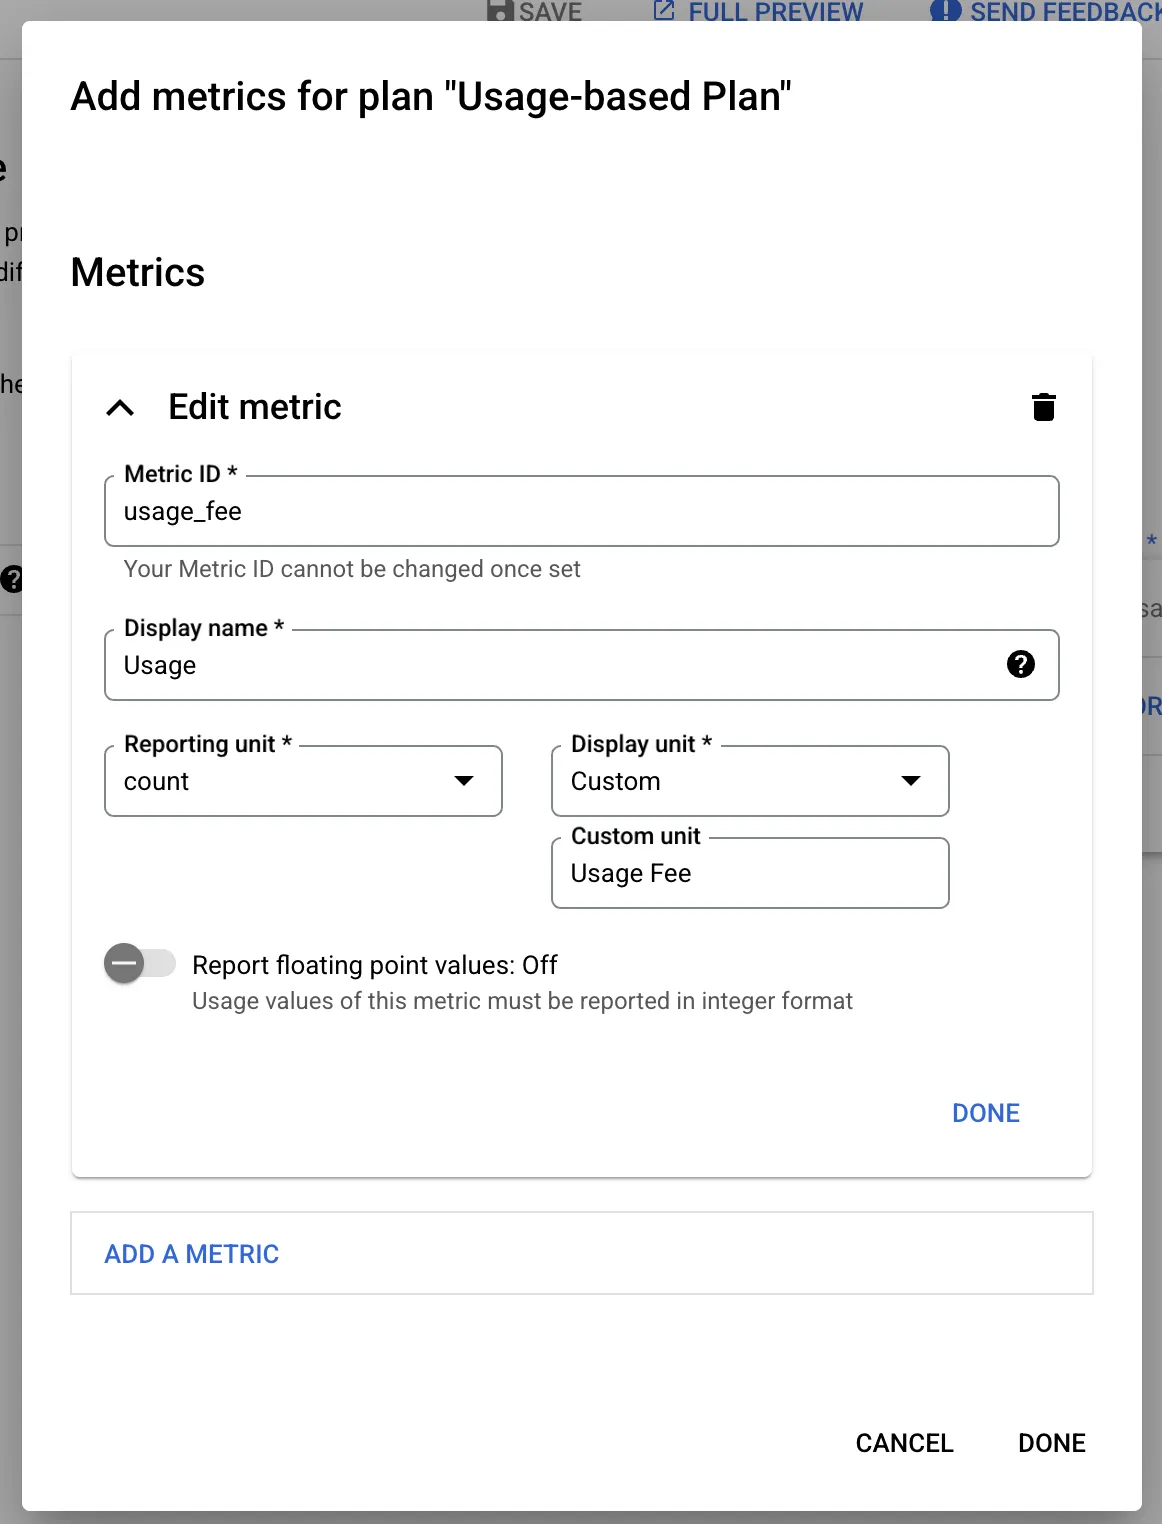
- Metric ID set to
-
Once the metric is submitted, configure pricing on the metric by adding a usage fee with the following settings:
- Display quantity set to
1 - Price set to
0.01
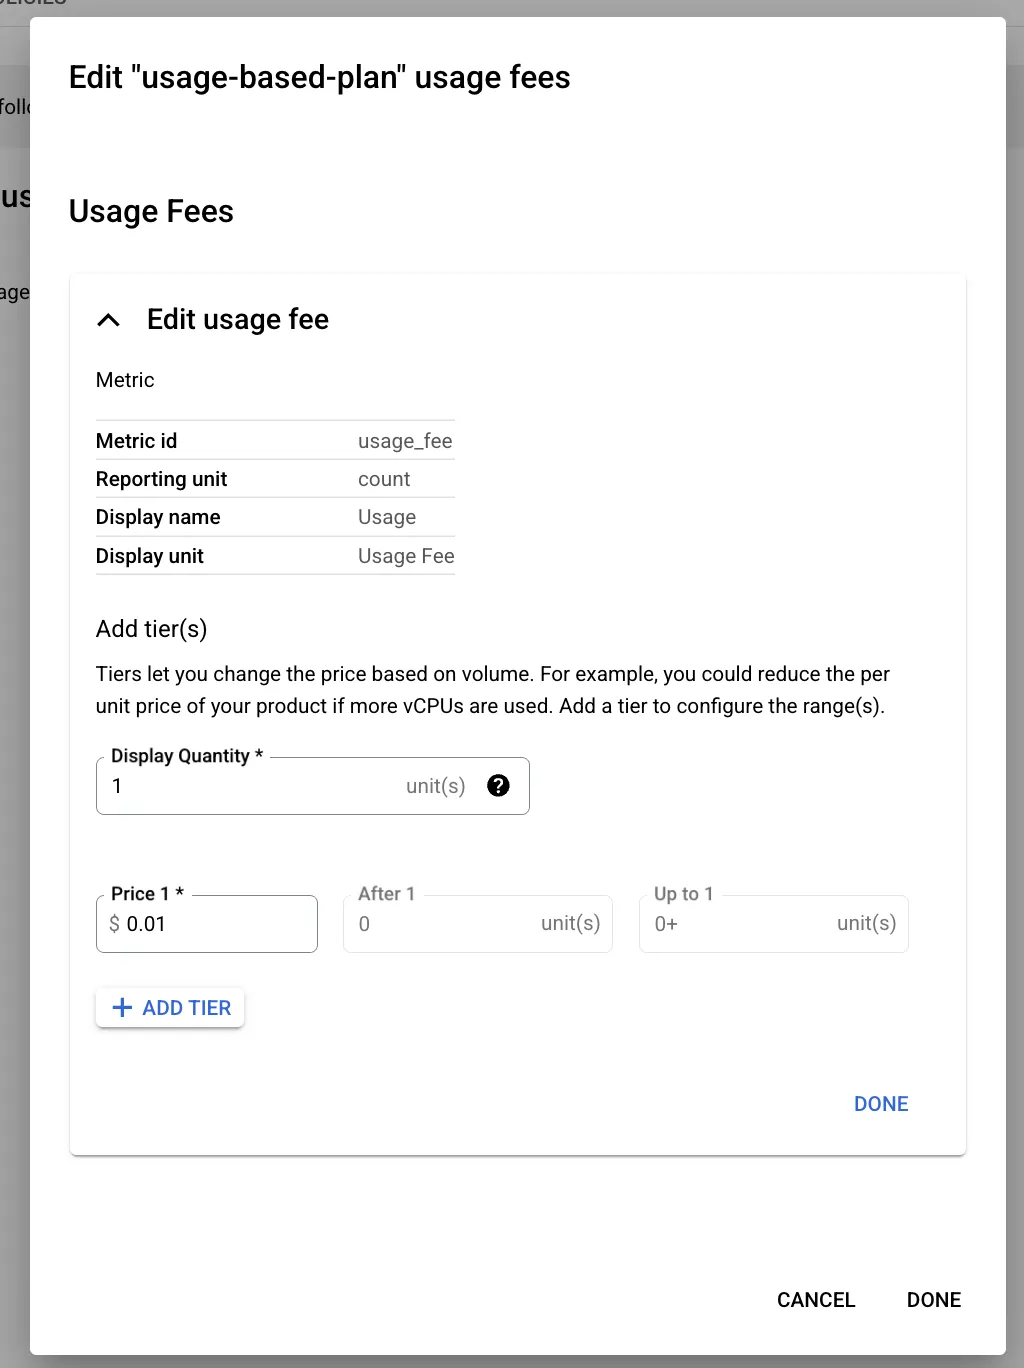
- Display quantity set to
-
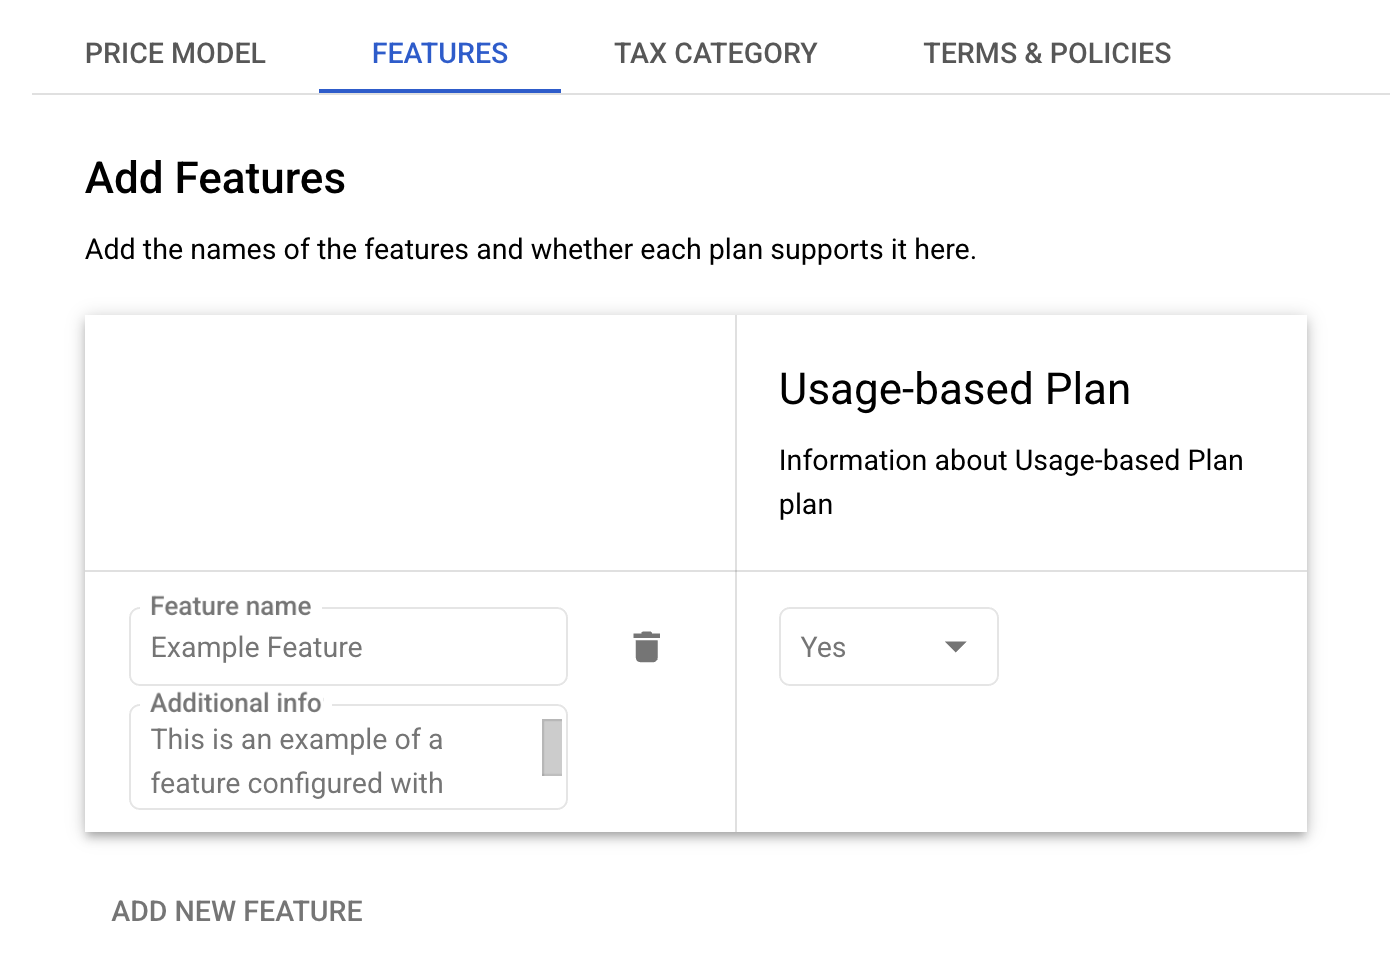
You will then be asked to create feature(s) on your listing. Metronome is not opinionated on what your feature(s) are named, but you will need to have at least one feature with your usage-based pricing plan attached.
- You will additionally fill out the Tax Category and Terms & Policies sections. There are no Metronome-specific requirements for these sections.
-
Create a new plan and add a metric with the following settings:
-
Complete the final section, Technical Integration. Here, in particular, you will need to configure your Metronome-provided service account with access to the appropriate APIs in order for Metronome to have access to meter your listing. Completing this section will require your Metronome Service Account ID that you created and deployed in the Set up Workload Identity Federation section.
-
In the Billing Integration section, under step 1, you will need to provide Metronome’s service account ID access to Partner Procurement API. Metronome requires this access in order to read and track metadata about your listing’s entitlements. Click Add Service Account and type or paste in Metronome’s service account ID:
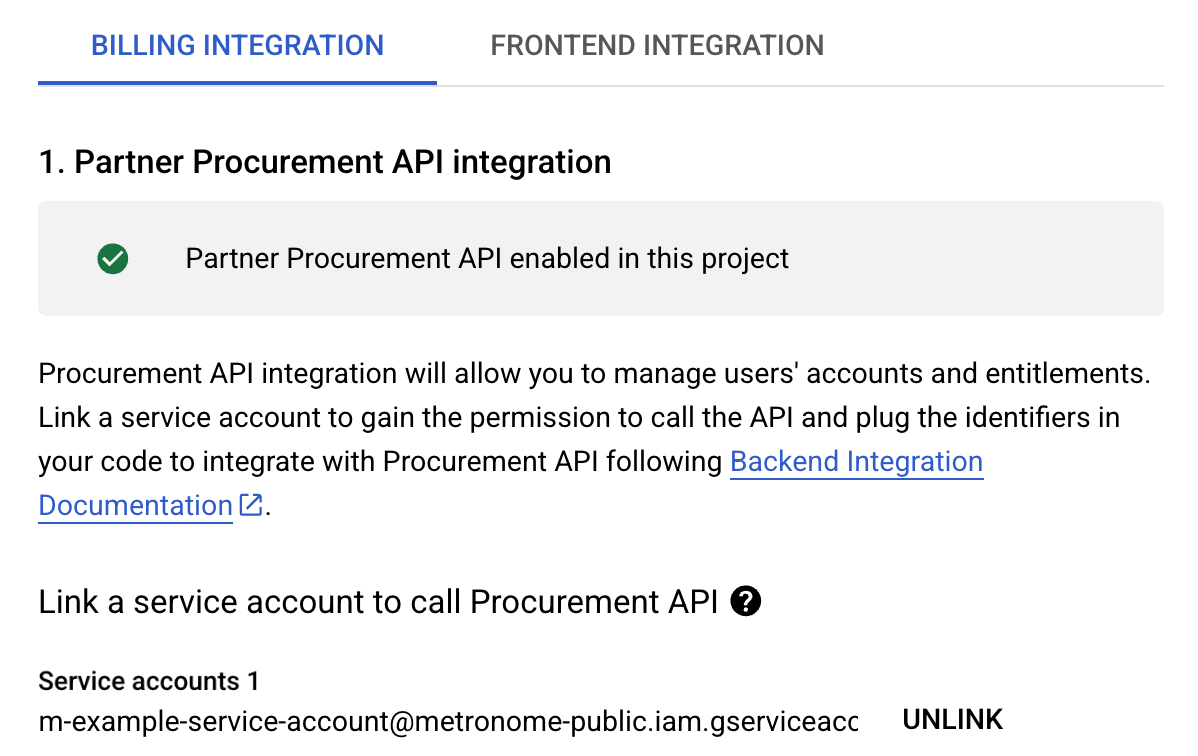
-
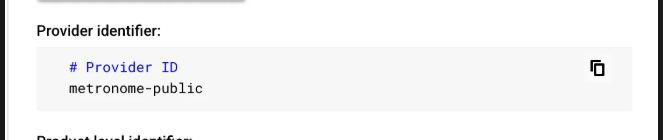
In the same Partner Procurement API integration step, just below the service account, your Provider ID will be displayed. Take note of this identifier as you will need to submit it to Metronome in the final step:
-
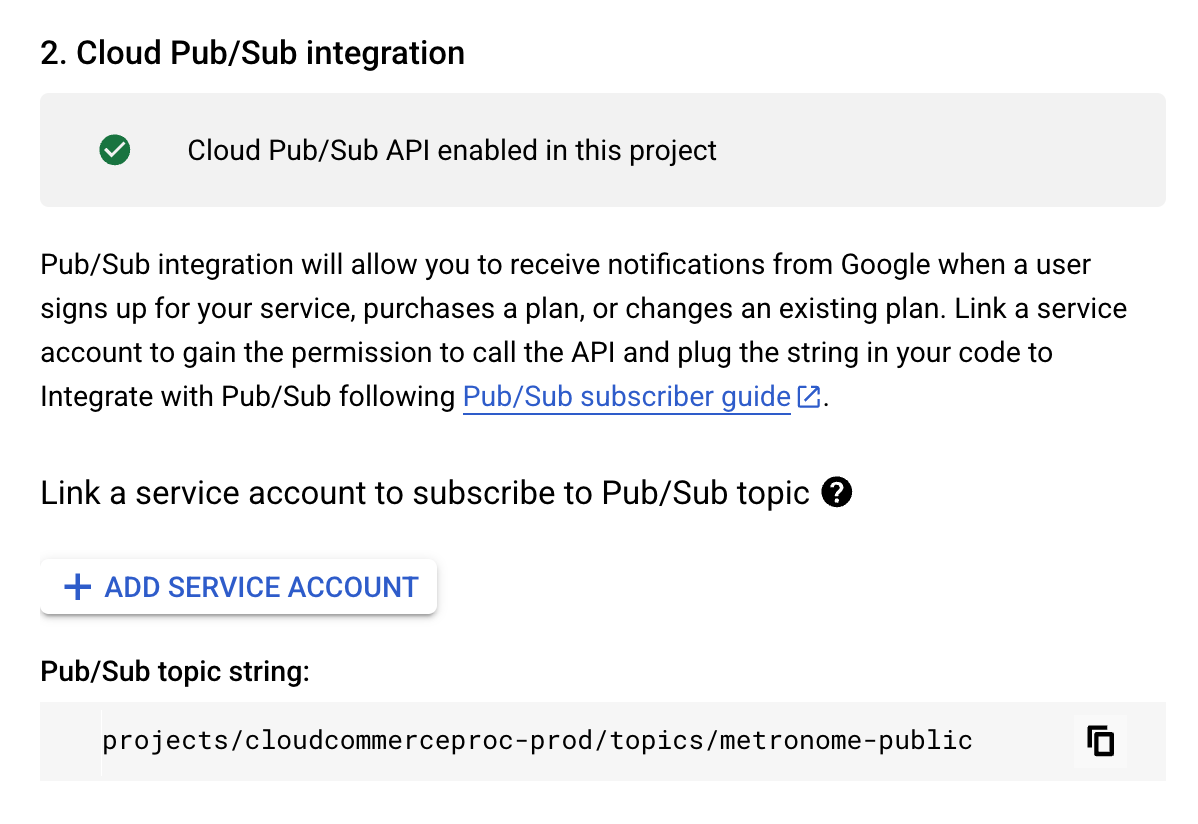
The next step is to configure a Pub/Sub integration. Metronome does not require access to Pub/Sub at this time. However, here you may link your own internal service account(s) for any backend integrations you will use to manage GCP Marketplace subscriptions to your listing.
-
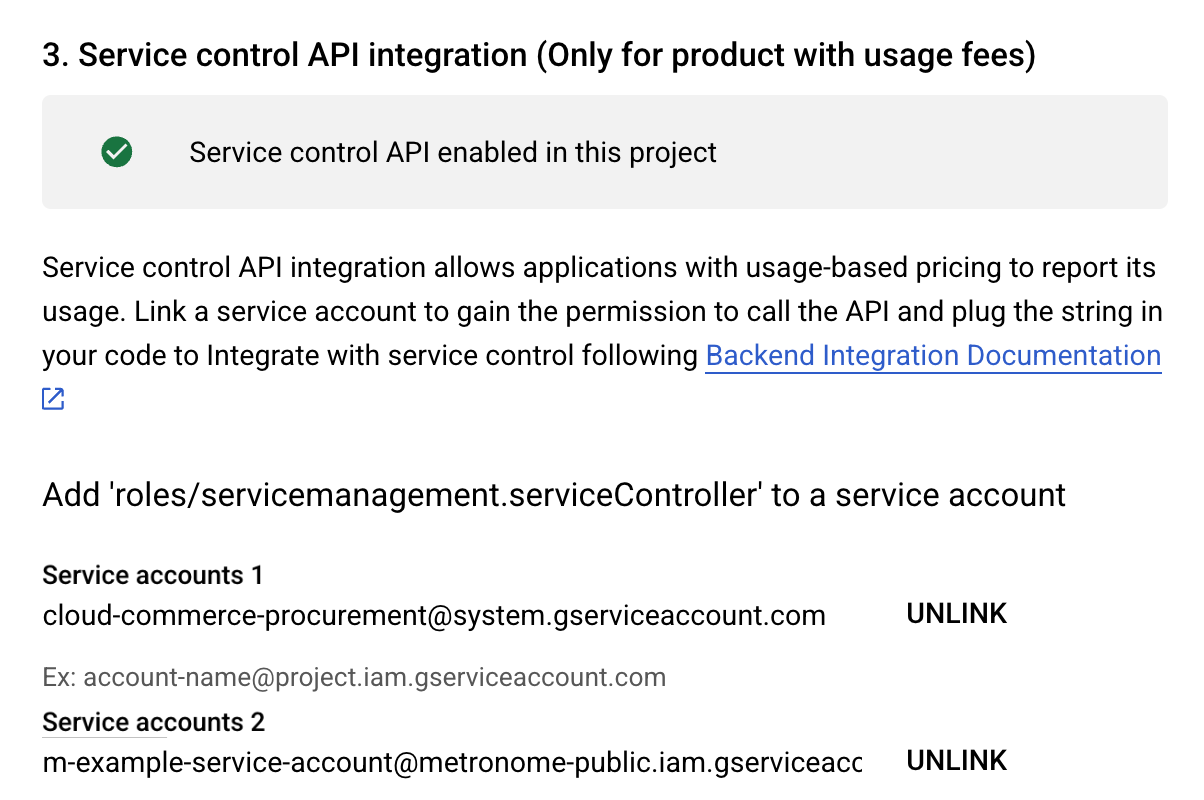
Finally, still in Billing Integration, under step 3, you will need to provide the same service account ID with access to the Service Controller API by again clicking Add Service Account and entering the identifier. Doing so permits Metronome to submit usage metrics to Google for billing:
Note: Google may automatically attach a system service account here, which should remain in place.
- Complete the Frontend Integration section and submit. There are no Metronome-specific requirements for this section.
-
In the Billing Integration section, under step 1, you will need to provide Metronome’s service account ID access to Partner Procurement API. Metronome requires this access in order to read and track metadata about your listing’s entitlements. Click Add Service Account and type or paste in Metronome’s service account ID:
- With all required sections for your listing submitted, Google will proceed with a review and approval workflow before your listing may be published.
Submit listing configuration to Metronome
With federated access configured via a Workload Identity Pool, and with Metronome’s Service Account configured with the appropriate permissions via your listing’s Technical Integration, you are now ready to submit your configuration information to Metronome to finalize the integration:- In Metronome, return to Connections > Integrations > Available Integrations > GCP Marketplace > click Get started.
-
Submit your Provider ID and your Workload Identity Configuration JSON file to the appropriate fields:
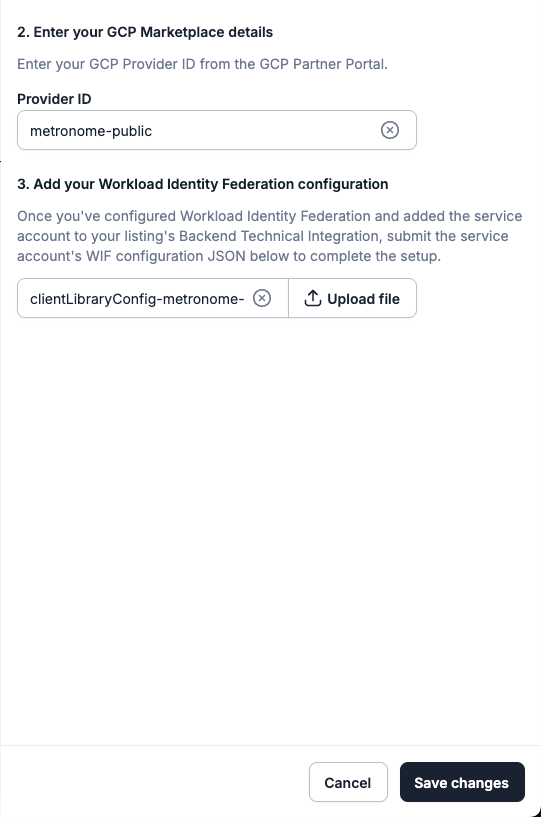
- Click Save changes to submit. Metronome will validate access has been granted to the listing correctly, and if successful, the integration will be saved.
Provision GCP Marketplace customers in Metronome
When a customer agrees to your Marketplace listing, you will need to provision their account in Metronome with a Metronome Contract that reflects the full details of the offer/subscription they signed with you in the Marketplace and GCP identified as the billing provider on that Contract. To connect a customer to GCP and have Metronome begin metering their invoices to GCP on your behalf:- Go to an existing customer’s detail page in Metronome or create a new customer at Customers > Add New Customer.
- Go to Settings > Available Integrations > GCP > Get Started.
-
Enter the Entitlement ID and Service Name for this customer’s subscription:
- You can find both pieces of information from the subscription or order in GCP Producer Portal.
-
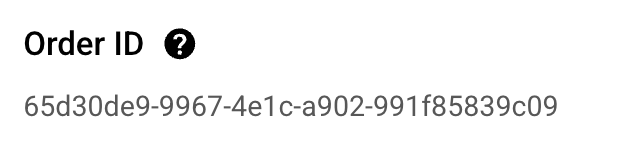
Entitlement ID is the unique identifier representing your customer’s offer/subscription in GCP. It is also referenced as Order ID. Example:
-
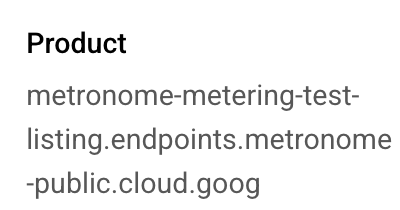
Service Name is a domain name that identifies your product/listing to Google. It is displayed as Product on an offer:
- Create a new contract for the customer that matches the details of the contract they signed with you in the GCP Marketplace. Include any credits and commits the customer has as part of the contract. Learn how to provision contracts in Metronome.
- Under the Billing Configuration section of the configure contract flow, select GCP as the billing provider.
-
Alternatively, you can use the following endpoints to set up GCP as a customer’s billing provider and assign it to a contract:
-
To set up a new customer configured with GCP Marketplace:
- Call the create customer endpoint
- In the request payload, include
customer_billing_provider_configurations:-
In the
configurationproperty, specifygcp_entitlement_idandgcp_service_name
-
In the
-
To configure an existing customer with GCP Marketplace:
- Call the set customer billing provider configurations endpoint
- In the request payload, include your configuration:
-
In the
configurationproperty, specifygcp_entitlement_idandgcp_service_name
-
In the
-
To set up a new contract with invoices metered to GCP Marketplace:
- Call the create contract endpoint
-
In the request payload, include
billing_provider_configuration:
-
To set up a new customer configured with GCP Marketplace:
What Metronome meters to GCP
When metering to GCP, Metronome sums up a customer’s total amount accrued across all contract invoices that have GCP set as the billing provider since the last metering request. Metronome sets the quantity for each metering record as the total dollar amount expressed in USD cents. If a customer purchased a commit or was offered a credit as part of their contract, Metronome meters like this:- Prepaid commits A contract in Metronome specifies a schedule over which the customer pays for their prepaid commit. Those inputs create one or more scheduled invoices. Metronome meters the amount the customer owes on the prepaid commit on the date associated with the service period of the scheduled invoice, not the created at date.
- Credits As credits on a Metronome contract are not paid for, Metronome only meters overages reflected on invoice totals after the credit has been drawn down in its entirety.
- Postpaid commits Metronome meters usage reflected on invoice totals throughout the duration of the contract. However, if the entirety of the postpaid commit isn’t consumed by the end of the contract, Metronome ignores the true-up invoice and doesn’t send it to the marketplace. This is because the true-up invoice isn’t finalized until after the Metronome grace period ends, at which point the metering endpoint for the marketplace has closed. This means you must handle the true-up in the marketplace directly.
Handling marketplace customer lifecycle events in Metronome and your app
Metronome stops metering if it detects subscription changes due to marketplace lifecycle events, and updates the customer’s status in Metronome accordingly. However, you are responsible for ensuing that the customer’s status is correctly represented in your application and ending the customer’s contract in Metronome, if relevant. To end the customer’s contract in the Metronome app, go to the customer > click the contract > select the overflow menu > click Edit Contract End Date. To end the customer’s contract with the Metronome API, use the/contracts/updateEndDate endpoint.