Create an Azure Marketplace offer and plan
Begin by creating an Azure Marketplace offer from your Azure partner portal.
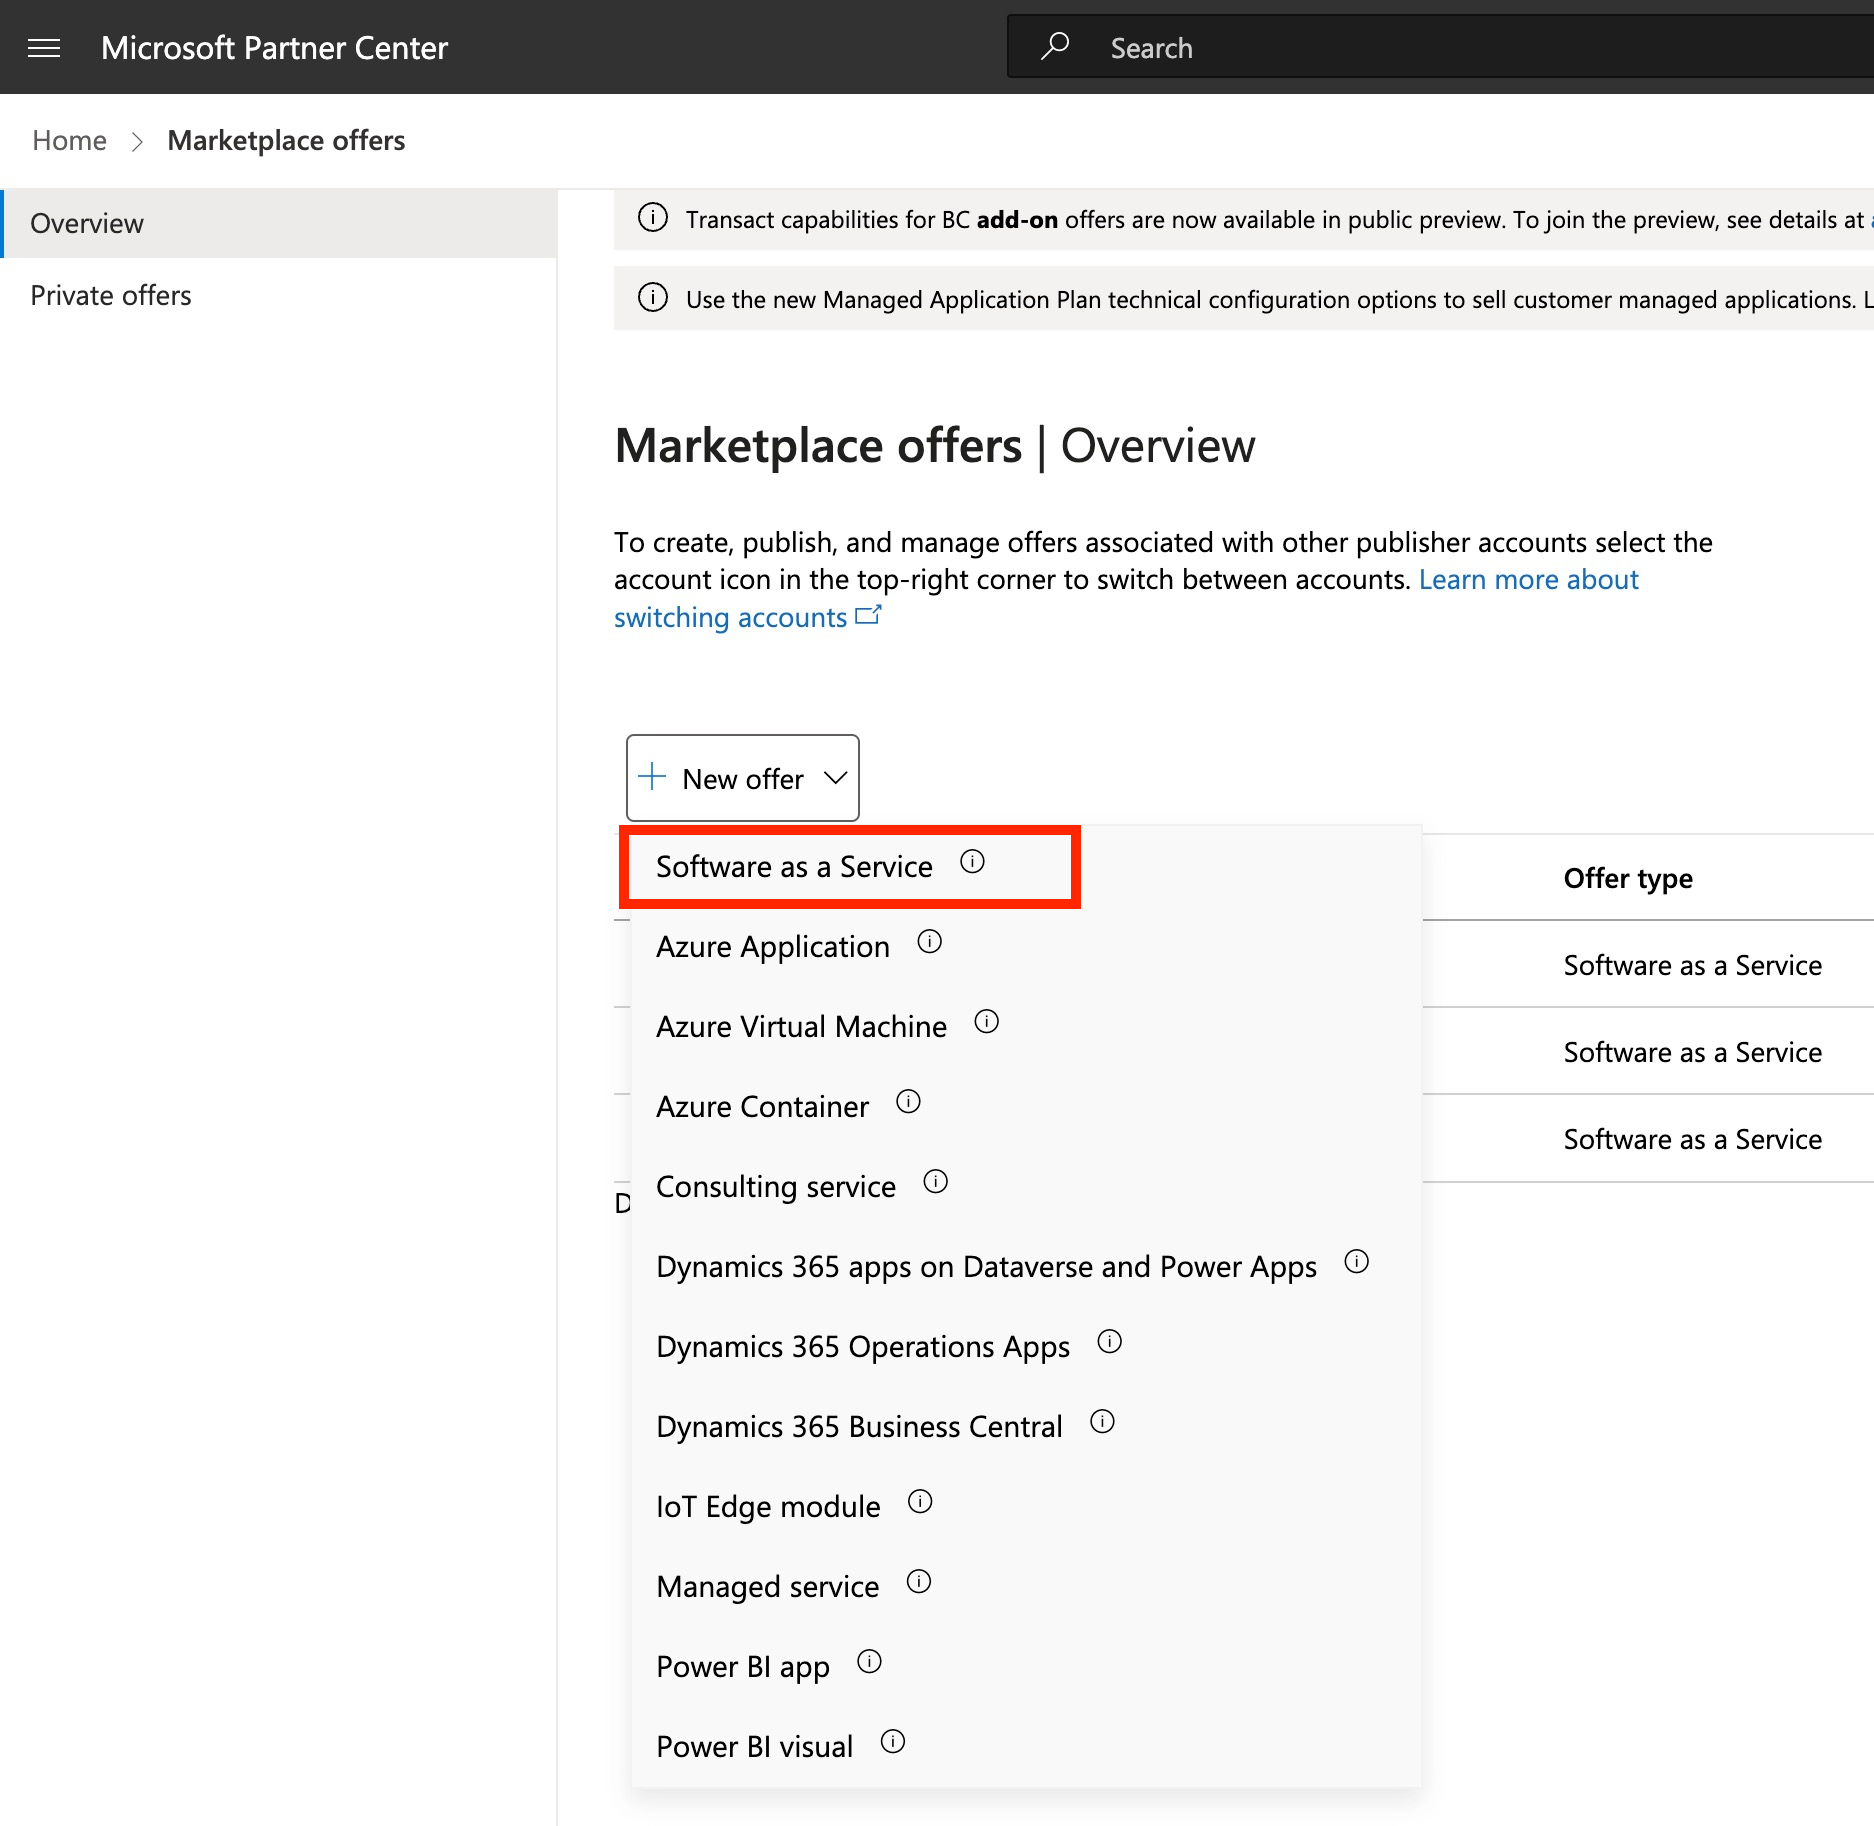
- Create a new Software as a Service offer from your partner portal and provide a name and alias.
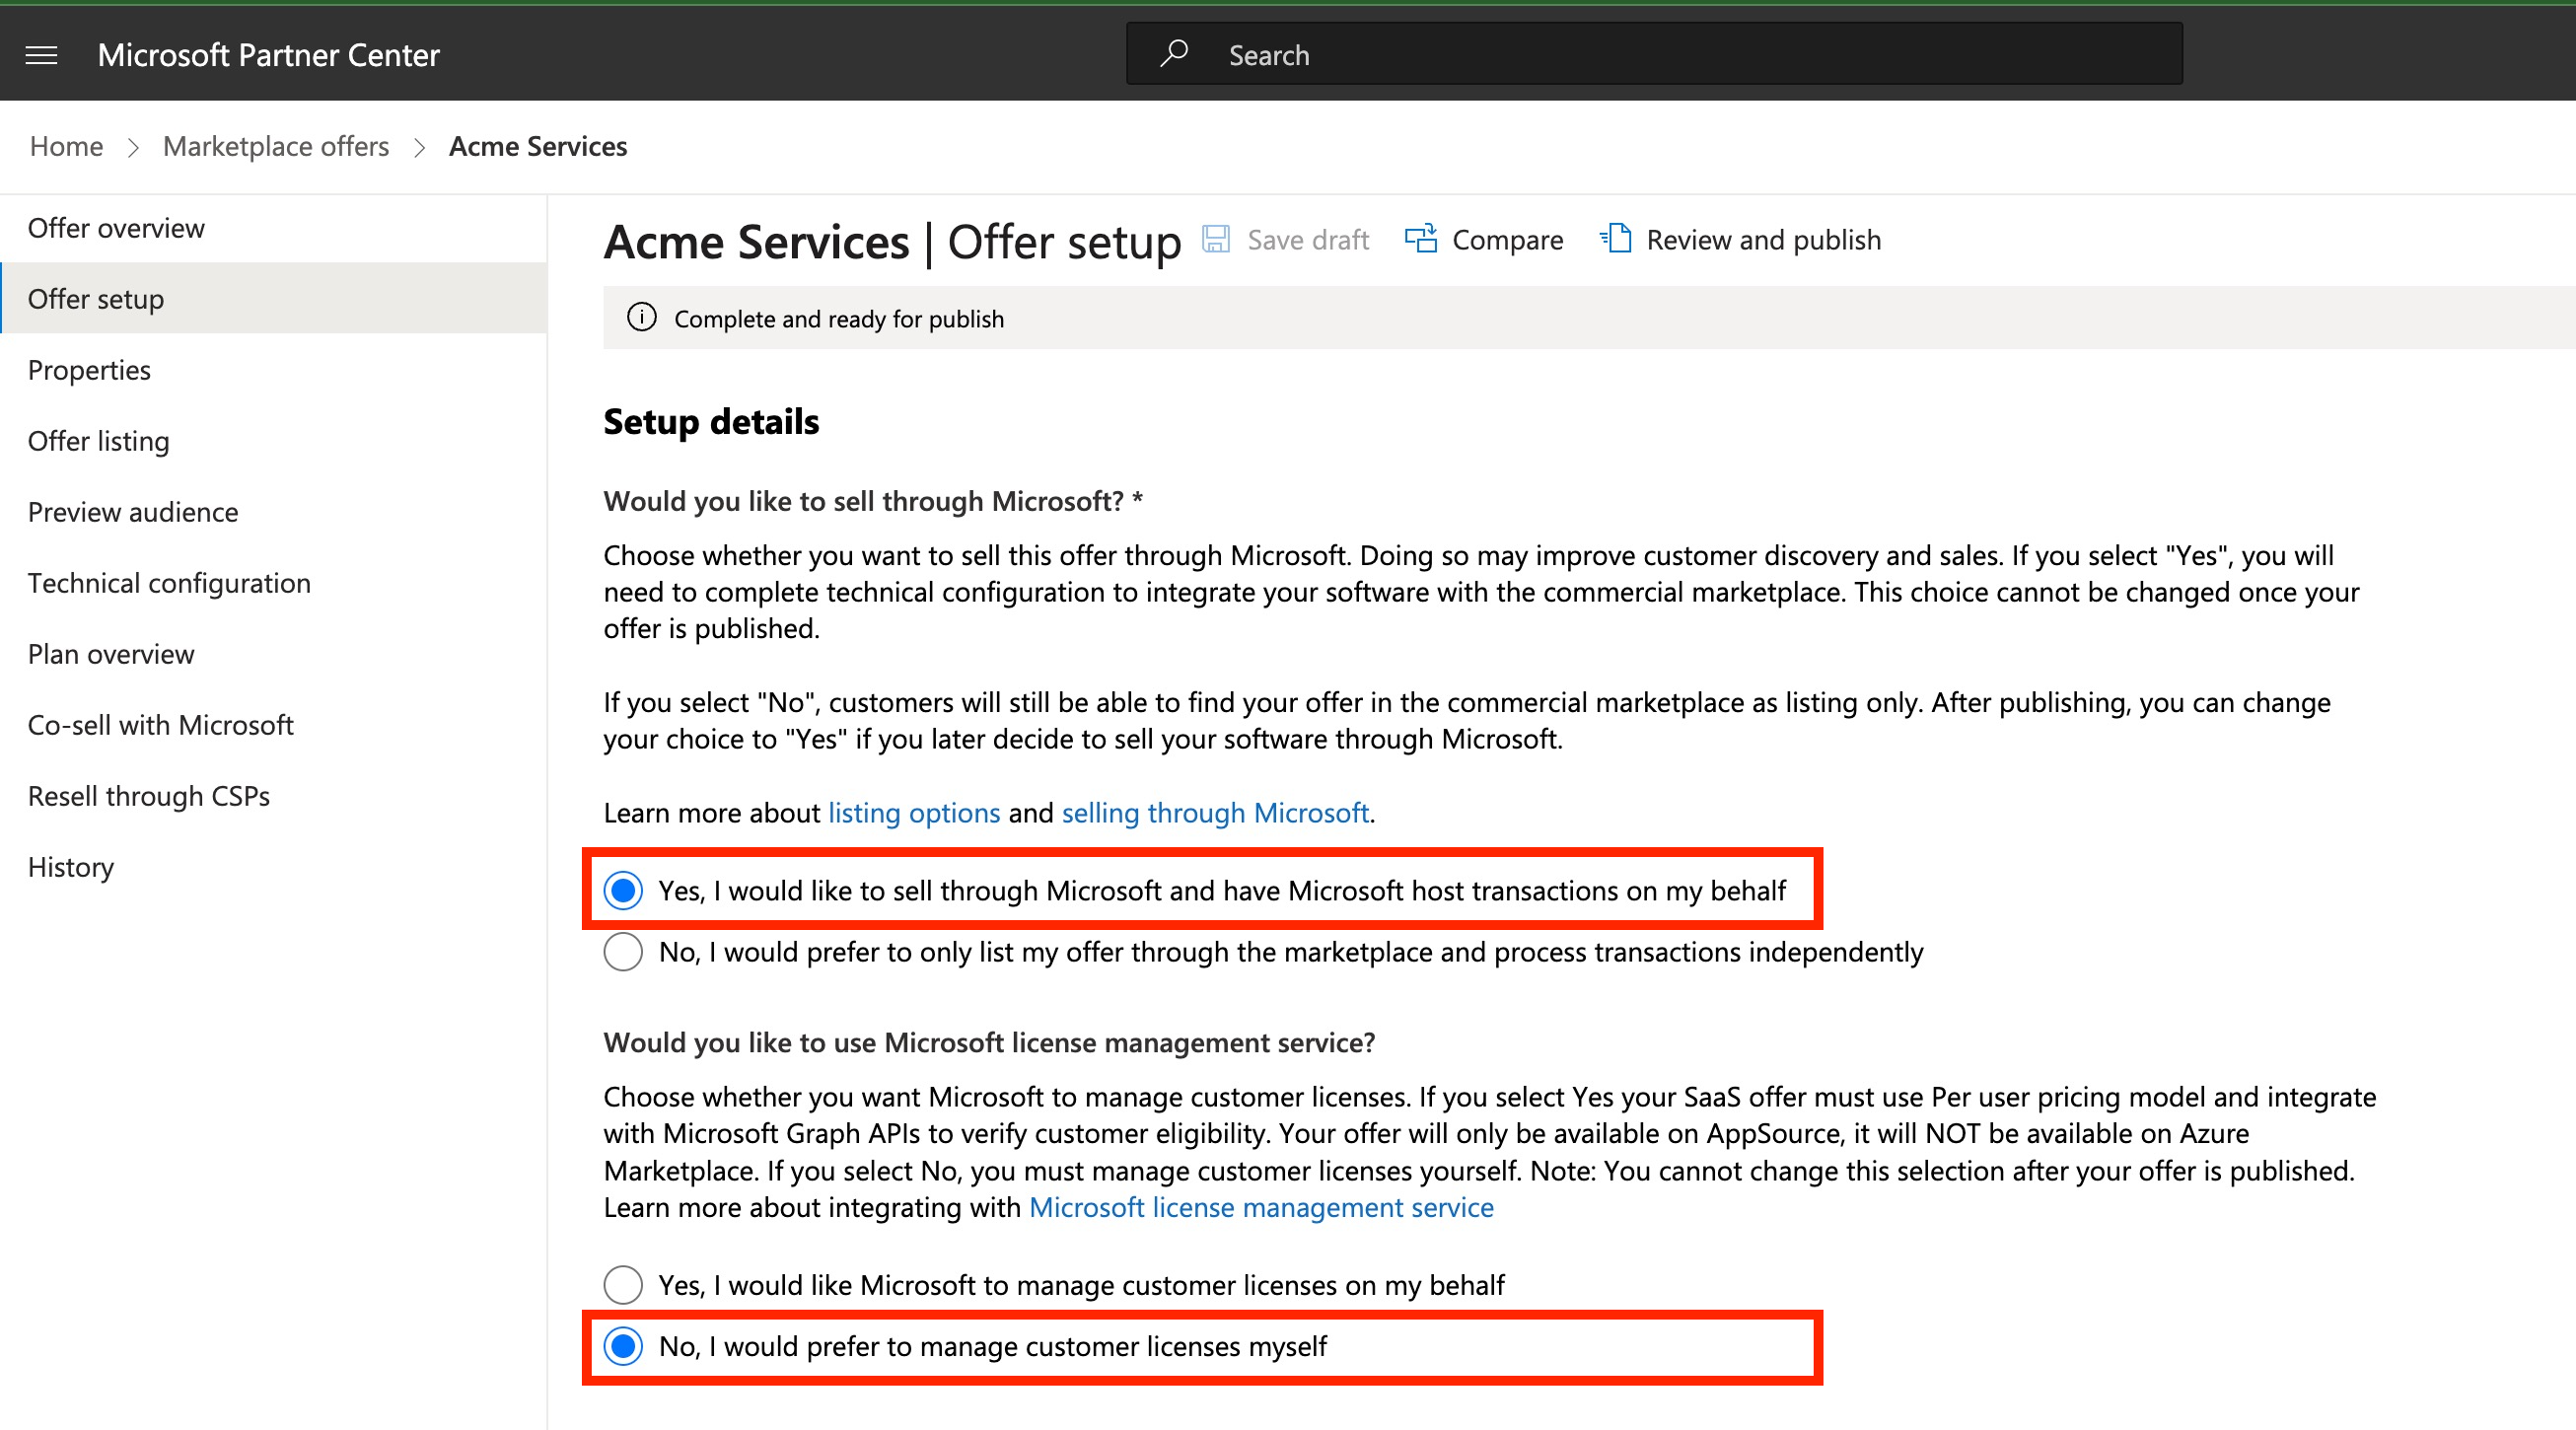
- In the Offer Setup tab, select Yes for Selling through Microsoft and No for using Microsoft’s license management service.
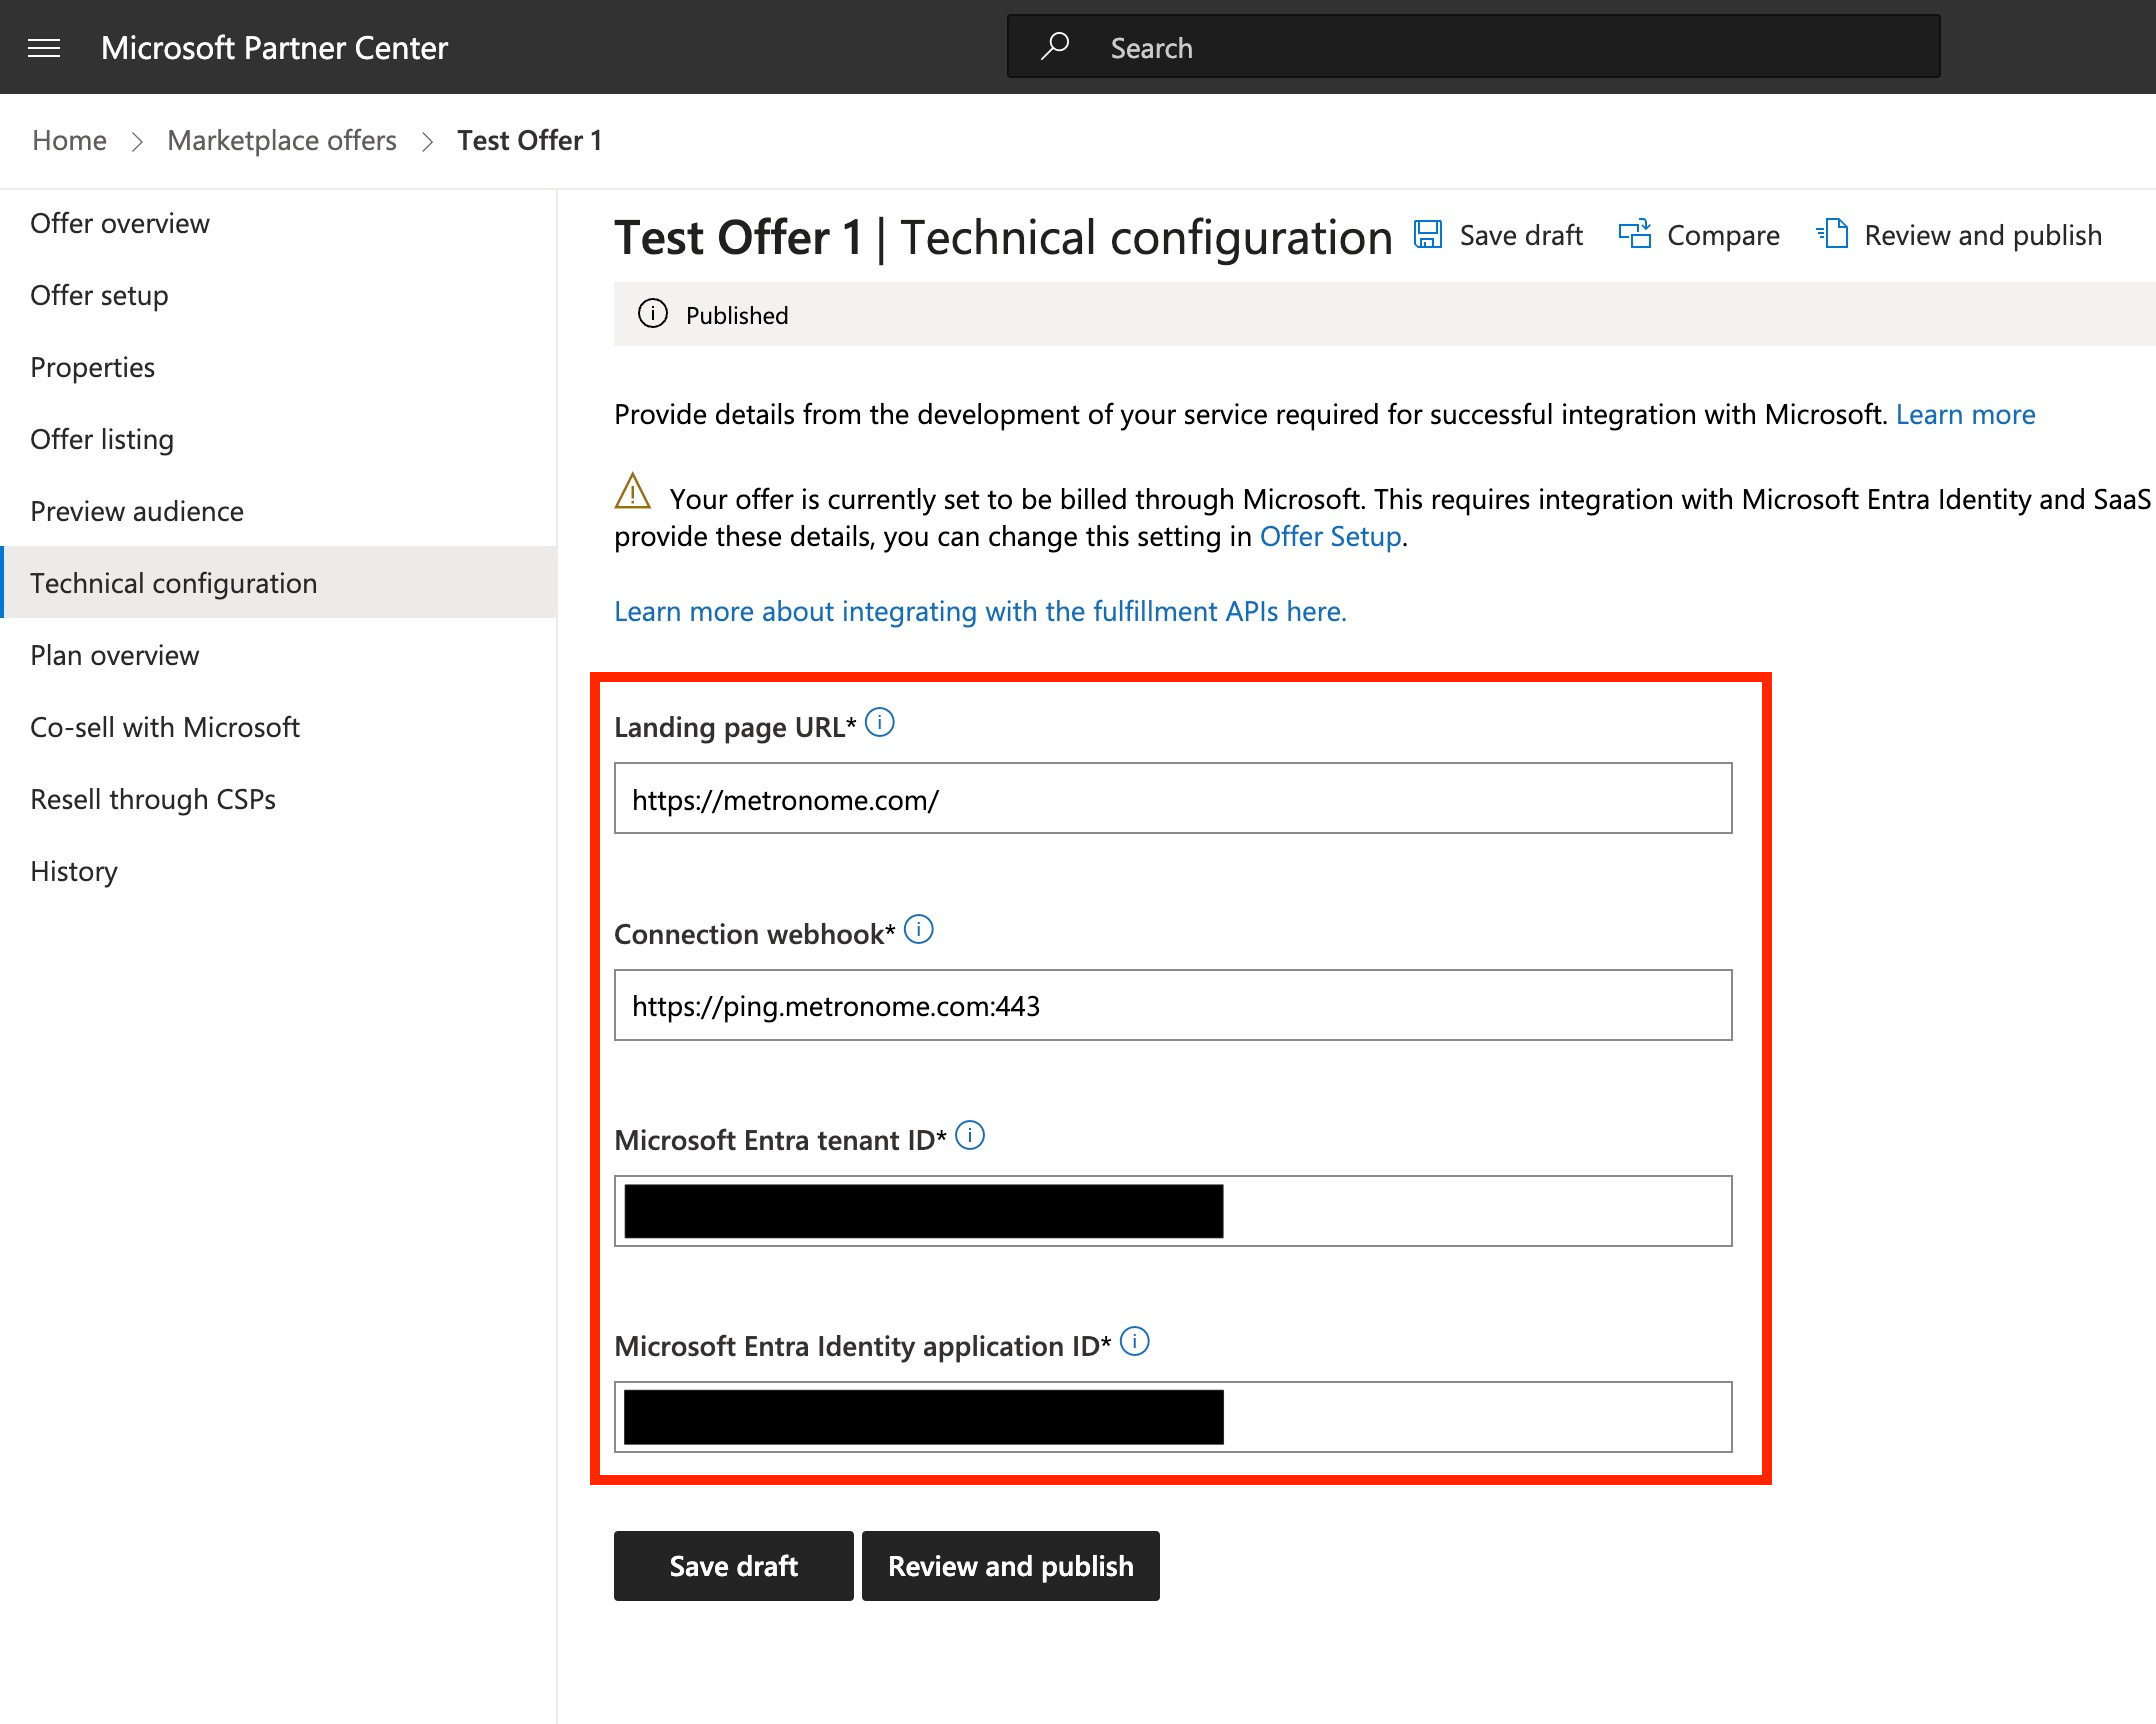
- Click the Technical configuration tab to specify SaaS URL redirect for setup, Webhook URL, and a Microsoft Entra Application ID and Tenant ID. Retrieve these from the Azure portal.
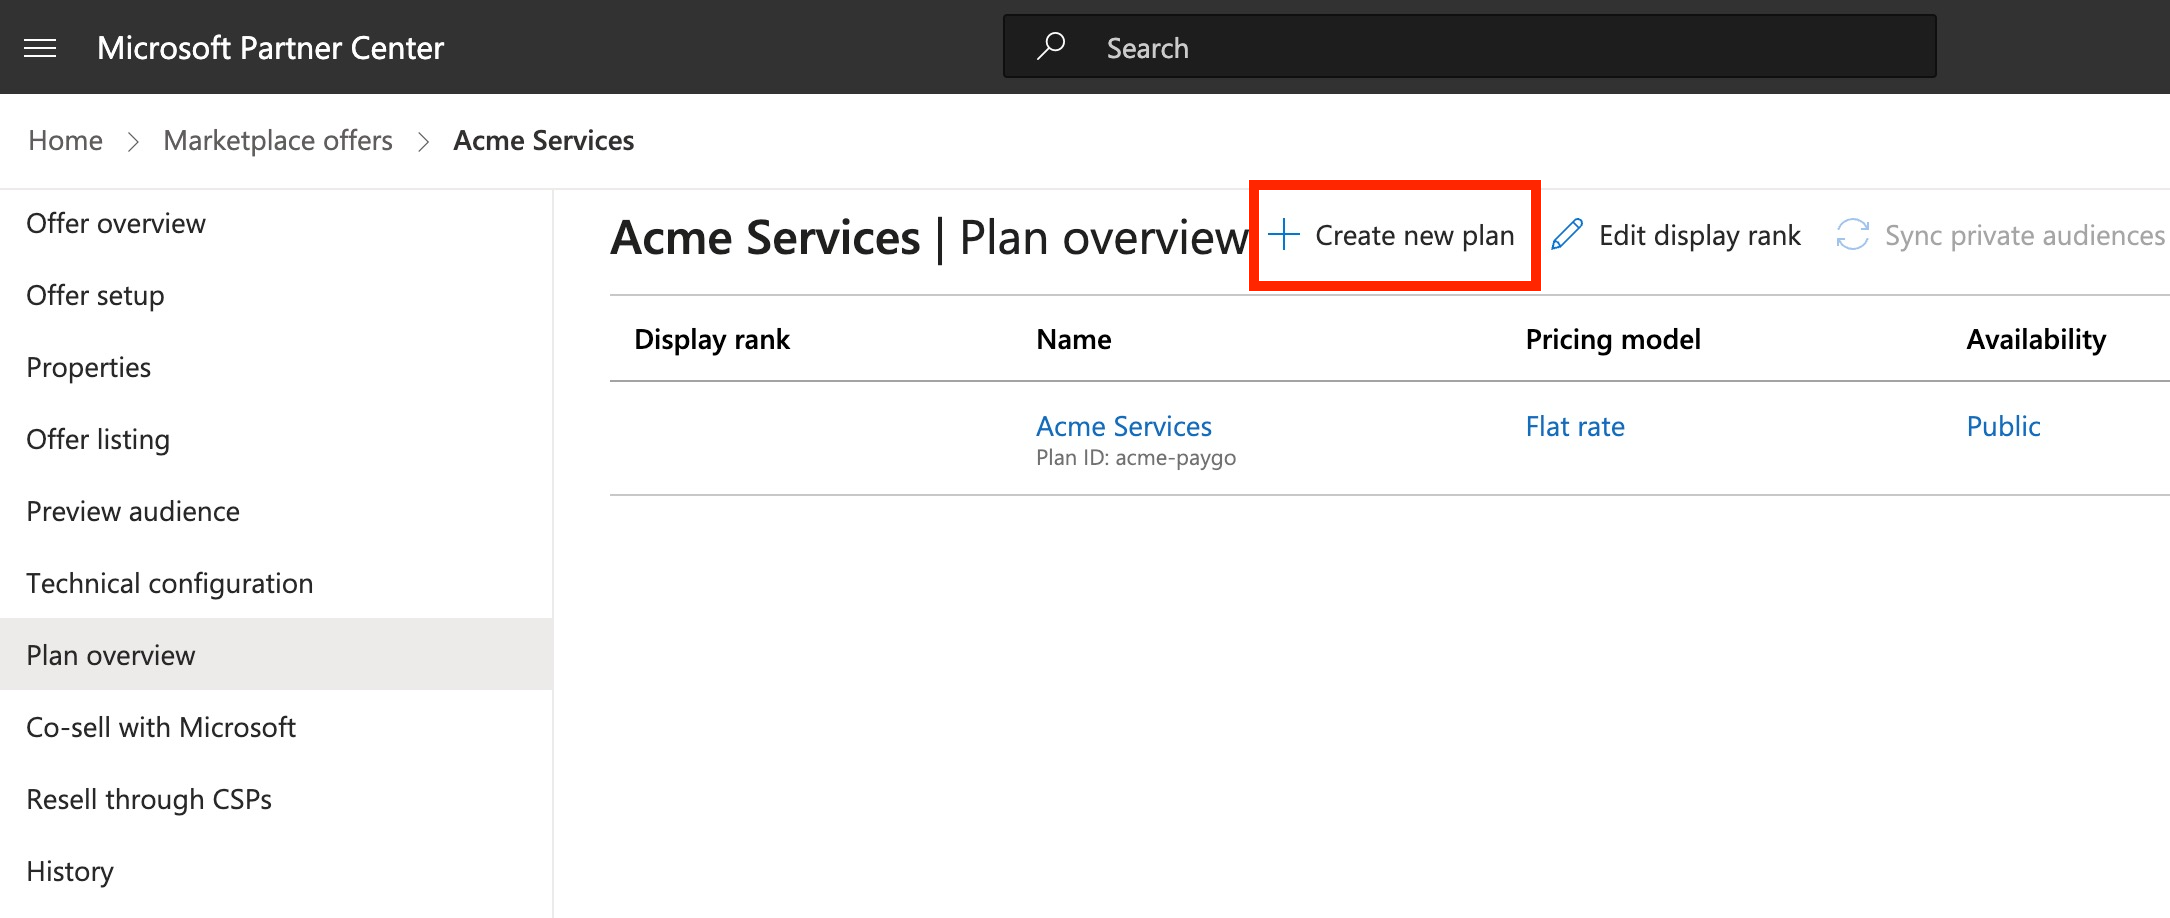
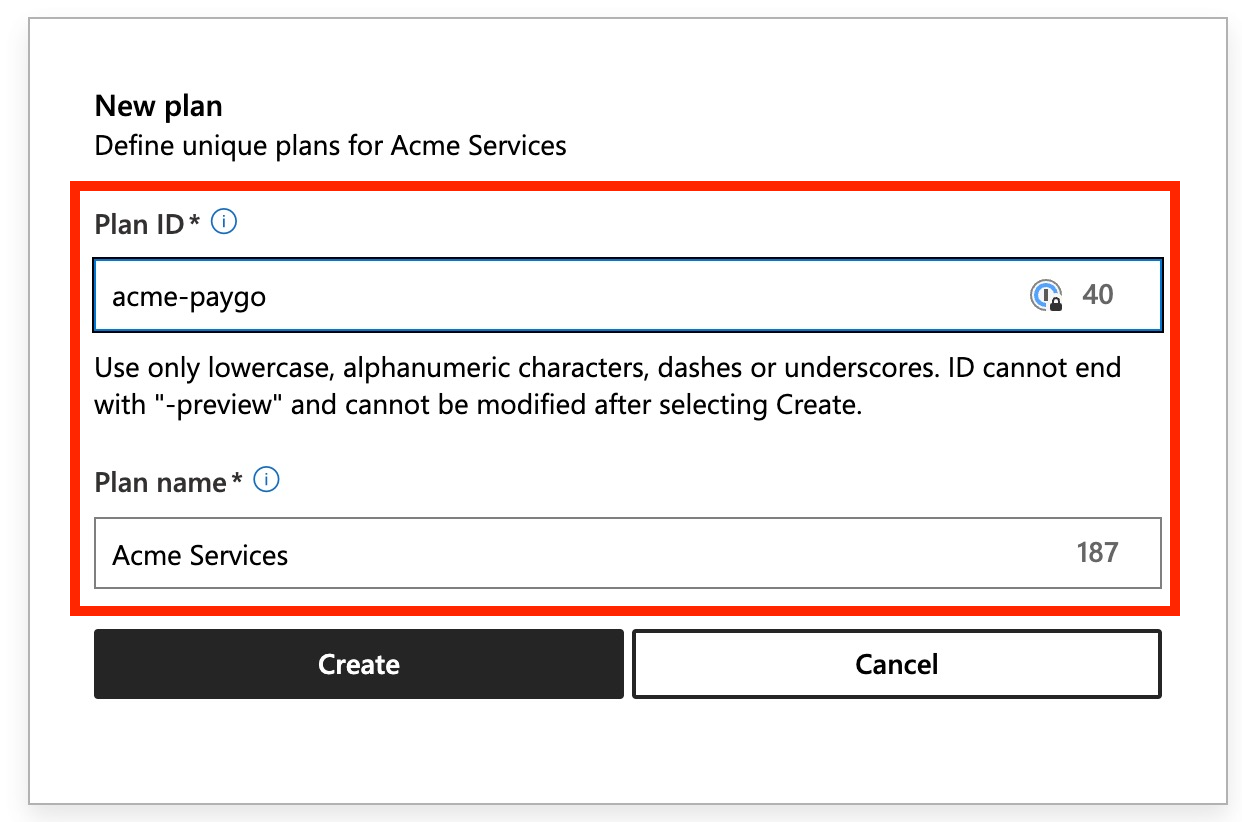
- Click the Plan overview tab to add plans for each rate card you defined in Metronome associated with this listing, and specify a plan ID and plan name.
-
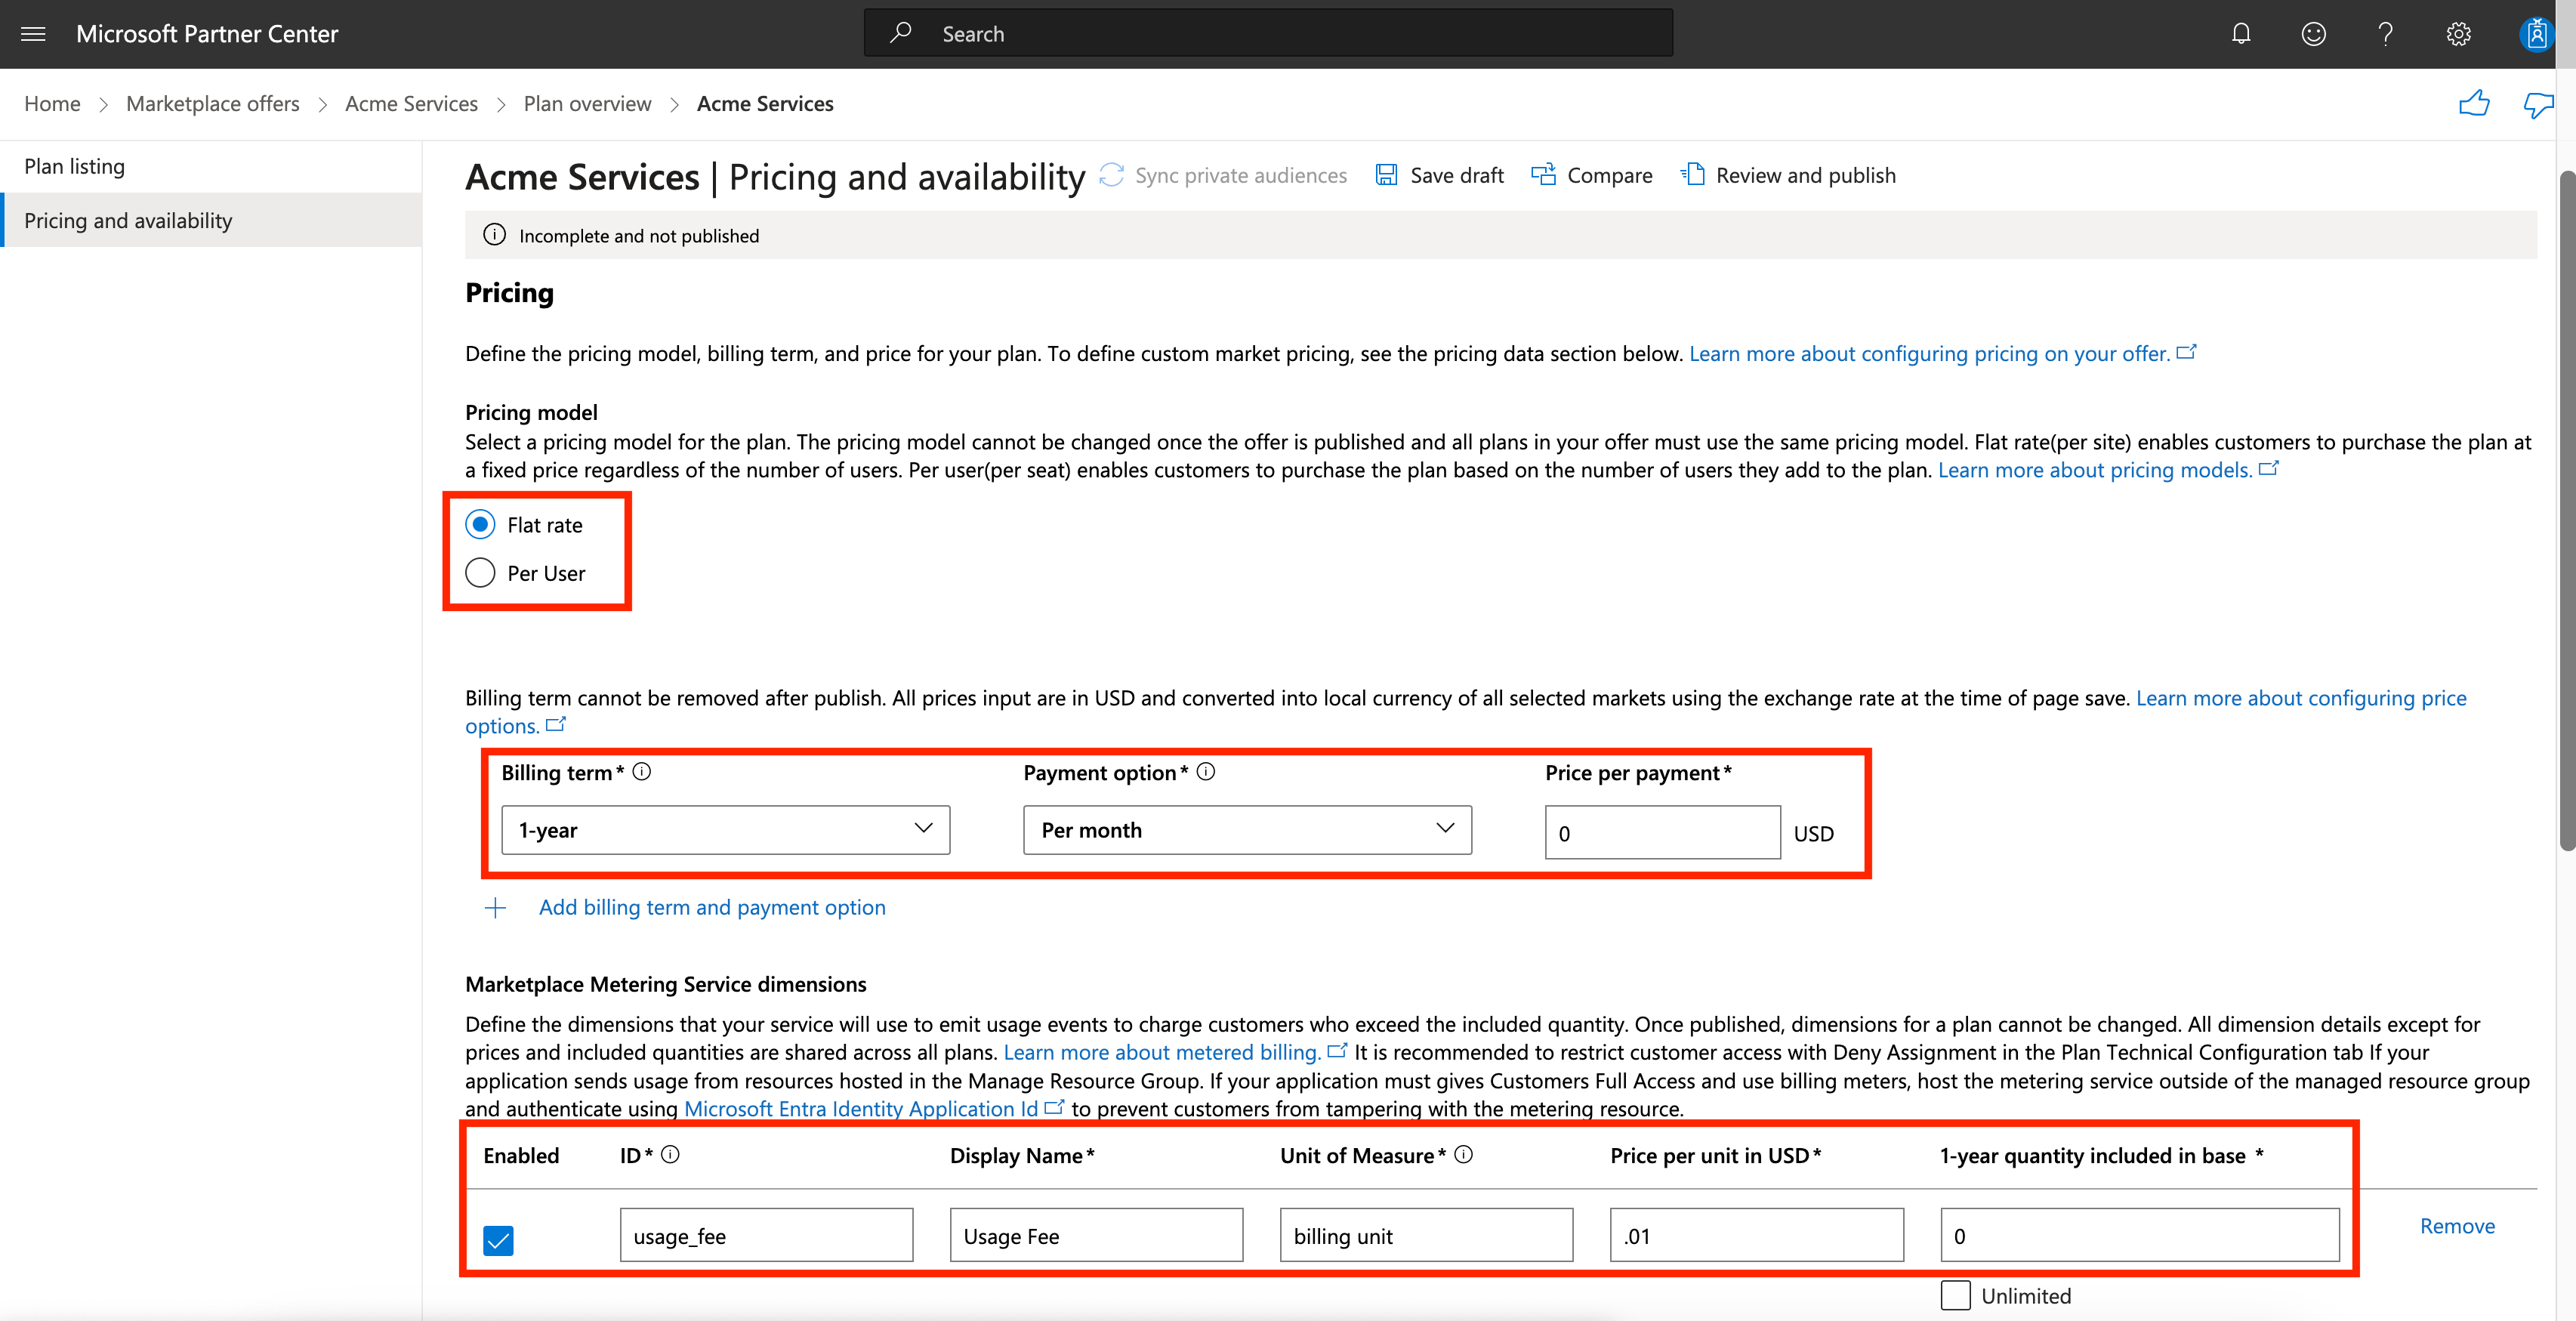
Specify the pricing model in the Pricing and Availability tab.
- Select the Flat Rate option with a monthly, yearly or multi-year Billing term with a $0 Price per payment.
- Add one metering service dimension with ONLY these values:
- ID set to
usage_fee
- Display name set to Usage Fee
- Unit of measure set to billing unit
- Price per unit set to .01
- Quantity included set to 0
CAUTIONDeviating from these values will cause the integration to fail.
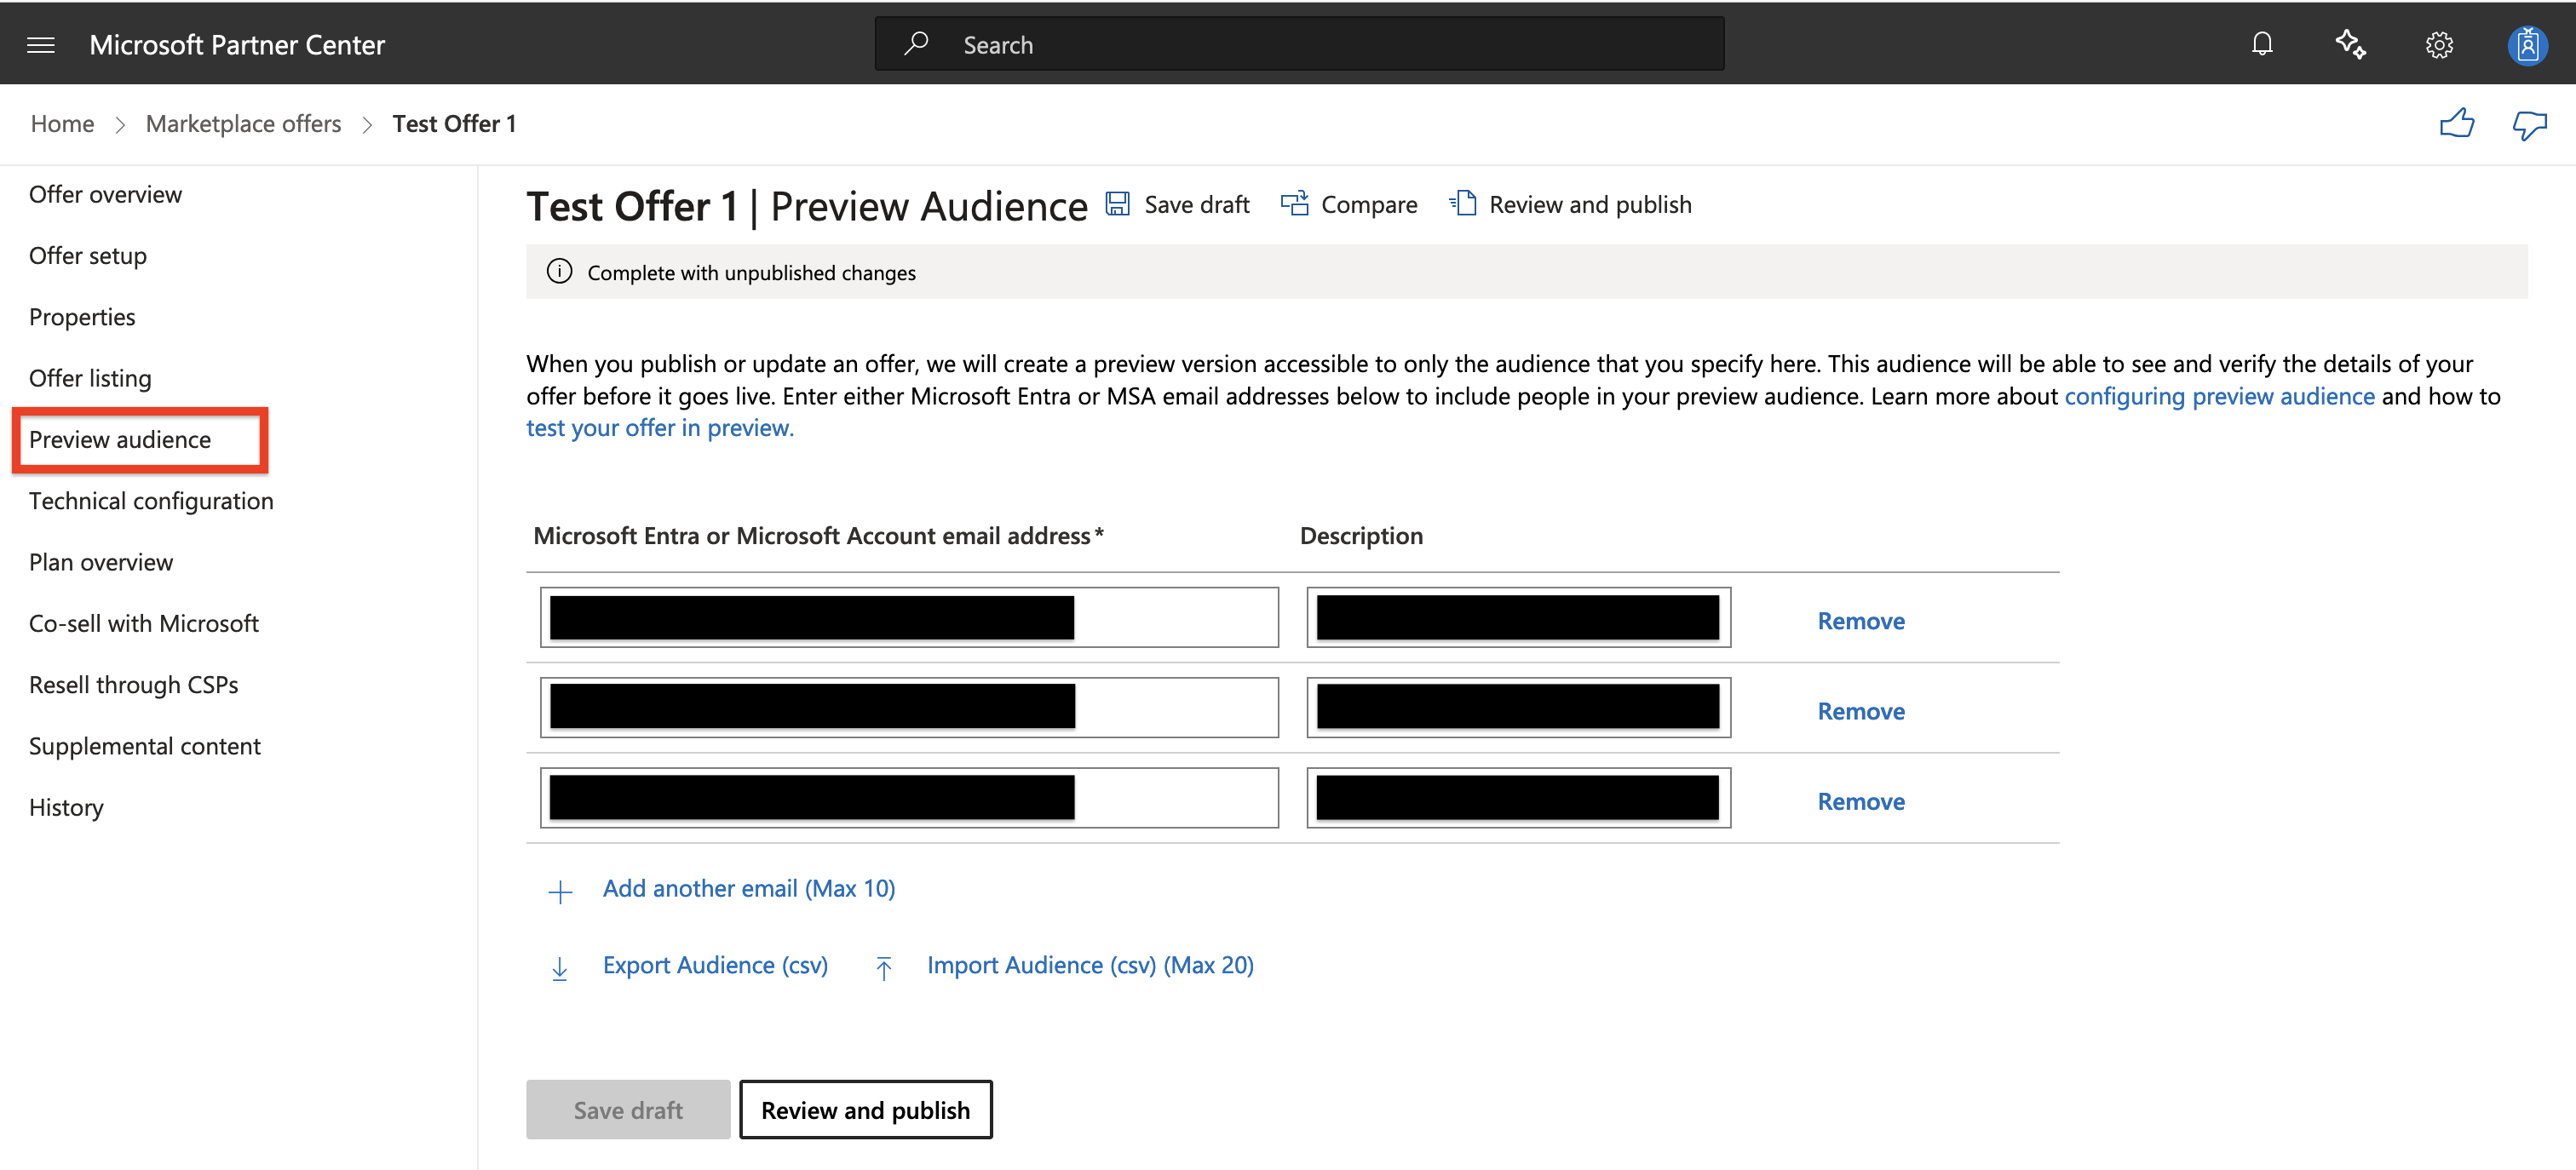
- Test your offer using the Preview audience tab
Set up authentication for Metronome to meter on your behalf
To invoice through the Azure Marketplace, set up authentication credentials for Metronome using your Tenant ID , Client ID and Client Secret. To retrieve these credentials:
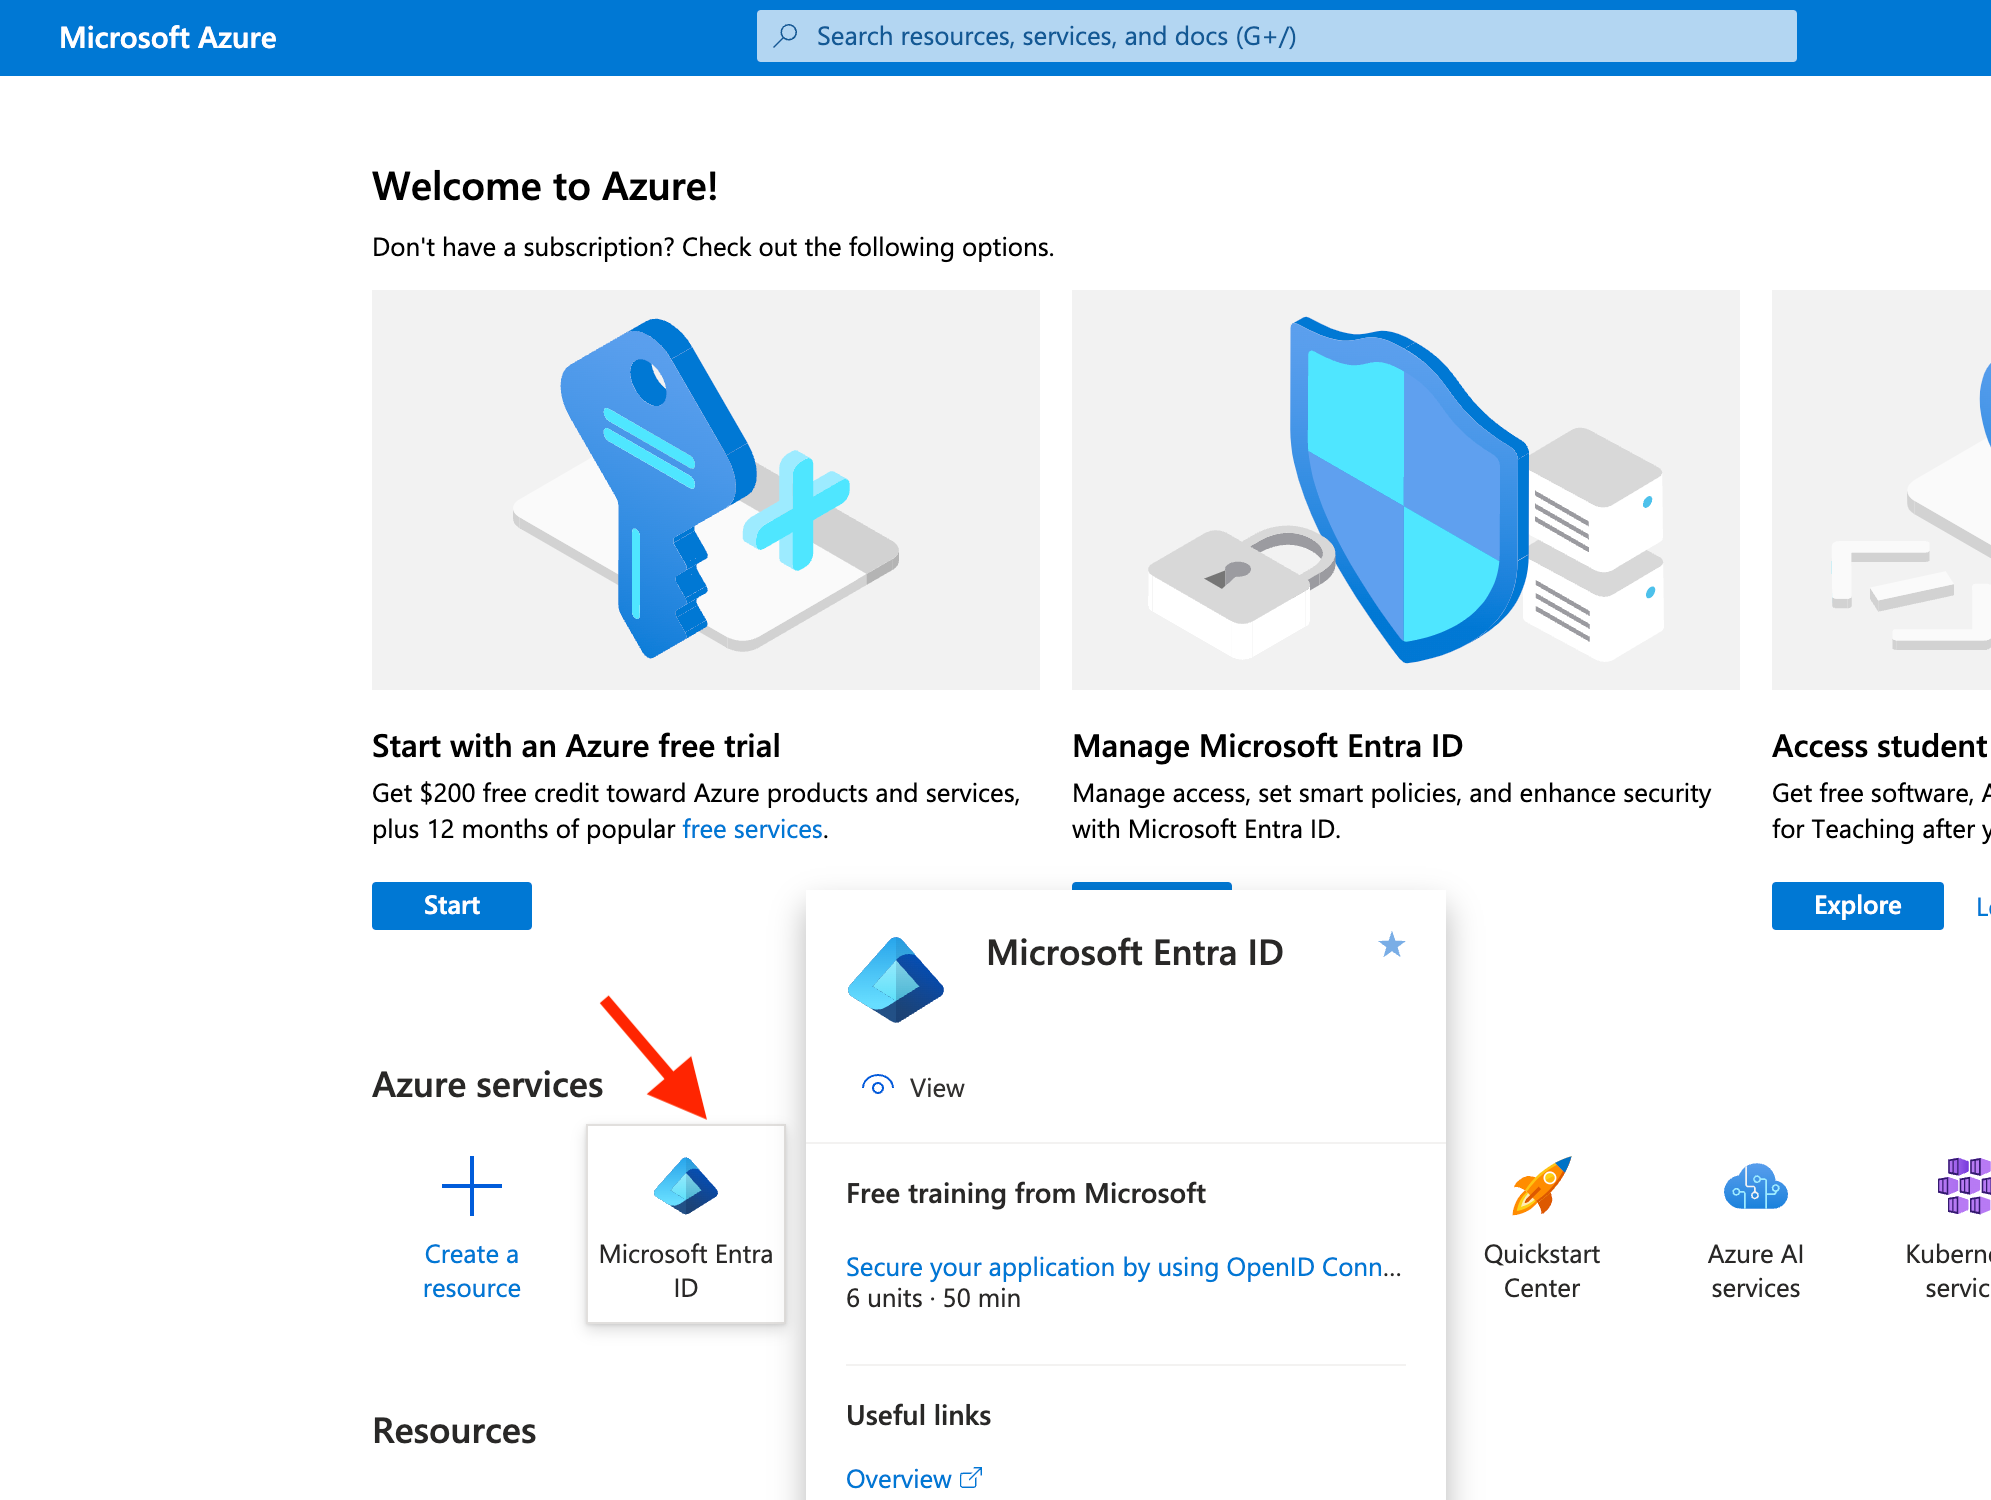
- Go to your Azure portal and select the Microsoft Entra ID service (formerly known as the Azure Active Directory).
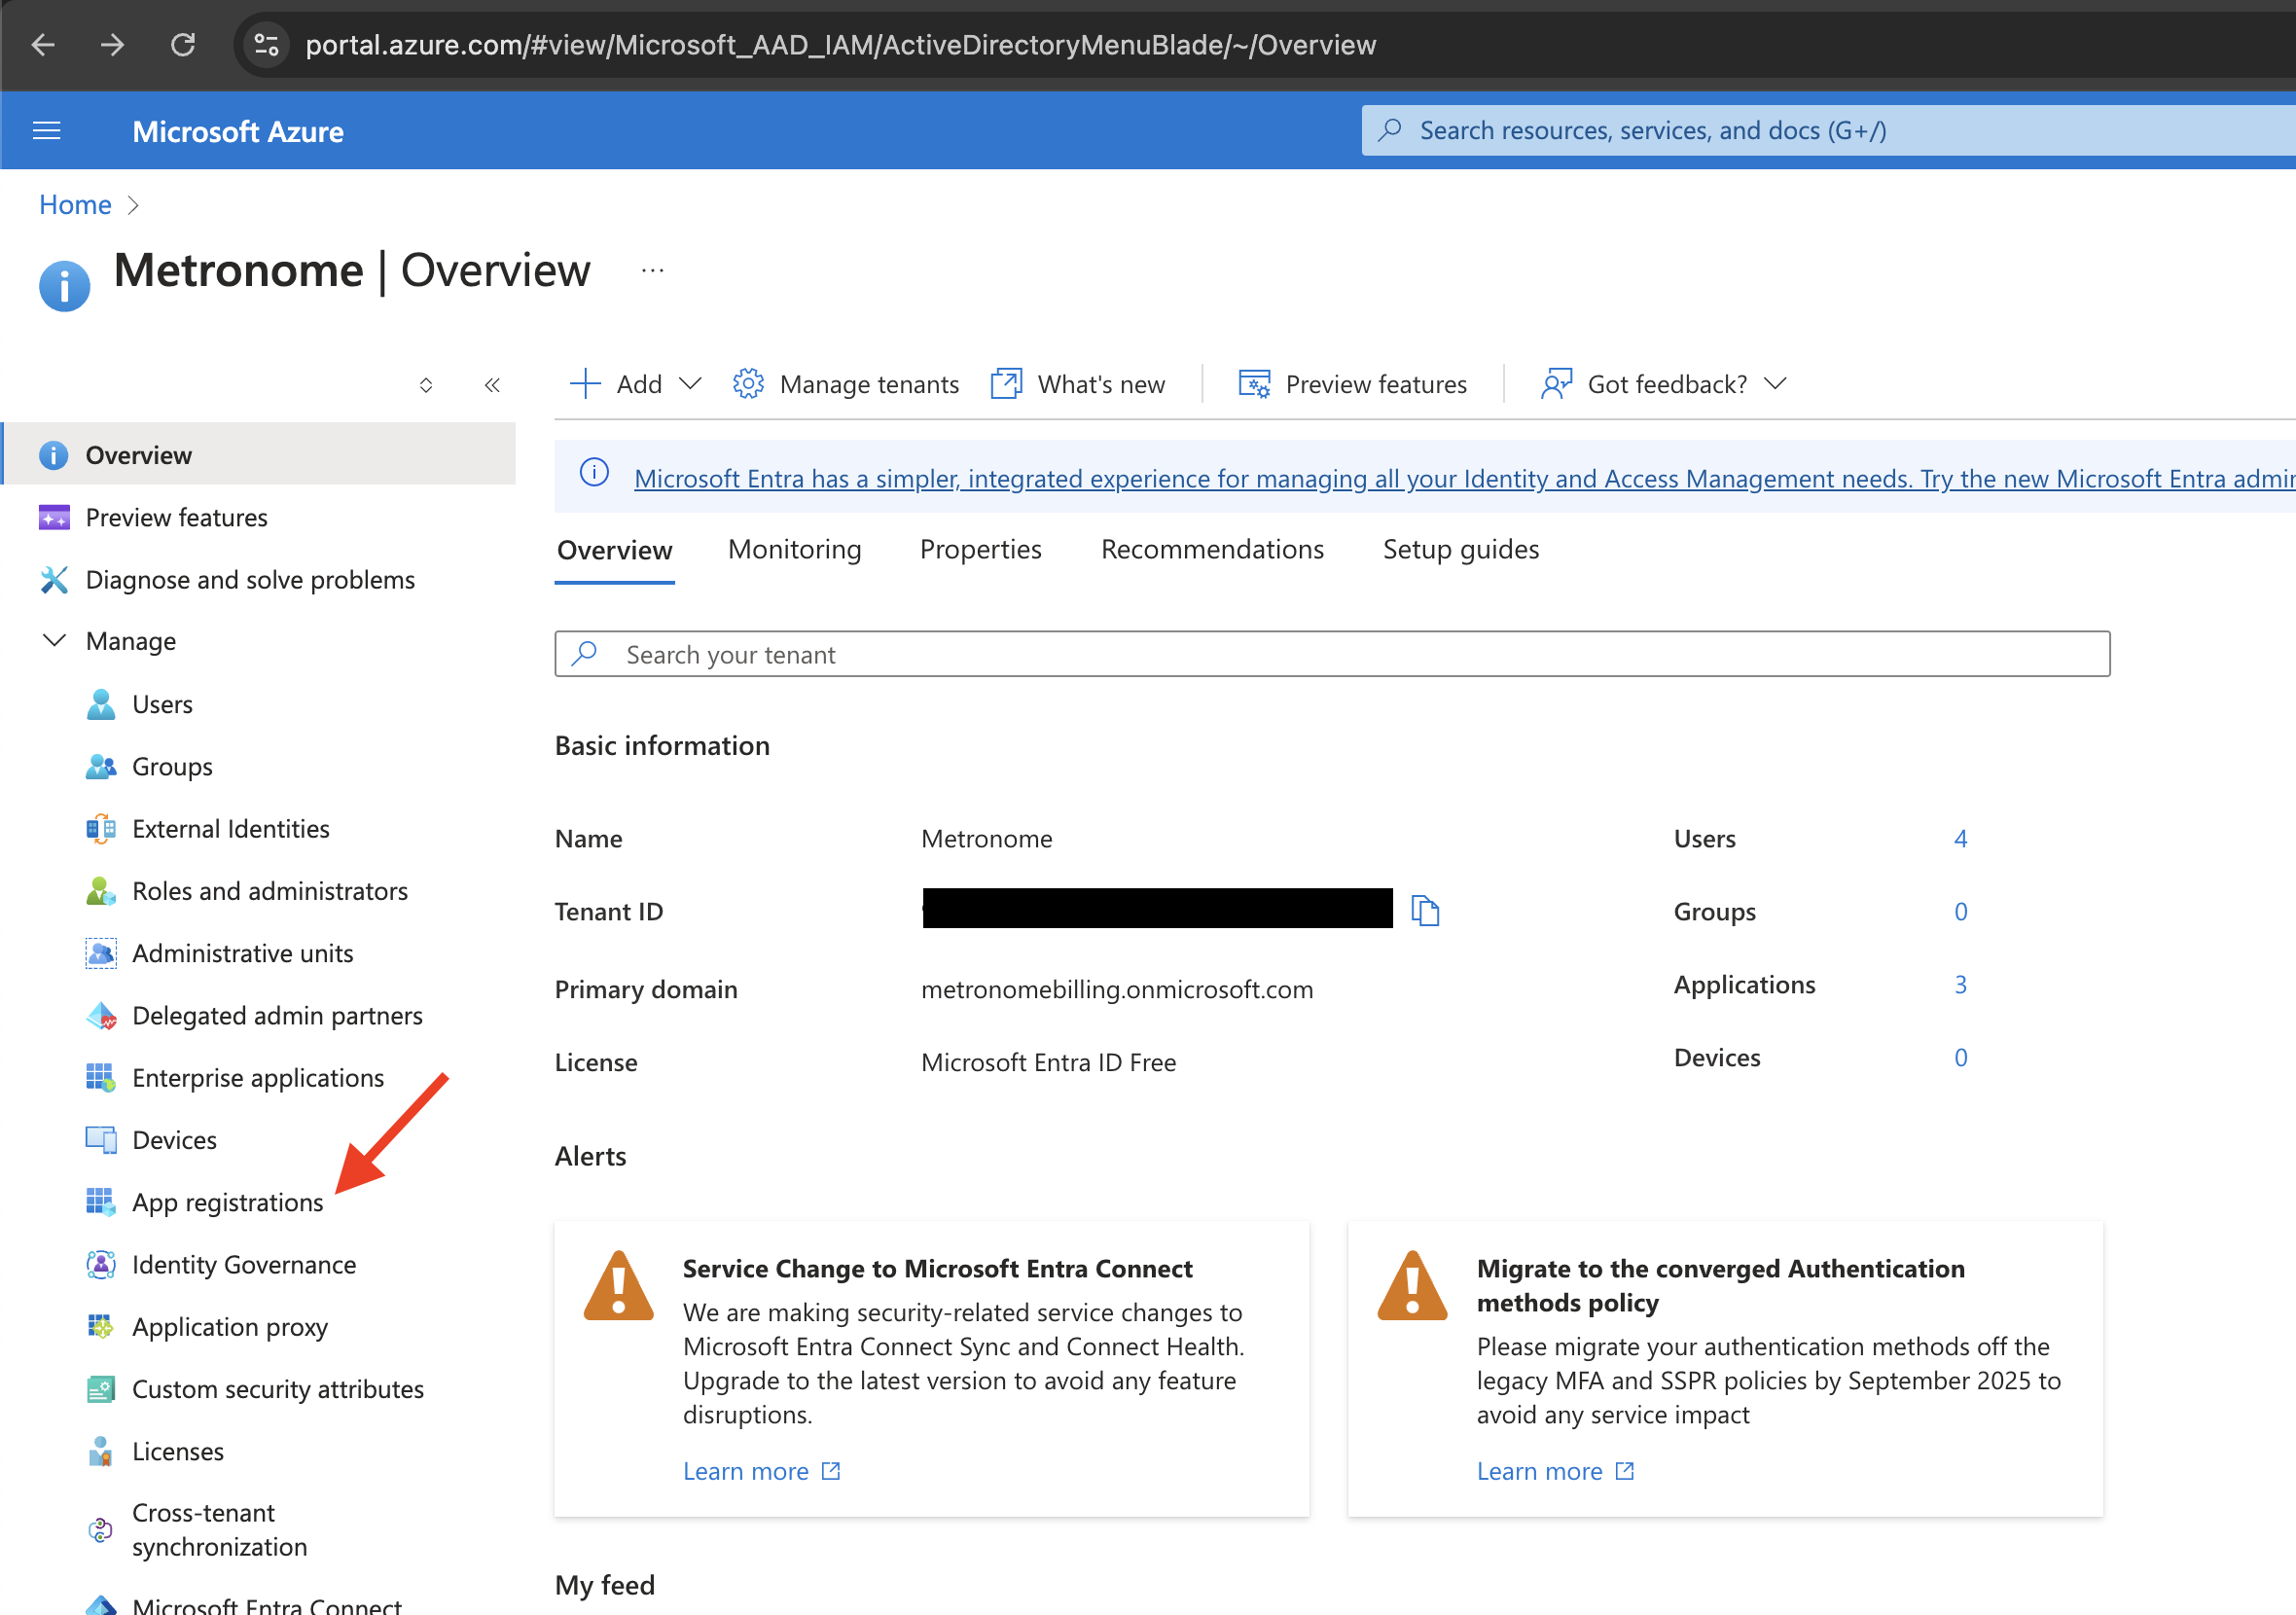
- From the Microsoft Entra ID overview, click App registrations in the sidebar to view applications that are authenticated to access the marketplace.
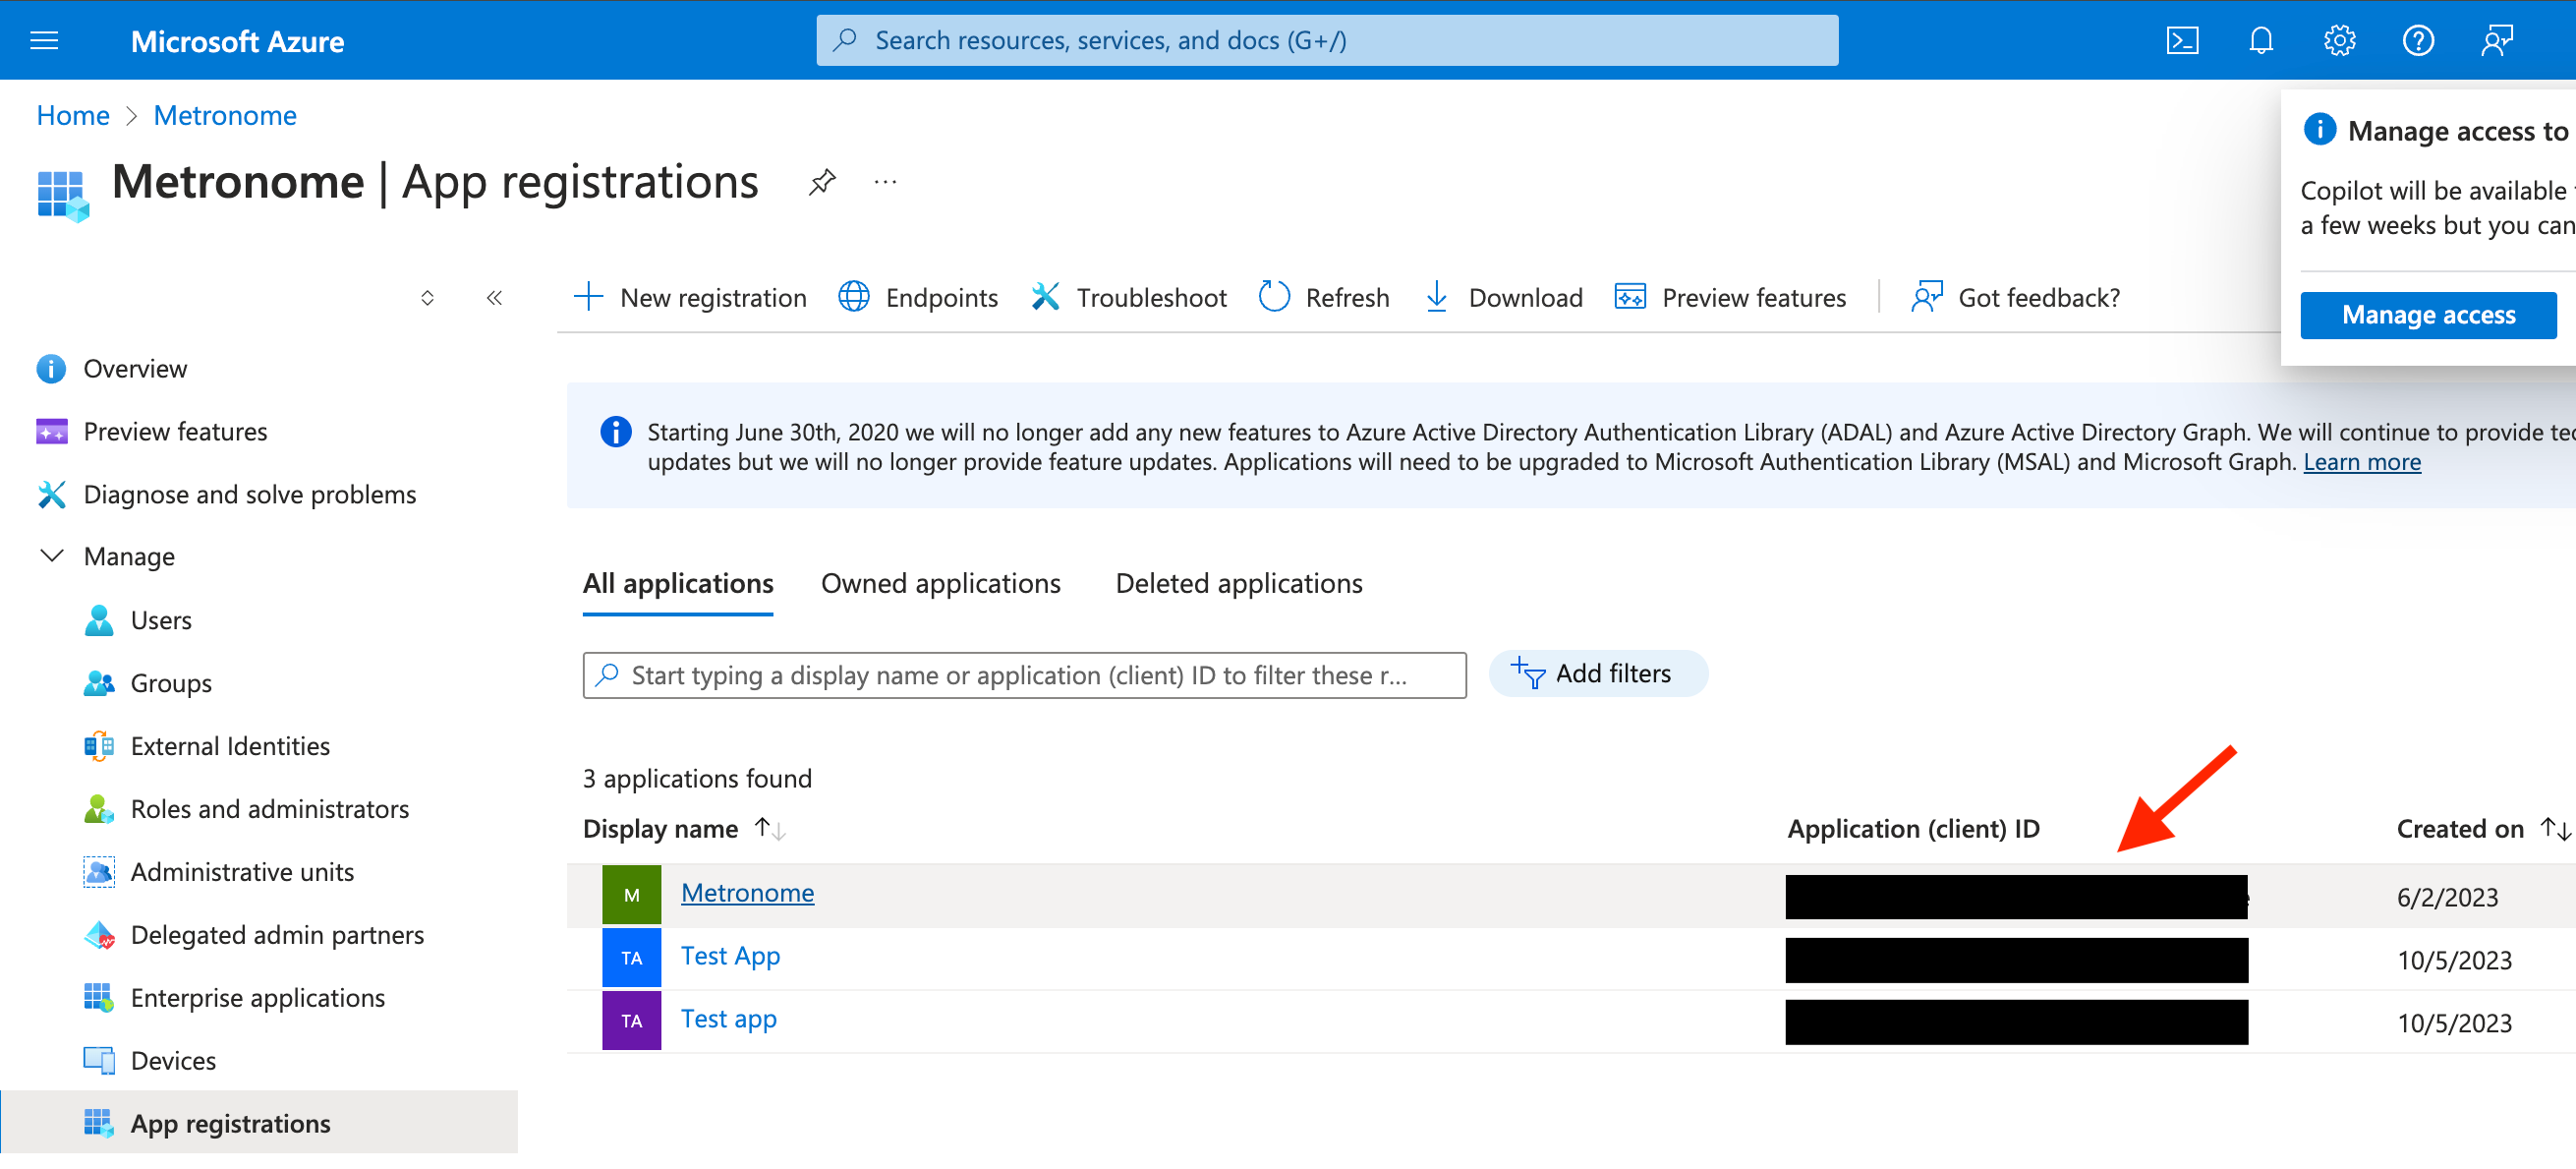
- Click the All applications tab and select the desired application based on the client ID (also known as the Application ID). This is the application you used to set up the marketplace listing.
-
Add application credentials to Metronome.
-
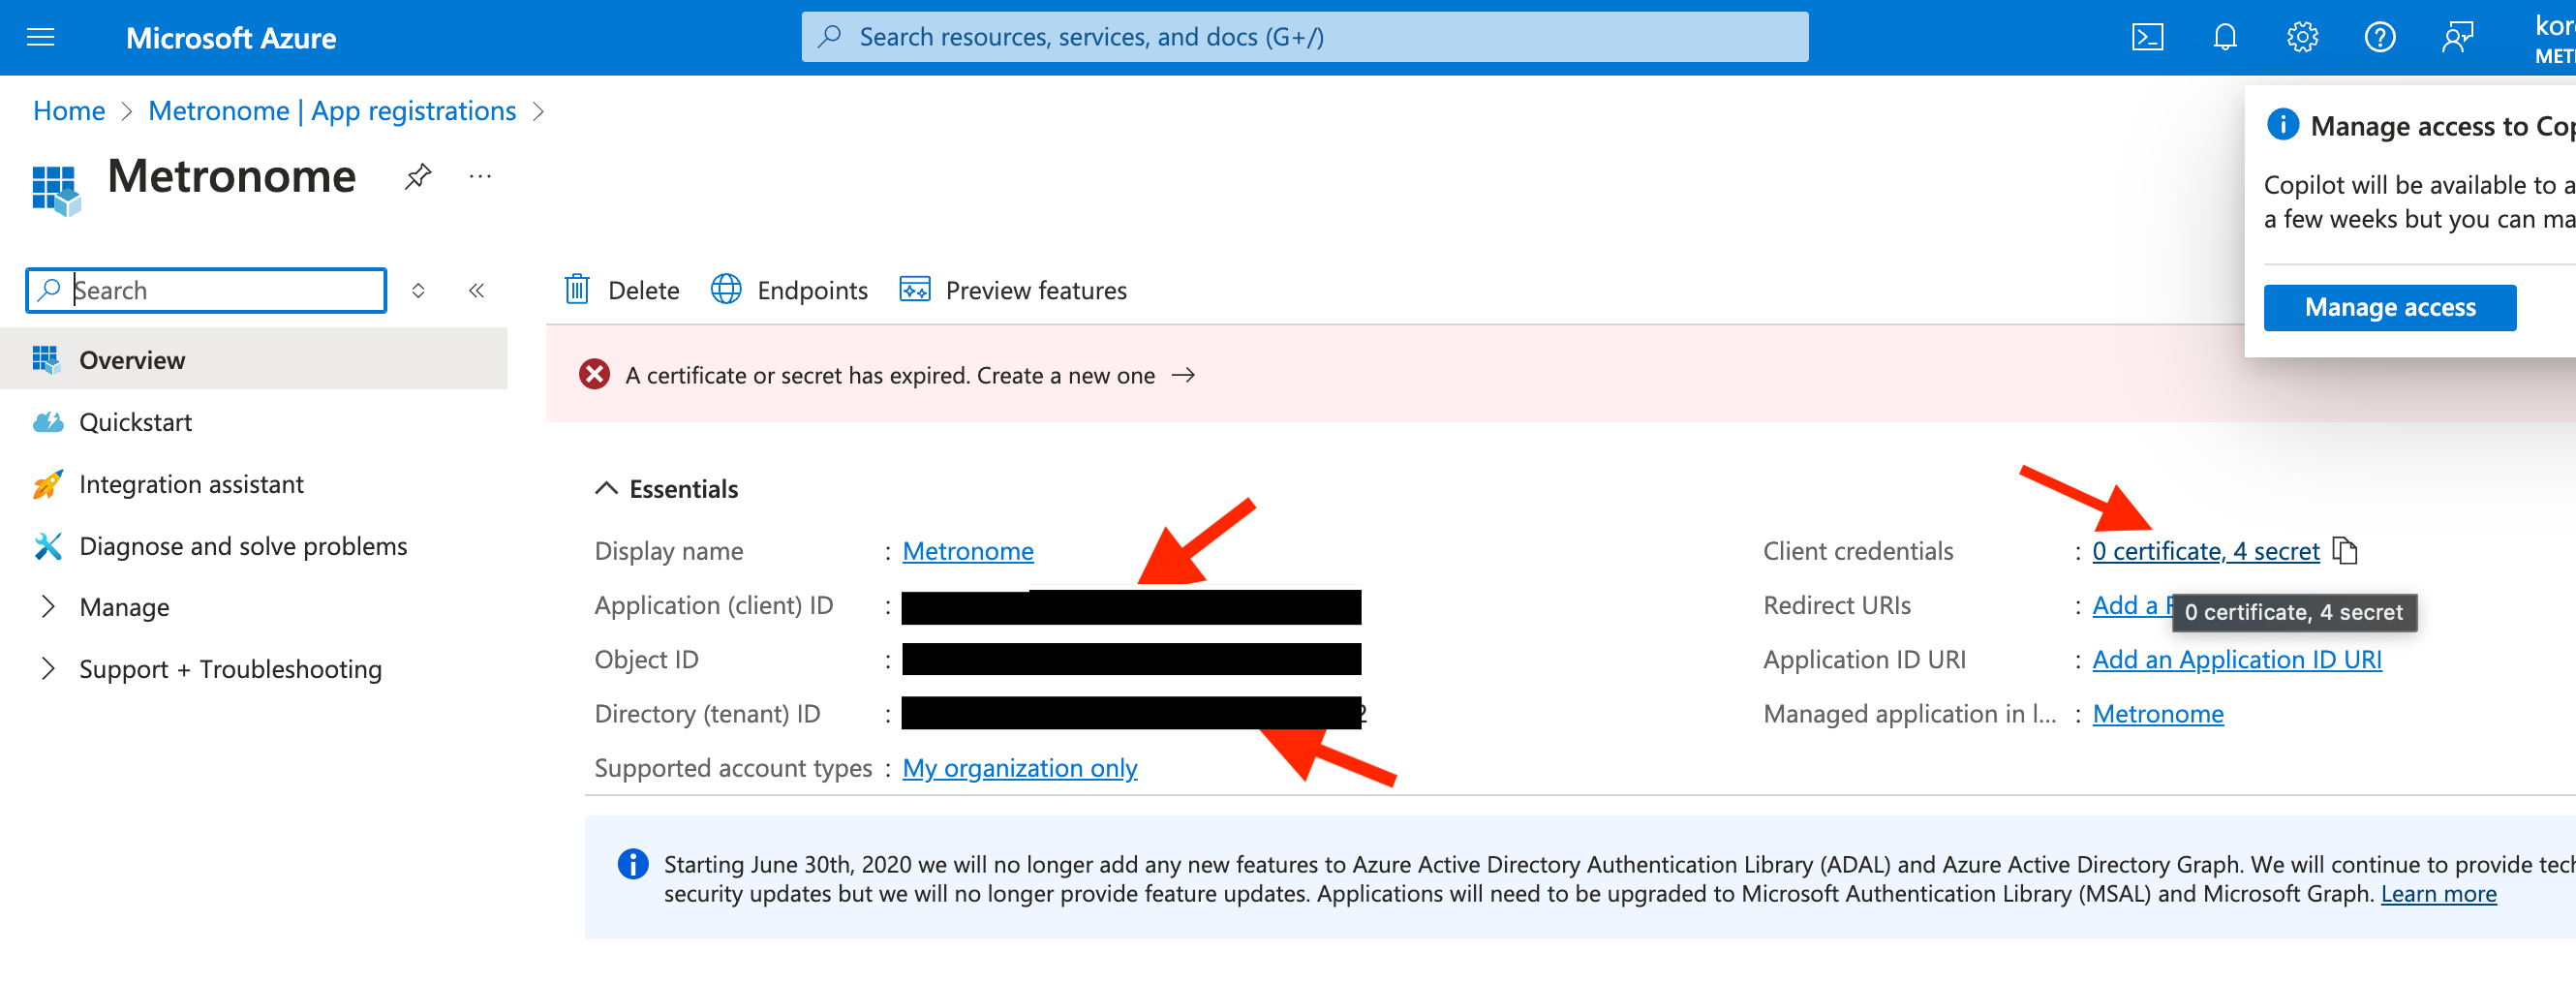
From the Application page, in the Essentials section, copy the Tenant ID and Application ID.
-
Click into the Client credentials to generate and copy a Client secret.
-
In Metronome, go to General Settings > Integrations > Available Integrations > Azure Marketplace card > Get Started.
-
Enter the Tenant ID , Application ID , and Client secret into their respective fields.
-
Click Save.
Provision Azure Marketplace customers in Metronome
When a customer agrees to your Azure Marketplace offer, you must to provision their account in Metronome with a Metronome contract that reflects the full details of the offer they signed with you in the marketplace, with Azure identified as the billing provider on that contract.
Before provisioning the customer in Metronome, ensure the customer has completed the marketplace signup flow and has been provisioned in your SaaS system. Additionally, make sure the subscription is activated in Azure Marketplace via Azure’s activate subscription API. When complete, you should have a unique Subscription ID for the customer’s accepted offer and the saasSubscriptionStatus as Subscribed.
To connect a customer to Azure and have Metronome begin metering their invoices to Azure on your behalf:
-
Go to an existing customer’s detail page in Metronome or create a new customer at Customers > Add New Customer.
-
Go to Settings > Available Integrations > Azure > Get Started.
-
Enter the Azure subscription ID.
-
Create a new contract for the customer that matches the details of the contract they signed with you in the marketplace. Include any credits and commits the customer has as part of the contract.
-
Under the Billing Configuration section of the configure contract flow, select Azure as the billing provider.
CAUTIONYou cannot add or change the billing provider after creating the contract.
-
Alternatively, you can use the following endpoints to set up Azure as a customer’s billing provider and assign it to a contract
-
To set up a new customer configured with Azure:
- Call the create customer endpoint
- In the request payload, include
customer_billing_provider_configurations:
- In the
configuration property, specify azure_subscription_id
{
  // ...
  "customer_billing_provider_configurations": [
    {
      "billing_provider": "azure_marketplace",
      "configuration": {
        "azure_subscription_id": "<your Azure subscription ID>"
      },
      "delivery_method": "direct_to_billing_provider"
    }
  ]
}
-
To configure an existing customer with Azure:
{
  // ...
  {
    "billing_provider": "azure_marketplace",
    "customer_id": "<your customer id>",
    "configuration": {
      "azure_subscription_id": "<your Azure subscription ID>"
    },
    "delivery_method": "direct_to_billing_provider"
  }
}
-
To set up a new contract with invoices metered to Azure:
- Call the create contract endpoint
- In the request payload, include
billing_provider_configuration:
{
  // ...
  "billing_provider_configuration": {
    "billing_provider": "azure_marketplace",
    "delivery_method": "direct_to_billing_provider"
  }
}
After you set Azure as that customer’s billing provider and begin sending usage events, Metronome starts metering that customer’s calculated invoice totals to Azure on your behalf.
What Metronome meters to Azure
When metering to AWS or Azure, Metronome sums up a customer’s total amount accrued across all contract invoices that have Azure set as the billing provider since the last metering request. Metronome sets the quantity for each metering record as the total dollar amount expressed in USD cents.
If a customer purchased a commit or was offered a credit as part of their contract, Metronome meters like this:
- Prepaid commits A contract in Metronome specifies a schedule over which the customer pays for their prepaid commit. Those inputs create one or more scheduled invoices. Metronome meters the amount the customer owes on the prepaid commit on the date associated with the service period of the scheduled invoice, not the created at date.
- Credits As credits on a Metronome contract are not paid for, Metronome only meters overages reflected on invoice totals after the credit has been drawn down in its entirety.
- Postpaid commits Metronome meters usage reflected on invoice totals throughout the duration of the contract. However, if the entirety of the postpaid commit isn’t consumed by the end of the contract, Metronome ignores the true-up invoice and doesn’t send it to the marketplace. This is because the true-up invoice isn’t finalized until after the Metronome grace period ends, at which point the metering endpoint for the marketplace has closed. This means you must handle the true-up in the marketplace directly.
Handle marketplace customer lifecycle events in Metronome and your app
Metronome stops metering if it detects subscription changes due to marketplace lifecycle events, and updates the customer’s status in Metronome accordingly. However, you are responsible for ensuing that the customer’s status is correctly represented in your application and ending the customer’s contract in Metronome, if relevant.
To end the customer’s contract in the Metronome app, go to the customer > click the contract > select the overflow menu > click Edit Contract End Date.
To end the customer’s contract with the Metronome API, use the /contracts/updateEndDate endpoint.
Limitations of Azure Marketplace offers
Billing through the Azure Marketplace has some limitations.
Azure Marketplace only supports positive quantities through their metering service.
There’s no way to decrease a customer’s total bill. For example, consider a customer who was meant to receive $1,000 in credits when they started using your product. Due to a typo, they erroneously received only $100. The mistake gets noticed one week into their first billing period, when the customer notices a $500 charge on their Azure bill. In Metronome, this mistake is easily rectified by adding an additional $900 credit, but in Azure, there’s no way to reduce that bill.
If this situation arises, Metronome stops billing for that customer until their usage catches up to the amount they’ve already been billed. If this is insufficient to correct the problem, you must issue a manual refund through Azure support. Contact your Metronome representative for help.
End of a customer’s Marketplace contract supports a 1 hour grace period for events.
To ensure that the end of a customer’s subscription is handled promptly, Metronome provides a 1 hour grace period of events sent after the completion of the subscription. While Metronome normally supports a grace period of up to 24 hours after the billing period ends, the Azure integration currently is limited to 1 hour. This means usage received after that cannot be billed through Azure. Metronome automatically disables metering 2 hours after the subscription ends.
In the event of an outage, Metronome catches up when everything comes back online. If Metronome was unable to send usage to Azure for some period of time, the accrued usage is included in the next request to Azure. However, if the customer’s contract already ended and the grace period elapsed, Metronome is unable to bill for the usage accrued during the down time.
Metronome’s integration with Azure Marketplace only supports invoices with a USD fiat currency. Metronome throws an error if you attempt to create a contract with Azure Marketplace set as the billing provider, and the rate card on the contract has a non-USD fiat currency. In the case where the contract is associated with other other invoices that are not in USD (for example, scheduled invoices associated with scheduled charges), only the USD invoices will be sent to Azure Marketplace.