

Set up the Stripe integration
Setting up the Stripe integration involves connecting Metronome and Stripe and configuring invoice settings.Connect Metronome and Stripe
When you connect your Stripe account with Metronome, Metronome can automatically create invoices in Stripe. Connecting involves granting Metronome the permissions to write and read data on your behalf to your Stripe account. Clients commonly connect Stripe to Metronome production and sandbox environments. This enables them to test potential price changes or other invoice updates end-to-end before enabling them for production customers. When you set up the Stripe integration in Metronome Sandbox, Metronome automatically connects to your Stripe test mode so you can test your integration end-to-end with invoice creation and payment collection. To connect Metronome and Stripe:- Authenticate your Stripe account from Metronome. Go to Developer - Integrations → click Enable and complete the Stripe wizard.
- Set up a Stripe connection from each Metronome environment you want to send invoices through, like production and sandbox environments.
- Enable Stripe’s automatic payment retry capabilities to improve invoice payment success.
Connecting Metronome to Multiple Stripe Accounts
Metronome supports multi-entity billing with Stripe so you can connect your Metronome environment to many Stripe accounts. This feature enables complex enterprises to manage their billing and finances as distinct business units. To set up multiple Stripe accounts:- Go to Developer - > Integrations
- Select Stripe - > Add another
- Select the appropriate Stripe account
Configure optional global integration settings available
After connecting Metronome to Stripe, you have certain options that you can configure from the General Settings - Integrations page. If connected to multiple Stripe accounts, you will need to configure the settings for each account independently.INFOThese settings are enforced per Stripe account at the environment level. You cannot configure customer specific preferences.
Create optional entity mapping rules
By default, Metronome sets metadata on Stripe invoices objects that it creates. One item it sets is ametronome_id, which is the Metronome invoice ID that lets you map a Stripe invoice to its corresponding Metronome invoice.
You may want to add additional metadata to Stripe entities. For example:
- Add attributes like the contract name or contract ID to the Stripe invoice (visible to customers) by mapping Metronome contract or rate card custom fields to Stripe invoice custom fields.
- Add metadata like invoice line item and invoice line item price objects to the Stripe invoice for your internal audits or for downstream integrations like tax calculation.
- Create a custom field key on the Metronome product entity:
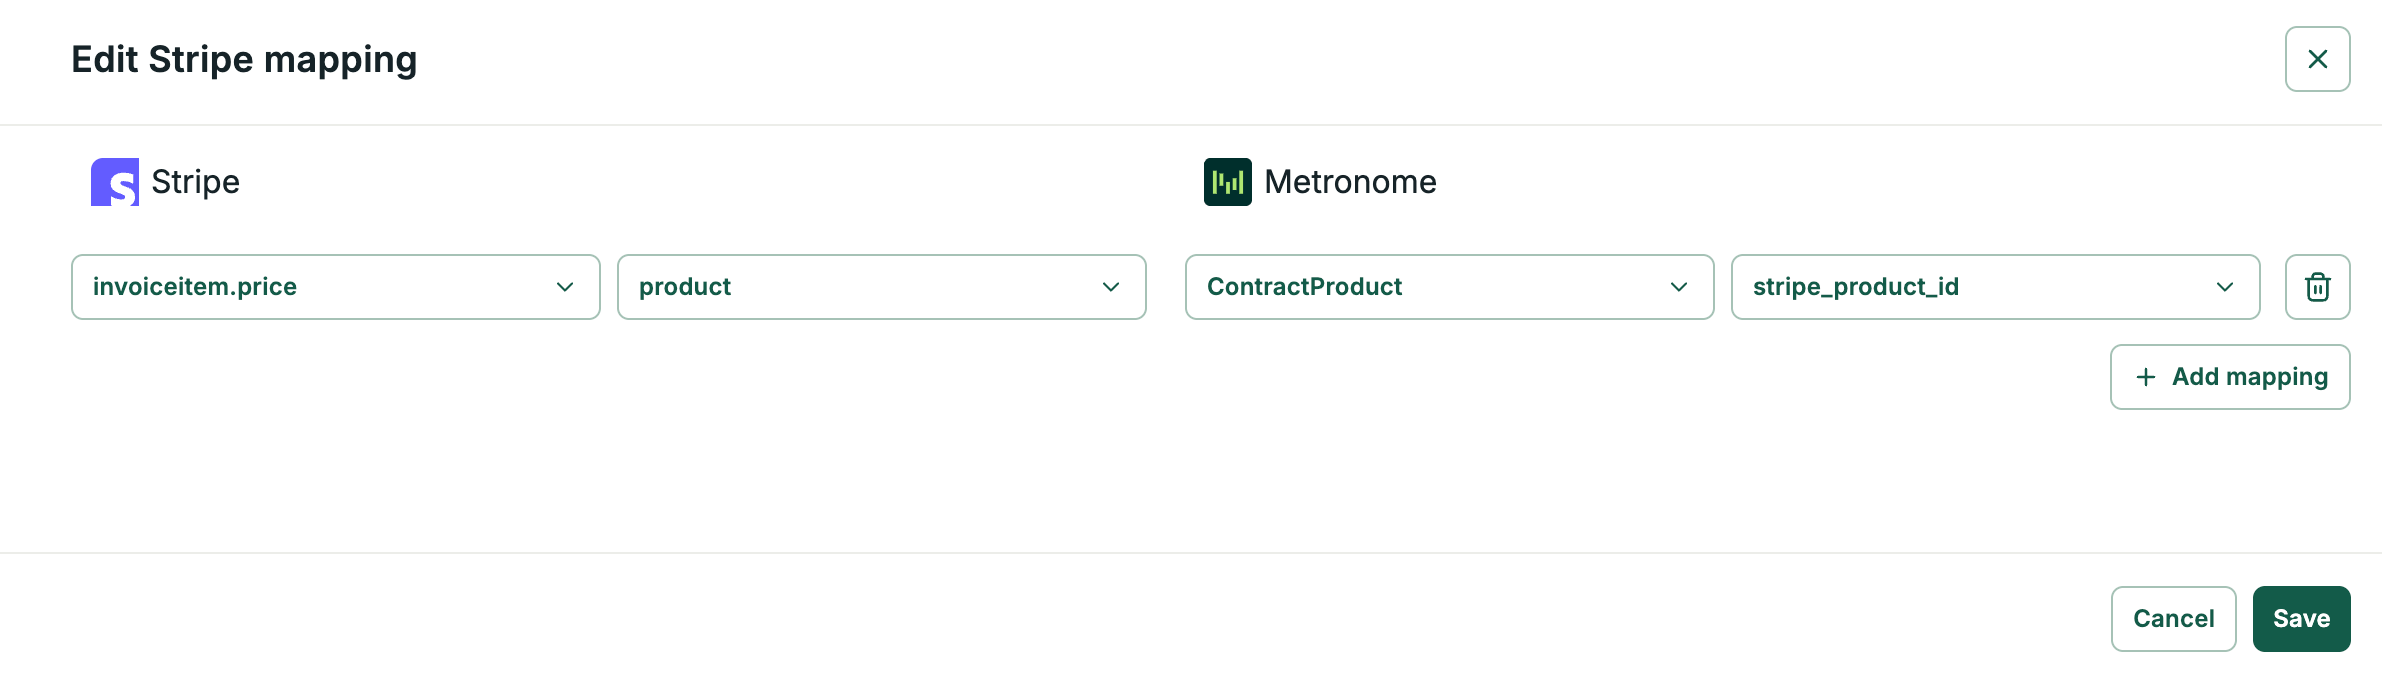
stripe_product_id. - Set the value for the custom field key you just created for each of your products in Metronome.
- Go to the General Settings - Integrations page and edit the mapping rules to map the Metronome custom field key
stripe_product_idto Stripeinvoiceitem.price.
Set the customer billing configuration
To determine which invoices to send to Stripe, Metronome looks at thebilling_configuration for each customer. The billing_configuration is an object within the Metronome customer object that captures additional metadata necessary to support Metronome’s native integrations. This includes information like the billing provider customer.id and invoice preferences. If the customer’s billing_configuration is set to Stripe, a Stripe invoice gets issued to the corresponding Stripe customer.
Set the billing configuration for a customer in the Metronome app or with the API.
INFOIf connected to multiple Stripe accounts, you can only set the billing configuration via the API.
/customersendpoint or after the customer already exists with /setCustomerBillingProviderConfigurations setting the billing configuration.
To set the a billing configuration, Metronome requires you to either specify a delivery_method or delivery_method_id. If you are only connecting to a single Stripe account, use the delivery_method. If connecting to multiple Stripe accounts, you must use delivery_method_id. Metronome uses this ID to determine which Stripe account each invoice should be sent to.
INFOYou can find the
delivery_method_id by using the /listConfiguredBillingProviders endpoint to fetch configured Stripe accounts in the Metronome environment./customers endpoint to set the billing configuration using delivery_method:
/setCustomerBillingProviderConfigurations to set the billing configuration of an existing client using delivery_method_id:
stripe_customer_id: The Stripe customer ID for the customer that gets issued a Stripe invoice.stripe_collection_method: Determines how to collect payment for the customer. Stripe supports two methods of collection:-
charge_automatically: Stripe attempts to charge for the invoice using the default payment method attached to the customer. -
send_invoice: Stripe emails this invoice to the customer with payment instructions. For thesend_invoiceoption you must specify how many days a customer has until payment is due. This corresponds with thedays_until_duefield in the Stripe API. By default, Stripe invoices are due 30 days after creation. The Metronome API doesn’t allow you to set this value directly, but you can update this setting on the General Settings - Integrations page.
-
Set the contract billing configuration
Metronome supports configuring the billing on the contract level. This allows you to optimize the billing for each contract: you may send pay-as-you-go contracts through Stripe but enterprise-level contracts through AWS. This example payload uses the/contracts/create endpoint to set the billing configuration:
billing_configuration_id which can be fetched from the /getCustomerBillingProviderConfigurations endpoint:
Adding a billing provider to an existing contract
When you add a billing provider configuration to an existing contract, Metronome does not retroactively send previously finalized invoices to Stripe. Only invoices that finalize after the configuration is added to the contract are sent to Stripe. The first invoice sent to Stripe is the in-arrears usage invoice for the billing period in which the configuration was added. For example:Metronome determines the first invoice to send based on when the configuration was added to the contract, not when the contract started or when the configuration was created.
Interact with the Stripe integration
After connecting Stripe with Metronome, use the Metronome API and app to interact with your integration.Track Stripe invoice statuses in Metronome
Metronome captures Stripe webhook events when the status of an invoice changes. The Stripe invoices statuses are accessible in Metronome as part of the response when fetching invoices from the list invoices API endpoint.INFOIf the global configuration is set to
Leave invoices as drafts, Stripe does not return a status and you won’t see a Stripe invoice status in Metronome.Calculate dynamic sales tax
Metronome’s native Stripe integration supports Anrok, Avalara, and Stripe Tax providers to add tax to an invoice created in Stripe. Which one you use depends on your invoice provider and compliance needs:
Regardless of which provider you choose, the general flow when using Stripe invoicing is:
- Metronome usage statement finalizes, creating a corresponding draft invoice in Stripe.
- Metronome passes entity mapping data (product IDs, metadata) to the Stripe invoice.
- Your tax provider calculates tax on the Stripe invoice.
- The invoice is finalized in Stripe with tax included.
Payment timing for charge_automatically invoices
Metronome finalizes invoices immediately at the end of the billing period — there is no wait before the invoice is sent to Stripe. However, when Metronome sends a finalized invoice to Stripe with charge_automatically, Stripe waits up to one hour after delivering the invoice.created webhook before attempting payment. The invoice sits in open state during that window.
This delay is a Stripe-side behavior that applies specifically to invoices that are manually finalized through the API (which is how Metronome submits all invoices today). It is not configurable in the Stripe Dashboard — the “grace period” setting in Stripe only controls the draft → finalized transition, not the finalized → payment-attempted transition.
This delay does not apply to:
- Auto-recharge invoices.
- Payment-gated commits, where payment is collected manually.
invoice.created webhook delivery fails. If invoices are sitting in open well past an hour, check that your Stripe webhook endpoint is configured correctly and is returning a 2xx response.
Workaround to bypass the one-hour wait: Confirm the payment intent yourself immediately after the invoice is finalized:
- Listen for the Stripe
invoice.finalizedorpayment_intent.createdwebhook. - Extract the
payment_intentID from the event payload. - Call
POST /v1/payment_intents/:id/confirmon the Stripe API.
Listen for Errors
Invoicing errors can happen. For example, errors happen when Stripe customers don’t exist. To receive notifications from Metronome when an error sending an invoice to Stripe occurs, listen for the webhook typeinvoice.billing_provider_error . When receiving those webhooks, trigger internal notifications and actions to ensure proper invoicing of your customers.