> ## Documentation Index
> Fetch the complete documentation index at: https://docs.metronome.com/llms.txt
> Use this file to discover all available pages before exploring further.
# Get to your first invoice
> This guide walks you through setting up billing, entirely in the Metronome dashboard.
**Looking for the API guide?** If your engineering team is setting up Metronome programmatically, see the [API Quickstart](/guides/get-started/api-quickstart).
**Don’t have a Metronome Account?** Sign up for a Sandbox account [here](https://signup.metronome.com/)!
## Step 1: Understand how the pieces fit together
Before building anything, here's how Metronome's core objects connect:
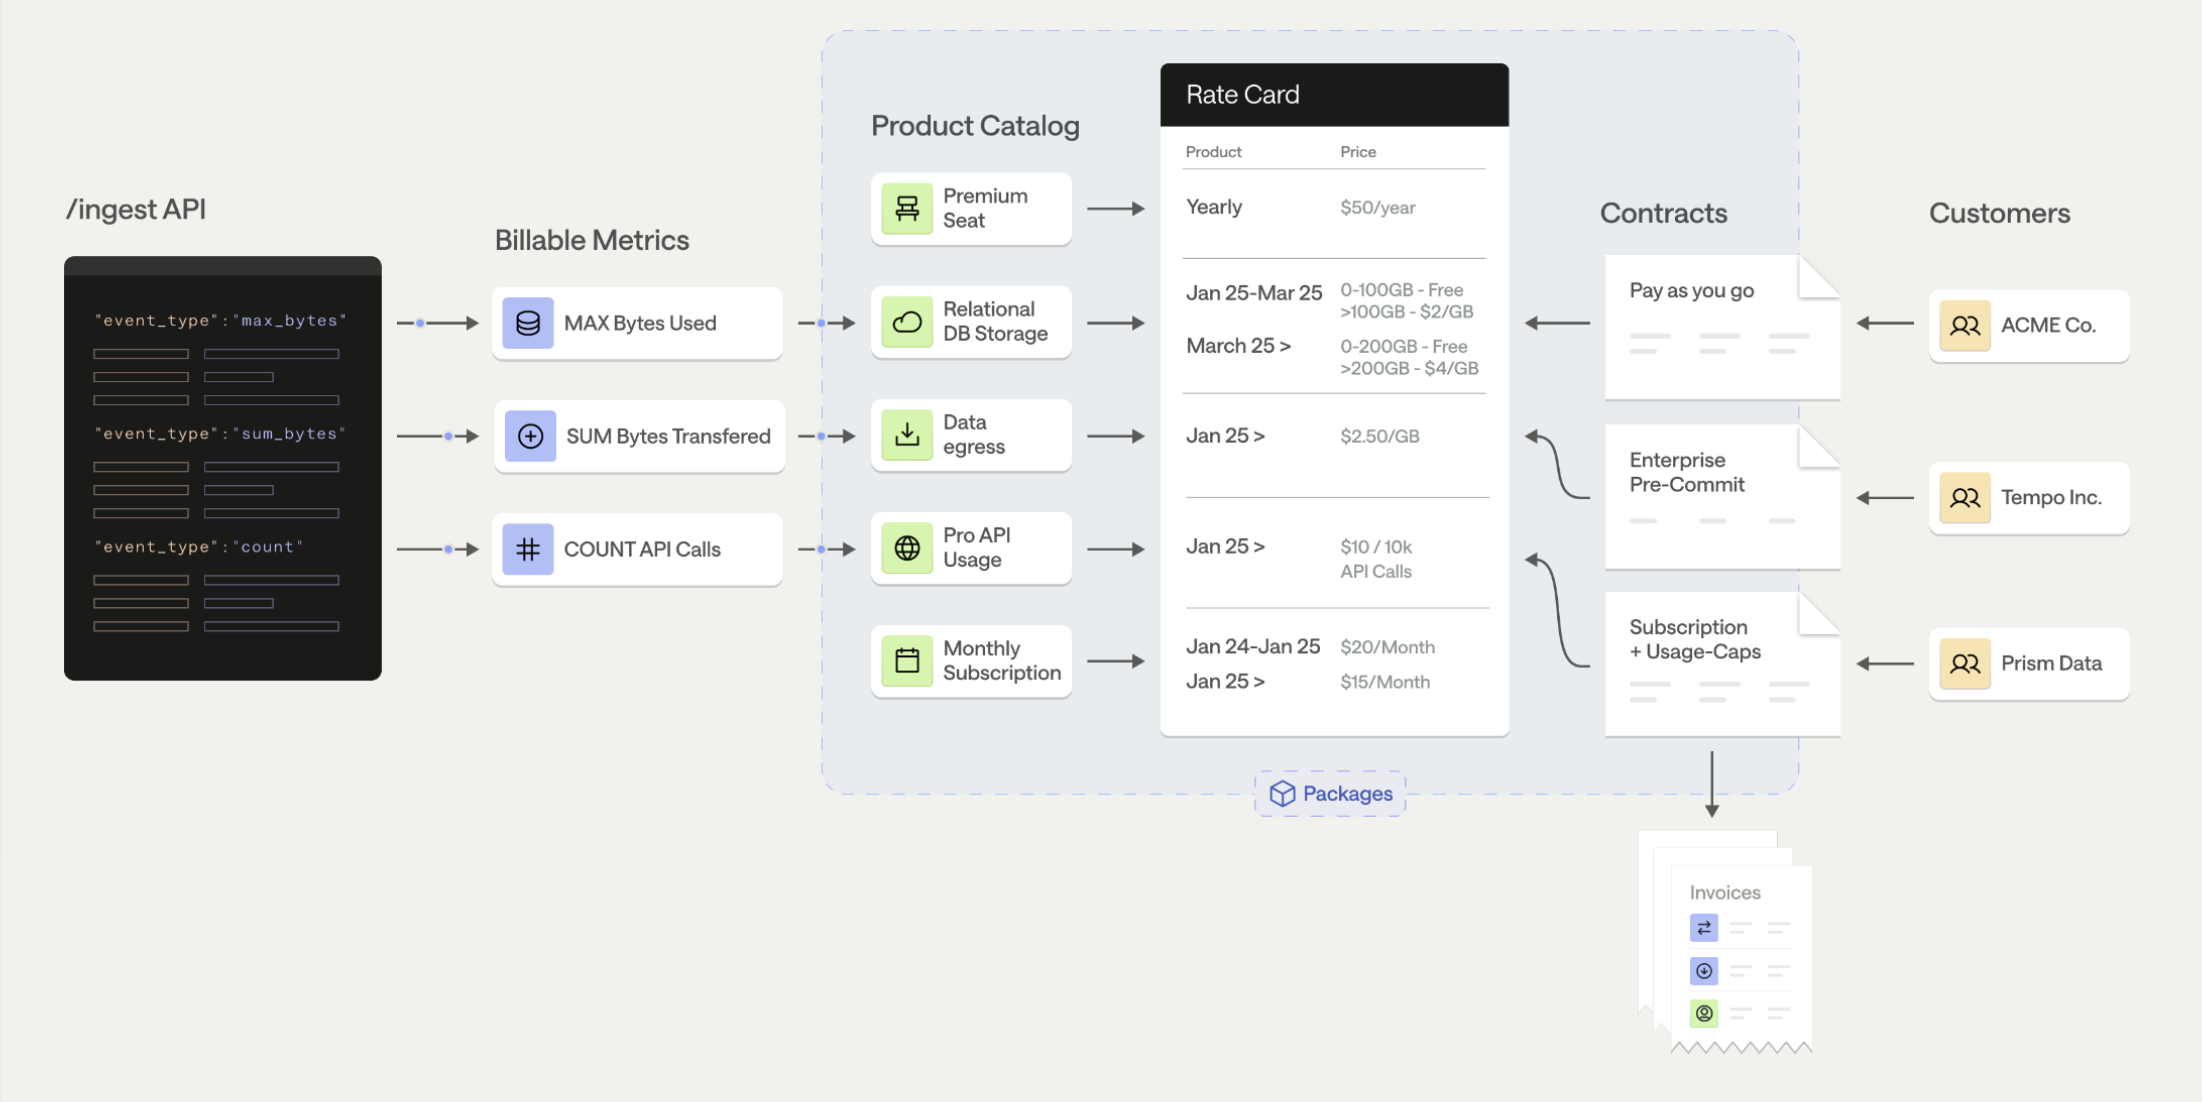 Metronome separates *metering* (what you measure) from *rating* (what you charge). You can change pricing without changing your event instrumentation, and vice versa.
Here's what each object does:
* **Usage Events** — Raw records of customer activity sent to Metronome (e.g., "customer X used 1,500 input tokens on model gpt-5 at timestamp Z")
* **Billable Metrics** — Rules that aggregate your events into billable quantities (e.g., "sum the `input_tokens` property for events of type `llm_request`"). This is also where you define **group keys** — the properties you'll use to price by or display on invoices.
* **Products** — Named line items on an invoice.
* **Rate Cards** — A centralized price book assigning a price to each product. A single rate card can be shared across many customers, making pricing updates easy to roll out.
* **Contracts** — Customer-specific agreements referencing a rate card, defining the billing period, and optionally including credits, commits, or overrides.
* **Packages** — Encodes your rate card and contract details in a single package to be applied across new customers.
* **Invoices** — Automatically generated each billing period based on a customer’s recurring charges and usage, rated against the contract.
**What you need to create (in this order):**
1. A billable metric
2. A product
3. A rate card with rates for each product
4. A customer
5. A contract linking the customer to the rate card
Then you send events and Metronome handles the rest.
## Step 2: Know what you're measuring — event schema overview
Before creating a billable metric, understand what your usage events will look like. See “[Design Usage Events](/guides/events/design-usage-events)” for full event schema details and payload examples.
**Every event includes these required fields:**
* **`transaction_id`** — Must be unique per event (used for deduplication)
* **`customer_id`** — The Metronome customer UUID or an ingest alias
* **`event_type`** — A string that connects the event to a billable metric (must exactly match)
* **`timestamp`** — When the usage occurred
**And optional properties (the key design decision):**
* **`properties`** — Key-value pairs containing quantities to meter (e.g., `tokens_usage`), dimensions to price by (e.g., `model_name`, `region`), and metadata for invoice display or analytics (e.g., `user_id`, `project_id`, `cost`). Metronome supports up to **2,000 properties** per event.
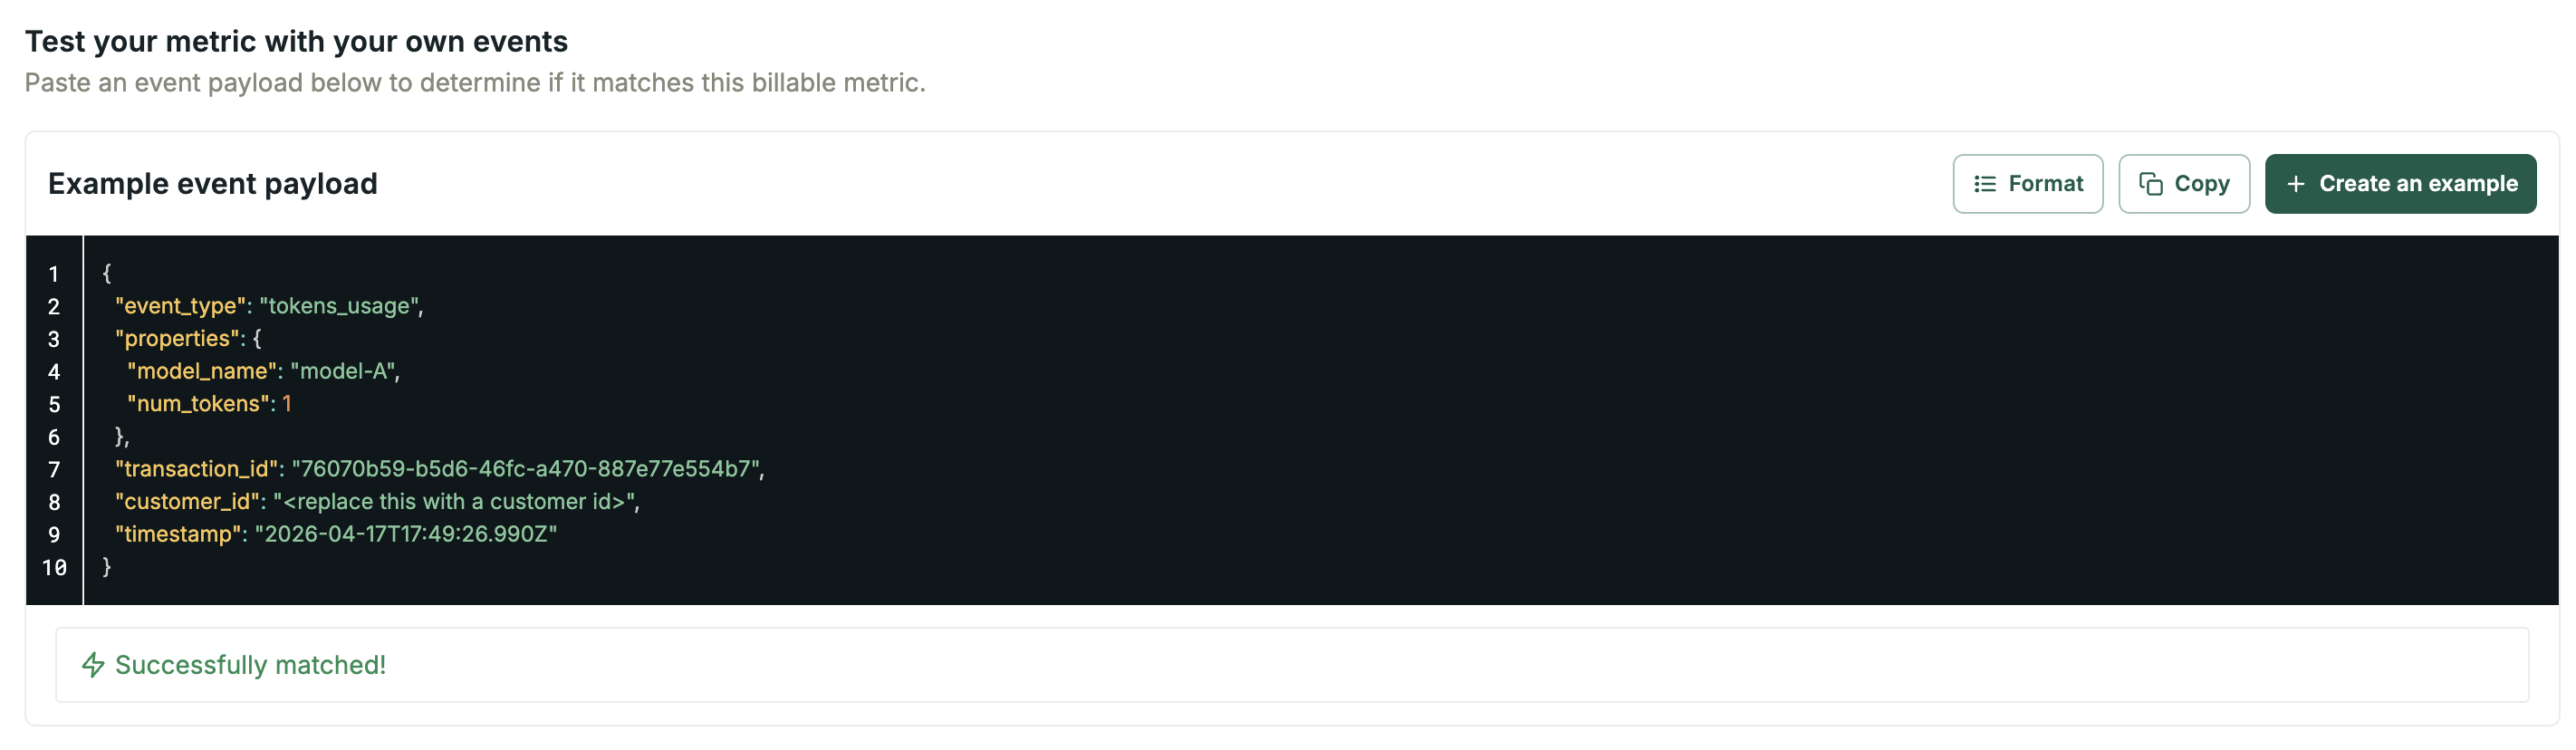
After creating a billable metric in the next step, you'll see an **example event payload** directly in the UI that shows you the expected format:
Metronome separates *metering* (what you measure) from *rating* (what you charge). You can change pricing without changing your event instrumentation, and vice versa.
Here's what each object does:
* **Usage Events** — Raw records of customer activity sent to Metronome (e.g., "customer X used 1,500 input tokens on model gpt-5 at timestamp Z")
* **Billable Metrics** — Rules that aggregate your events into billable quantities (e.g., "sum the `input_tokens` property for events of type `llm_request`"). This is also where you define **group keys** — the properties you'll use to price by or display on invoices.
* **Products** — Named line items on an invoice.
* **Rate Cards** — A centralized price book assigning a price to each product. A single rate card can be shared across many customers, making pricing updates easy to roll out.
* **Contracts** — Customer-specific agreements referencing a rate card, defining the billing period, and optionally including credits, commits, or overrides.
* **Packages** — Encodes your rate card and contract details in a single package to be applied across new customers.
* **Invoices** — Automatically generated each billing period based on a customer’s recurring charges and usage, rated against the contract.
**What you need to create (in this order):**
1. A billable metric
2. A product
3. A rate card with rates for each product
4. A customer
5. A contract linking the customer to the rate card
Then you send events and Metronome handles the rest.
## Step 2: Know what you're measuring — event schema overview
Before creating a billable metric, understand what your usage events will look like. See “[Design Usage Events](/guides/events/design-usage-events)” for full event schema details and payload examples.
**Every event includes these required fields:**
* **`transaction_id`** — Must be unique per event (used for deduplication)
* **`customer_id`** — The Metronome customer UUID or an ingest alias
* **`event_type`** — A string that connects the event to a billable metric (must exactly match)
* **`timestamp`** — When the usage occurred
**And optional properties (the key design decision):**
* **`properties`** — Key-value pairs containing quantities to meter (e.g., `tokens_usage`), dimensions to price by (e.g., `model_name`, `region`), and metadata for invoice display or analytics (e.g., `user_id`, `project_id`, `cost`). Metronome supports up to **2,000 properties** per event.
After creating a billable metric in the next step, you'll see an **example event payload** directly in the UI that shows you the expected format:
 **TIP**
Before creating a billable metric, decide which properties to include. The more metadata the better — properties like `user_id` (for seat billing), `region` (for regional pricing), `project_id` (for invoice breakdowns), and `cost` (for COGS analysis) are all valuable even if you don't use them on day one.
## Step 3: Create a billable metric
A billable metric defines *what* to measure. Navigate to **Offering → Billable Metrics → + Add**.
There are two billable metric types:
* **Streaming Metric** — Covers most use-cases. Optimized for performance with real-time aggregation as events arrive.
* **SQL Metric** — For complex calculations like daily averages, unique counts per period, or weighted formulas. [Learn more about SQL BMs →](/guides/get-started/core-concepts/billable-metrics-sql-editor)
The following setup is for streaming billable metrics:
1. **Name** your metric (e.g., "Input Tokens").
2. Set the **event type filter** — this must exactly match the `event_type` your application sends (e.g., `tokens_usage`).
3. Define properties. Include the property to use as the **aggregation key** (the property to aggregate, e.g., `num_tokens`).
Send more properties than you think you need. You can always ignore unused properties, but you cannot retroactively add group keys to a billable metric.
4. Choose your **aggregation type**:
| Type | What it does | Example use case |
| ----- | ------------------------------------- | ----------------------------- |
| Count | Counts matching events | API calls, requests, messages |
| Sum | Sums a numeric property across events | Tokens, bytes, seconds |
| Max | Maximum value in a window | Peak concurrent connections |
5. Select the group keys.
### Understanding group keys
**Group keys** determine what you can price by and display on invoices downstream. Think of them like a `GROUP BY` clause in SQL — they break your aggregated usage into buckets.
**What group keys enable (on the Product, in the next step):**
| Downstream use | What it does | Example |
| ---------------------- | ------------------------------------ | ------------------------------------------------------------ |
| Pricing group key | Different prices per dimension value | `model_name` → charge \$1.50 for model-A, \$0.30 for model-B |
| Presentation group key | Invoice line-item breakdowns | `user_id` → show per-user usage on invoice |
**IMPORTANT: You must define group keys here on the billable metric first.** They cannot be added later, and they must exist here before they can be assigned as pricing or presentation keys on a product.
**Common group key examples:**
* `model_name` — per-model pricing (pricing group key)
* `region` — per-region pricing (pricing group key)
* `instance_type` — per-GPU/instance pricing (pricing group key)
* `user_id` — per-user invoice breakdowns, or seat-based billing using the Unique aggregation (presentation group key)
* `project_id` — per-project invoice breakdowns (presentation group key)
**Billable metrics cannot be modified after creation**
You cannot add or change group keys, property filters, or aggregation settings. If you think you *might* want to price by or display a dimension in the future, include it as a group key now. It is best practice to include all properties as group keys.
1. Define your **group keys** based on the guidance above.
2. **Review the event** in the Example event payload box to validate your filters.
3. Click **Save**.
Navigate to **Offering → Billable Metrics**. Your new metric should appear in the list. Click into it to verify the aggregation, filters, and group keys are correct.
## Step 4: Create a product
A **product** is a named line item that appears on your customer's invoice. Navigate to **Offering → Products → + Add new product**.
1. Enter a **Name** — this is what appears on the invoice (e.g., "Input Tokens").
2. Select **Product Type**:
* **Usage** — Variably priced based on customer usage (requires a billable metric)
* **Subscription** — Recurring fee on a schedule (platform fees, seat licenses)
* **Composite** — Percentage charge on a group of other products
* **Fixed** — One-time or scheduled charges (used for commits, credits, one-time fees)
* Commits vs Credits: Commits have a cost-basis, while credits are always free
3. For usage products, select the **billable metric** you created in Step 3. You can swap out the billable metric on a usage product if necessary.
4. Assign **group keys** on the product:
| I want to... | Use | Example |
| ------------------------------------------- | ---------------------- | ---------------------------------------- |
| Charge different prices per dimension | Pricing group key | `model_name` → different price per model |
| Show breakdowns on the invoice (same price) | Presentation group key | `user_id` → per-user line items |
| One flat price for all usage | Don't set either | Simple count-based billing |
You can use both pricing and presentation group keys on the same product (e.g., price by `model_name`, display by `user_id`). Group keys here must be a subset of the group keys on the underlying billable metric.
*(Optional Conversions)* Add a **quantity conversion** — e.g., send individual tokens but display and price per million tokens on the invoice. Add a **rounding conversion** — e.g., send seconds but round and display to the nearest minute on the invoice.
Navigate to **Offering → Products**. Click into your product to verify the billable metric and group keys.
## Step 5: Create a rate card
A **rate card** is a centralized pricing table that assigns prices to your products. Rate cards are in a single fiat currency. Navigate to **Offering → Rate Cards → + Add new rate card**.
**Best practice:** Use a single rate card as your source of truth for standard pricing. When you update rates here, changes propagate to all contracts that reference this rate card. You can override rates per-customer on individual contracts.
1. **Name** your rate card (e.g., "Standard Rate Card").
2. **Add products** and set their rates.
3. If using **dimensional pricing** (pricing group keys on the product), define values for each dimension and set a rate per value. For example, if `model_name` is your pricing group key, add entries for `model-A` at \$1.50 and `model-B` at \$0.30.
**Additional rate card features:**
* **Tiered pricing** — Set volume-based tiers on any product. On the rate card, click into the product → Add Tiers. For example, first 1M tokens at \$1.00, next 1M at \$0.80.
* **Custom Pricing Units (Credit Conversions)** — If you bill in credits or a custom unit rather than USD, first create a Custom Pricing Unit under **Offering → Pricing Units**, then configure the conversion on the rate card. [Learn more →](/guides/pricing-packaging/make-pricing-changes/use-currency-custompricingunits)
* **Commit rates** — Set rates that apply specifically when usage draws down from a commit.
* **Changing and Adding Rates** — Edit the rate to change the rate and select the start date of the new rate. Add new rates by clicking “Add a Rate” on the rate card.
## Step 6: Create a customer and contract
Now tie everything together.
### Create a customer
Navigate to **Customers → + Add customer.** Enter the customer **Name**.
*(Optional)* Add **ingest aliases** so your engineering team can send events using your internal customer ID instead of Metronome's UUID.
### Create a contract
Navigate to your new customer → **+ Add contract**.
1. Select your **rate card**.
2. Set the **contract start date and end date.**
3. *(Optional)* **Billing Provider** — Connect an invoice integration to send finalized invoices to a payment system. For details, see:
* [Stripe Integration Guide](/integrations/invoice-integrations/stripe)
* [AWS Marketplace](/integrations/marketplace-integrations/aws) / [Azure Marketplace](/integrations/marketplace-integrations/azure)
4. (Optional) **Include contract specific terms.** Contracts can include customer-specific terms, such as prepaid commits and overrides. See the following links for more information on setting this up.
1. [Credits and Commits](/guides/pricing-packaging/apply-credits-and-commits/create-a-pre-paid-commit)
2. [Overrides](/guides/customers-billing/manage-customers/provision-a-customer#add-contract-discounts-and-overrides)
Navigate to **Customers → \[Your Customer] → Contract**. You should see the contract with your rate card assigned.
### Send test events (sandbox only)
Now that you have a customer and contract, you can send test events directly from the UI.
Navigate to the customer's contract view and click on the product on the rate card. You'll find the option to send test events here.
**TIP**
Before creating a billable metric, decide which properties to include. The more metadata the better — properties like `user_id` (for seat billing), `region` (for regional pricing), `project_id` (for invoice breakdowns), and `cost` (for COGS analysis) are all valuable even if you don't use them on day one.
## Step 3: Create a billable metric
A billable metric defines *what* to measure. Navigate to **Offering → Billable Metrics → + Add**.
There are two billable metric types:
* **Streaming Metric** — Covers most use-cases. Optimized for performance with real-time aggregation as events arrive.
* **SQL Metric** — For complex calculations like daily averages, unique counts per period, or weighted formulas. [Learn more about SQL BMs →](/guides/get-started/core-concepts/billable-metrics-sql-editor)
The following setup is for streaming billable metrics:
1. **Name** your metric (e.g., "Input Tokens").
2. Set the **event type filter** — this must exactly match the `event_type` your application sends (e.g., `tokens_usage`).
3. Define properties. Include the property to use as the **aggregation key** (the property to aggregate, e.g., `num_tokens`).
Send more properties than you think you need. You can always ignore unused properties, but you cannot retroactively add group keys to a billable metric.
4. Choose your **aggregation type**:
| Type | What it does | Example use case |
| ----- | ------------------------------------- | ----------------------------- |
| Count | Counts matching events | API calls, requests, messages |
| Sum | Sums a numeric property across events | Tokens, bytes, seconds |
| Max | Maximum value in a window | Peak concurrent connections |
5. Select the group keys.
### Understanding group keys
**Group keys** determine what you can price by and display on invoices downstream. Think of them like a `GROUP BY` clause in SQL — they break your aggregated usage into buckets.
**What group keys enable (on the Product, in the next step):**
| Downstream use | What it does | Example |
| ---------------------- | ------------------------------------ | ------------------------------------------------------------ |
| Pricing group key | Different prices per dimension value | `model_name` → charge \$1.50 for model-A, \$0.30 for model-B |
| Presentation group key | Invoice line-item breakdowns | `user_id` → show per-user usage on invoice |
**IMPORTANT: You must define group keys here on the billable metric first.** They cannot be added later, and they must exist here before they can be assigned as pricing or presentation keys on a product.
**Common group key examples:**
* `model_name` — per-model pricing (pricing group key)
* `region` — per-region pricing (pricing group key)
* `instance_type` — per-GPU/instance pricing (pricing group key)
* `user_id` — per-user invoice breakdowns, or seat-based billing using the Unique aggregation (presentation group key)
* `project_id` — per-project invoice breakdowns (presentation group key)
**Billable metrics cannot be modified after creation**
You cannot add or change group keys, property filters, or aggregation settings. If you think you *might* want to price by or display a dimension in the future, include it as a group key now. It is best practice to include all properties as group keys.
1. Define your **group keys** based on the guidance above.
2. **Review the event** in the Example event payload box to validate your filters.
3. Click **Save**.
Navigate to **Offering → Billable Metrics**. Your new metric should appear in the list. Click into it to verify the aggregation, filters, and group keys are correct.
## Step 4: Create a product
A **product** is a named line item that appears on your customer's invoice. Navigate to **Offering → Products → + Add new product**.
1. Enter a **Name** — this is what appears on the invoice (e.g., "Input Tokens").
2. Select **Product Type**:
* **Usage** — Variably priced based on customer usage (requires a billable metric)
* **Subscription** — Recurring fee on a schedule (platform fees, seat licenses)
* **Composite** — Percentage charge on a group of other products
* **Fixed** — One-time or scheduled charges (used for commits, credits, one-time fees)
* Commits vs Credits: Commits have a cost-basis, while credits are always free
3. For usage products, select the **billable metric** you created in Step 3. You can swap out the billable metric on a usage product if necessary.
4. Assign **group keys** on the product:
| I want to... | Use | Example |
| ------------------------------------------- | ---------------------- | ---------------------------------------- |
| Charge different prices per dimension | Pricing group key | `model_name` → different price per model |
| Show breakdowns on the invoice (same price) | Presentation group key | `user_id` → per-user line items |
| One flat price for all usage | Don't set either | Simple count-based billing |
You can use both pricing and presentation group keys on the same product (e.g., price by `model_name`, display by `user_id`). Group keys here must be a subset of the group keys on the underlying billable metric.
*(Optional Conversions)* Add a **quantity conversion** — e.g., send individual tokens but display and price per million tokens on the invoice. Add a **rounding conversion** — e.g., send seconds but round and display to the nearest minute on the invoice.
Navigate to **Offering → Products**. Click into your product to verify the billable metric and group keys.
## Step 5: Create a rate card
A **rate card** is a centralized pricing table that assigns prices to your products. Rate cards are in a single fiat currency. Navigate to **Offering → Rate Cards → + Add new rate card**.
**Best practice:** Use a single rate card as your source of truth for standard pricing. When you update rates here, changes propagate to all contracts that reference this rate card. You can override rates per-customer on individual contracts.
1. **Name** your rate card (e.g., "Standard Rate Card").
2. **Add products** and set their rates.
3. If using **dimensional pricing** (pricing group keys on the product), define values for each dimension and set a rate per value. For example, if `model_name` is your pricing group key, add entries for `model-A` at \$1.50 and `model-B` at \$0.30.
**Additional rate card features:**
* **Tiered pricing** — Set volume-based tiers on any product. On the rate card, click into the product → Add Tiers. For example, first 1M tokens at \$1.00, next 1M at \$0.80.
* **Custom Pricing Units (Credit Conversions)** — If you bill in credits or a custom unit rather than USD, first create a Custom Pricing Unit under **Offering → Pricing Units**, then configure the conversion on the rate card. [Learn more →](/guides/pricing-packaging/make-pricing-changes/use-currency-custompricingunits)
* **Commit rates** — Set rates that apply specifically when usage draws down from a commit.
* **Changing and Adding Rates** — Edit the rate to change the rate and select the start date of the new rate. Add new rates by clicking “Add a Rate” on the rate card.
## Step 6: Create a customer and contract
Now tie everything together.
### Create a customer
Navigate to **Customers → + Add customer.** Enter the customer **Name**.
*(Optional)* Add **ingest aliases** so your engineering team can send events using your internal customer ID instead of Metronome's UUID.
### Create a contract
Navigate to your new customer → **+ Add contract**.
1. Select your **rate card**.
2. Set the **contract start date and end date.**
3. *(Optional)* **Billing Provider** — Connect an invoice integration to send finalized invoices to a payment system. For details, see:
* [Stripe Integration Guide](/integrations/invoice-integrations/stripe)
* [AWS Marketplace](/integrations/marketplace-integrations/aws) / [Azure Marketplace](/integrations/marketplace-integrations/azure)
4. (Optional) **Include contract specific terms.** Contracts can include customer-specific terms, such as prepaid commits and overrides. See the following links for more information on setting this up.
1. [Credits and Commits](/guides/pricing-packaging/apply-credits-and-commits/create-a-pre-paid-commit)
2. [Overrides](/guides/customers-billing/manage-customers/provision-a-customer#add-contract-discounts-and-overrides)
Navigate to **Customers → \[Your Customer] → Contract**. You should see the contract with your rate card assigned.
### Send test events (sandbox only)
Now that you have a customer and contract, you can send test events directly from the UI.
Navigate to the customer's contract view and click on the product on the rate card. You'll find the option to send test events here.
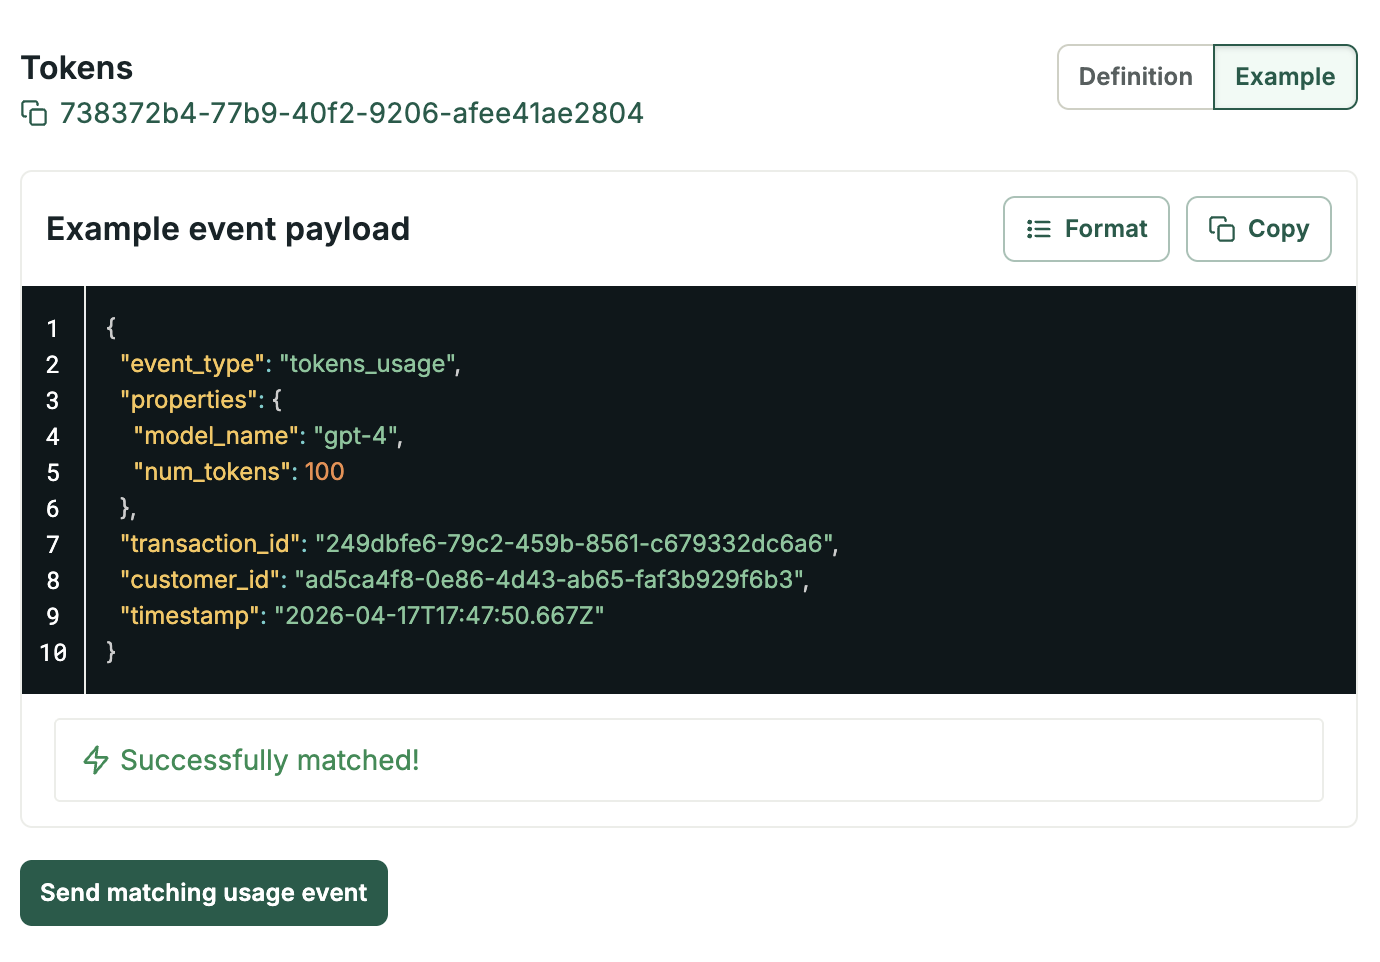 When composing a test event, keep in mind:
* The **transaction\_id** must be unique for each event
* The **timestamp** must be within the last 34 days
* The **event\_type** and **properties** must match your billable metric's configuration (filters and group keys)
This feature is only available in sandbox, not production. In production, your engineering team [sends events](/api-reference/usage/ingest-events) via the API.
## Step 7: Verify your invoice
Metronome automatically generates invoices based on the billing schedule on the contract.
**To see a draft invoice:** Navigate to **Customers → Contract → Invoices**. The current billing period's draft invoice should show your usage and calculated charges.
**Invoice lifecycle:**
1. **Draft** — Accumulates usage throughout the billing period (viewable in Metronome).
2. **Finalized** — Locked at the end of the billing period. There is a **24 hour grace period** at the end of the billing period before invoices are finalized to make any necessary changes to an invoice.
3. **Sent to billing provider** — If connected (e.g., Stripe), invoices are pushed within \~1 hour of finalization. Payment status is managed in your billing provider's dashboard, not in Metronome.
4. **Paid / Failed** — Collection handled by your billing provider. You can set up [webhooks](/guides/platform-configuration/setup-webhooks#webhook-types) to listen to payment statuses for payment-gated commits.
Verify the draft invoice shows correct usage quantities and charges based on your event ingestion and rate card pricing. If you see usage (under Connections) but no charges on the invoice, check that your events are matching the pricing group key values on your rate card.
## Ready for more?
You've created your first invoice in Metronome! Here are additional features to explore:
* [**Embeddable Customer Dashboards**](/guides/customers-billing/optimize-customer-experience/customer-dashboards-and-reporting) — Give your customers self-serve visibility into usage and spend
* [**Webhooks**](/guides/platform-configuration/setup-webhooks) — Get notified about invoice lifecycle events, balance thresholds, and payment outcomes
* [**Alerts & Notifications**](/guides/customers-billing/set-up-notifications/create-and-manage-notifications) — Spend alerts, balance thresholds, usage milestones
* [**Credits & Commits**](/guides/pricing-packaging/apply-credits-and-commits) — Prepaid balances, enterprise commitments, free tier credits
* [**Revenue Recognition**](/guides/reporting-insights/financial-reporting/revenue-recognition) — ASC 606 / IFRS 15 compliance
* [**Production Checklist**](/guides/implement-metronome/production-checklist) — When you're ready to go live
When composing a test event, keep in mind:
* The **transaction\_id** must be unique for each event
* The **timestamp** must be within the last 34 days
* The **event\_type** and **properties** must match your billable metric's configuration (filters and group keys)
This feature is only available in sandbox, not production. In production, your engineering team [sends events](/api-reference/usage/ingest-events) via the API.
## Step 7: Verify your invoice
Metronome automatically generates invoices based on the billing schedule on the contract.
**To see a draft invoice:** Navigate to **Customers → Contract → Invoices**. The current billing period's draft invoice should show your usage and calculated charges.
**Invoice lifecycle:**
1. **Draft** — Accumulates usage throughout the billing period (viewable in Metronome).
2. **Finalized** — Locked at the end of the billing period. There is a **24 hour grace period** at the end of the billing period before invoices are finalized to make any necessary changes to an invoice.
3. **Sent to billing provider** — If connected (e.g., Stripe), invoices are pushed within \~1 hour of finalization. Payment status is managed in your billing provider's dashboard, not in Metronome.
4. **Paid / Failed** — Collection handled by your billing provider. You can set up [webhooks](/guides/platform-configuration/setup-webhooks#webhook-types) to listen to payment statuses for payment-gated commits.
Verify the draft invoice shows correct usage quantities and charges based on your event ingestion and rate card pricing. If you see usage (under Connections) but no charges on the invoice, check that your events are matching the pricing group key values on your rate card.
## Ready for more?
You've created your first invoice in Metronome! Here are additional features to explore:
* [**Embeddable Customer Dashboards**](/guides/customers-billing/optimize-customer-experience/customer-dashboards-and-reporting) — Give your customers self-serve visibility into usage and spend
* [**Webhooks**](/guides/platform-configuration/setup-webhooks) — Get notified about invoice lifecycle events, balance thresholds, and payment outcomes
* [**Alerts & Notifications**](/guides/customers-billing/set-up-notifications/create-and-manage-notifications) — Spend alerts, balance thresholds, usage milestones
* [**Credits & Commits**](/guides/pricing-packaging/apply-credits-and-commits) — Prepaid balances, enterprise commitments, free tier credits
* [**Revenue Recognition**](/guides/reporting-insights/financial-reporting/revenue-recognition) — ASC 606 / IFRS 15 compliance
* [**Production Checklist**](/guides/implement-metronome/production-checklist) — When you're ready to go live